This crochet shawl grows from a small top-center ring into a triangle of open fans, then finishes with a mesh band and a raised crocheted bobble edge. The leaf-green lace-weight version measures almost 1.5 m from tip to tip and 60 cm deep, making a light fashion wrap to drape over the shoulders or gather loosely around the neck.
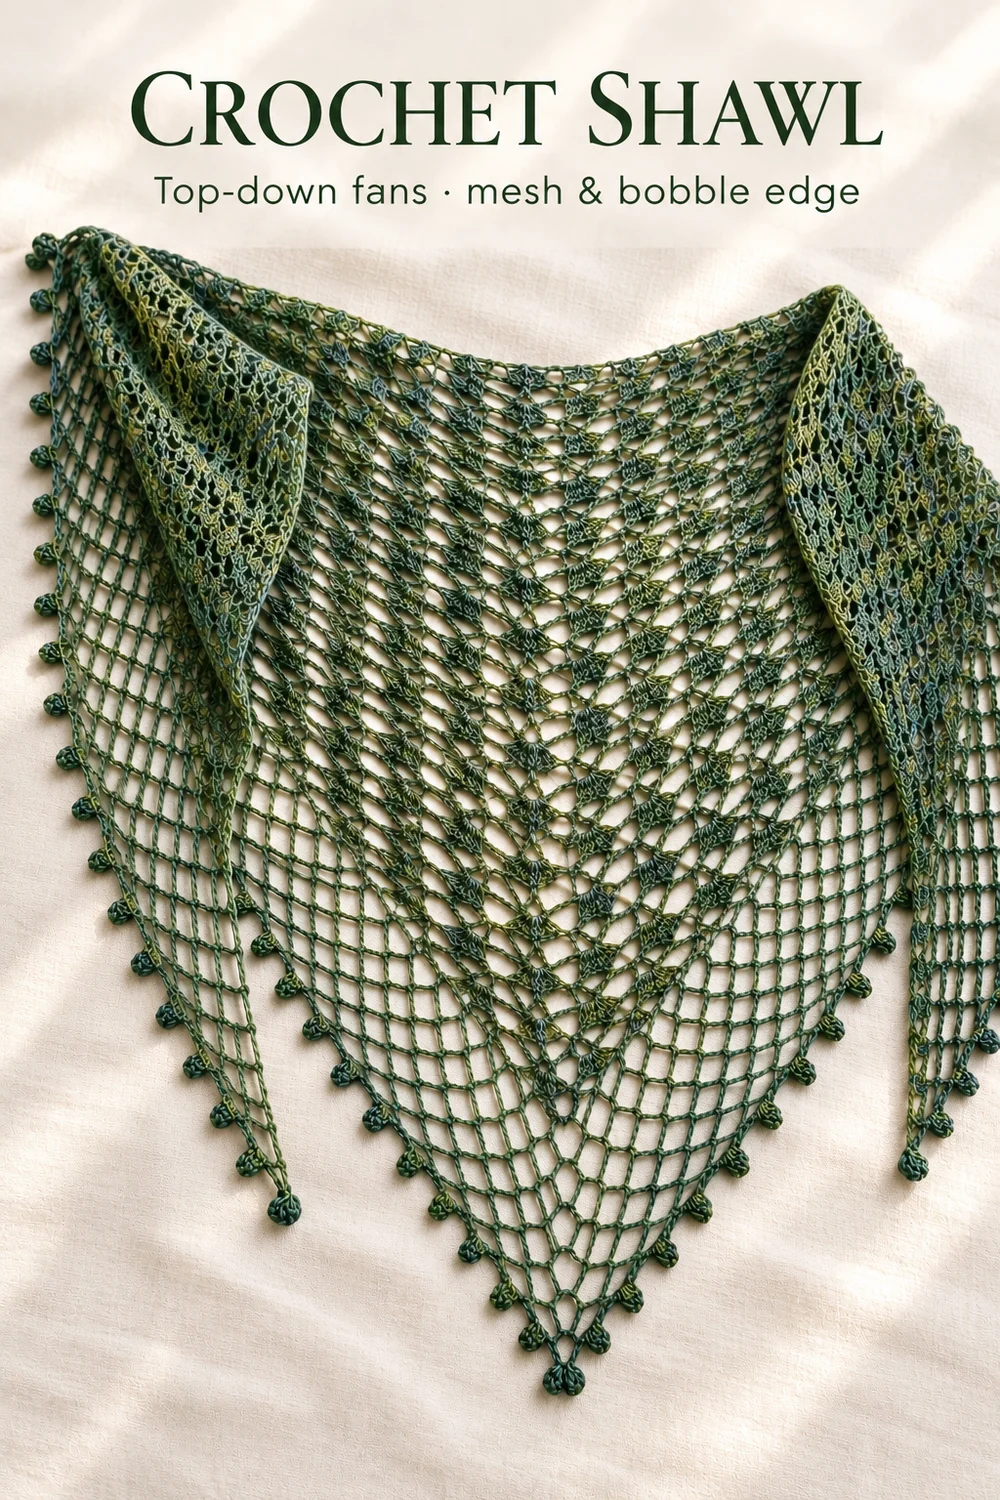
The interest in this shawl crochet pattern comes from alternating solid fans with open supporting rows. The center and outer edges grow together, while the mesh gives the lower outline a finer, more open texture. The bright mint teaching sample makes the construction visible; the finished leaf-green wrap uses a thinner yarn and has a lighter appearance.
Before you start your crochet shawl
- For the finished leaf-green shawl: lace-weight 100% baby merino wool, 429 m per 50 g. That shawl uses about 75 g, or one and a half skeins of this yarn.
- 4 mm crochet hook, as used for the finished leaf-green shawl.
- Scissors and a yarn needle for the ends.
- An optional stitch marker to identify the central mesh arch.
The mint teaching yarn is a different, slightly thicker substitute used to make the stitches visible; its fibre and yarn weight are not specified. The mint sample’s dimensions are not a sizing guide. There is no stated gauge or fixed body-row total. Measure the growing triangle against the coverage you want, allowing space for the mesh border before deciding to stop the body.
US terms are used: ch means chain, sl st means slip stitch, sc means single crochet and dc means double crochet. A fan contains seven completed dc; a V contains dc, ch 1 and dc in one placement. Work a dc by yarning over, inserting the hook, drawing up a loop and pulling through two loops twice. A sc closes its two loops together.
Use the outer edge spaces as landmarks rather than relying on a full-row stitch total. The repeated chain spaces are part of the structure, not accidental gaps to tighten away. For a smaller openwork accessory with a shaped finish, see the crochet lace headband.
Work the top-down triangle and border
-
1. Make the ring and first fan
- Start · ch 4 ring
- Fan · 7 dc
- Edge · ch 4 / ch 1 + dc
Ch 4 and join the first chain with a sl st to make a small ring. Keep the opening visible between your fingers so you can work into its center rather than into an individual chain.
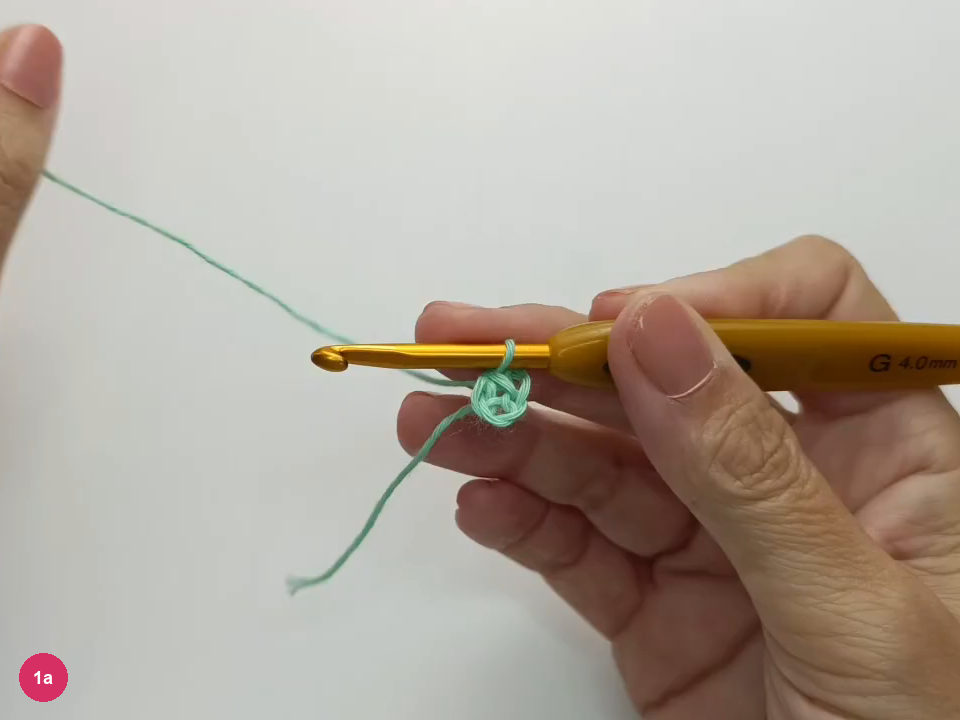
Step 1a: the small foundation ring is open beneath the hook. Ch 4, then work 7 dc into the ring to form the first fan. The starting chain is an edge column with a separating chain; keep it distinct from the seven posts of the fan.
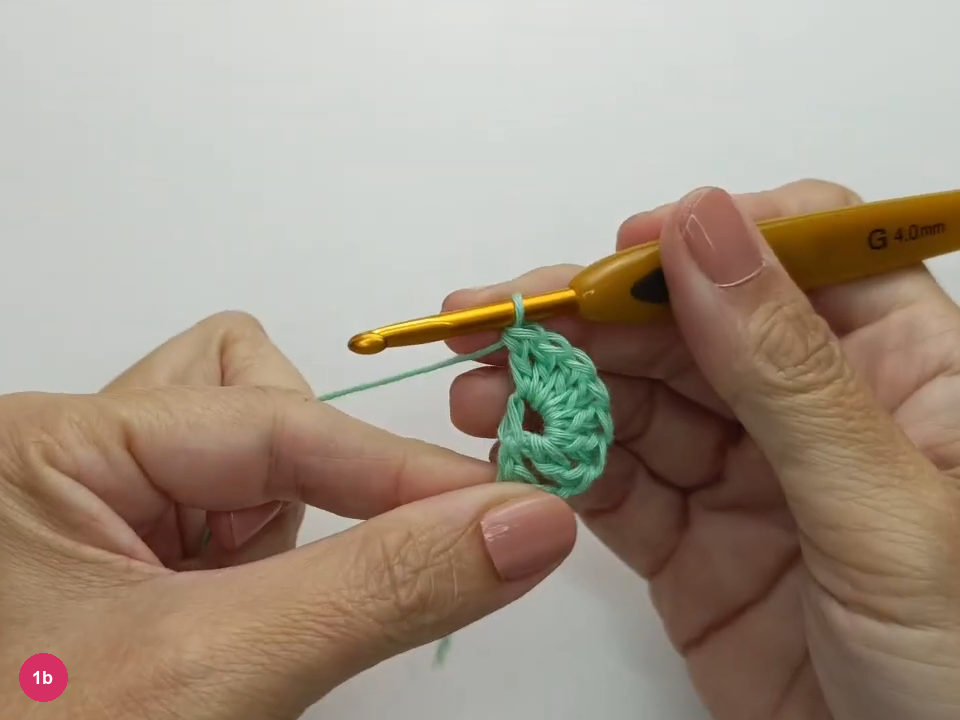
Step 1b: seven double crochets form the first fan inside the ring. Ch 1 and work another dc into the ring to close the first row. Spread the fan gently: the middle is solid, while a small opening remains between the fan and each outer edge column.
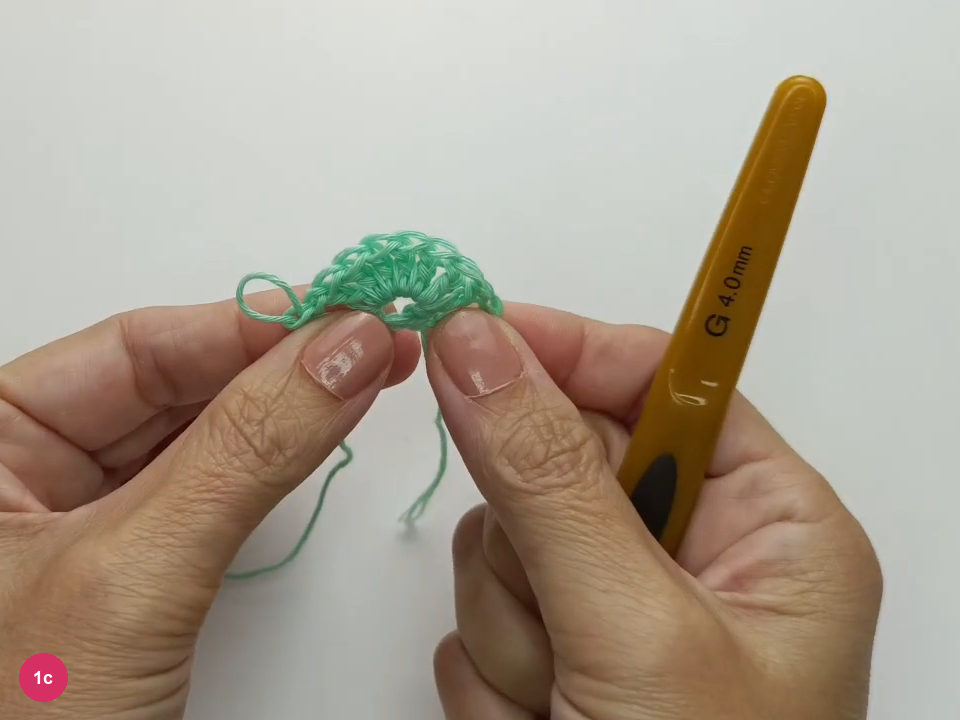
Step 1c: the first fan lies between the two open edge spaces. -
2. Set up the V-stitch row
- V · dc, ch 1, dc
- Bridge · ch 3
- Fan center · 4th dc
Ch 4 and turn, then work a V-stitch into the edge space beside the last dc of the previous row. A V-stitch here is (dc, ch 1, dc), all in the same space; the chains used to turn remain outside that V.
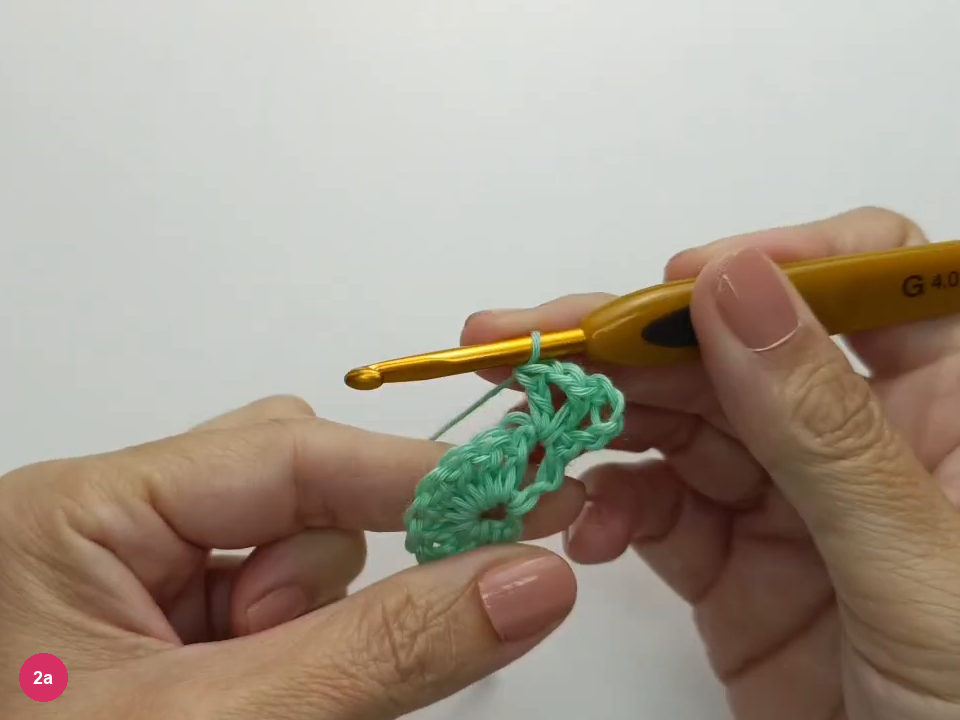
Step 2a: a V-stitch sits in the near edge space. Ch 3 and work a V-stitch into the fourth dc of the seven-post fan. Count from either side of the fan, excluding the outer edge column, to locate the middle stitch before inserting the hook.
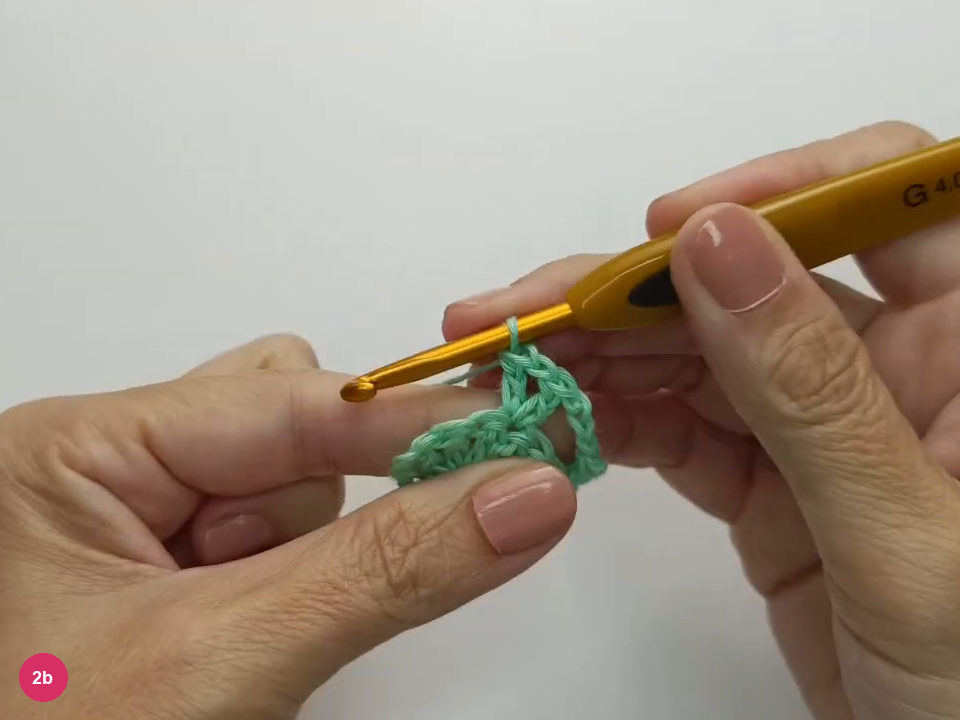
Step 2b: the central V-stitch is worked into the middle of the fan. Ch 3 and work a V-stitch into the opening beside the starting chain at the opposite edge. Ch 1 and add a dc in that same opening, leaving a separate edge column outside the V.
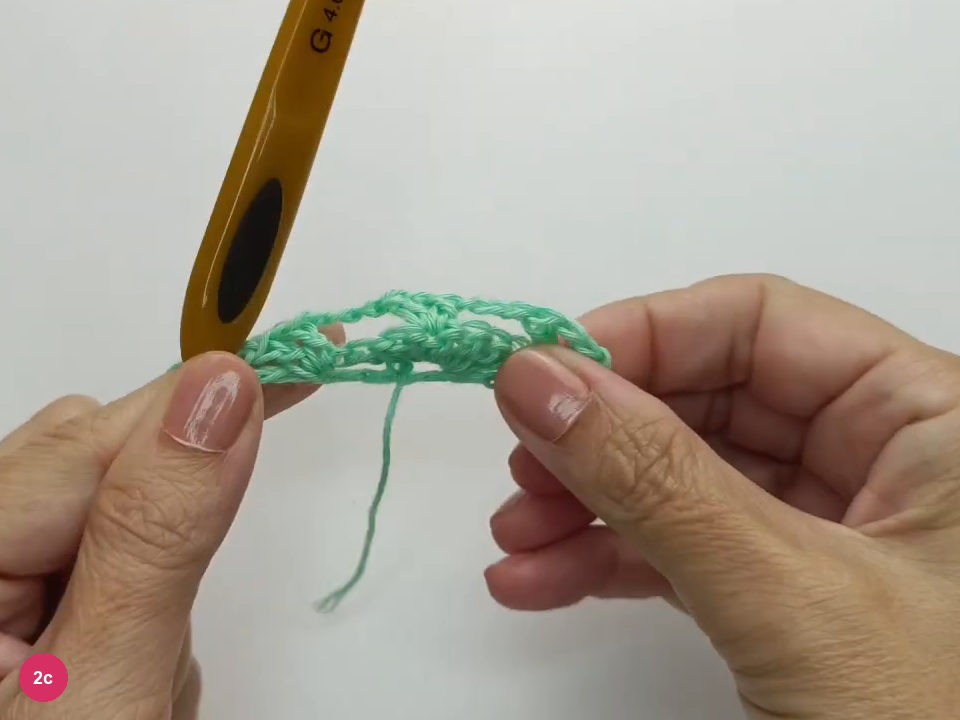
Step 2c: the support row has V-stitches at both edges and the center. -
3. Work a row of fans
- Each V-space · 7 dc
- Between fans · ch 1
Ch 4 and turn, then work 7 dc into the ch-1 space of the first V. Insert into the open space between its posts, rather than into the top of either post, so the fan can spread.
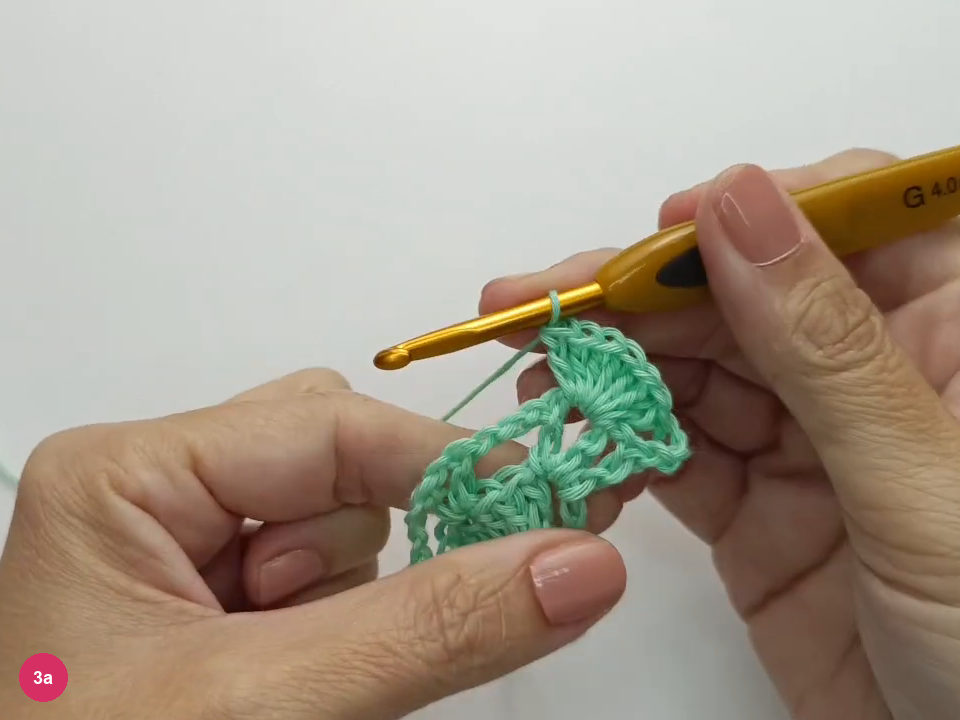
Step 3a: the first seven-post fan fills the edge V-space. Ch 1, move straight to the central V-space and work 7 dc into it. Leave the intervening ch-3 bridge unworked: it links the supporting stitches but is not a fan placement.
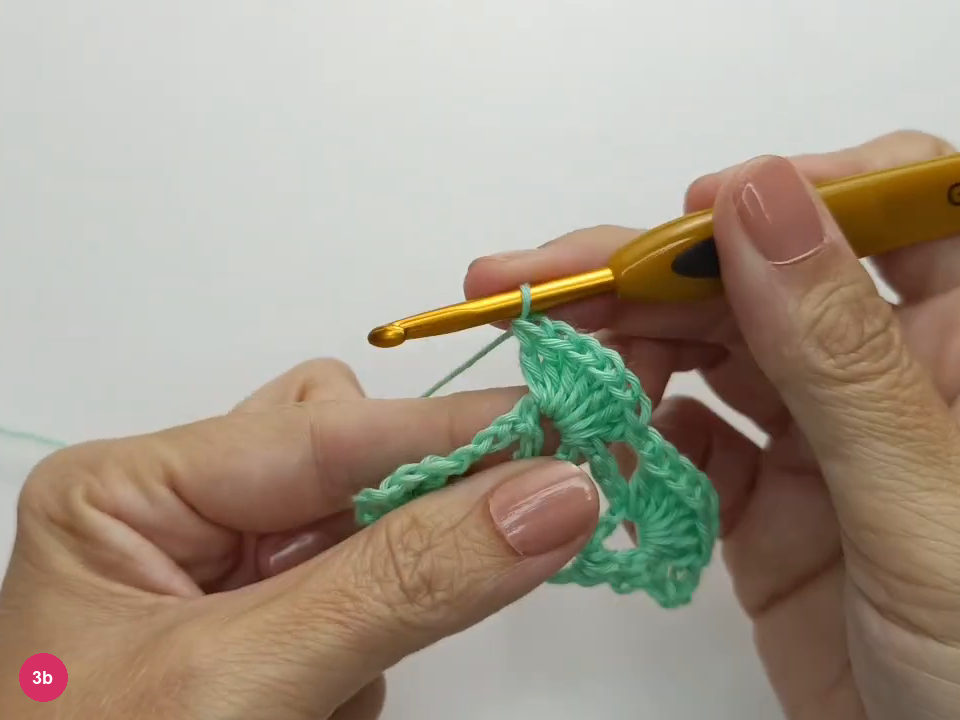
Step 3b: a second fan fills the central V-space. Ch 1 and make a seven-dc fan in the final V-space, then ch 1 and dc into the remaining edge opening. Open the small triangle enough to check the fan placements without pulling the stitches out of shape.
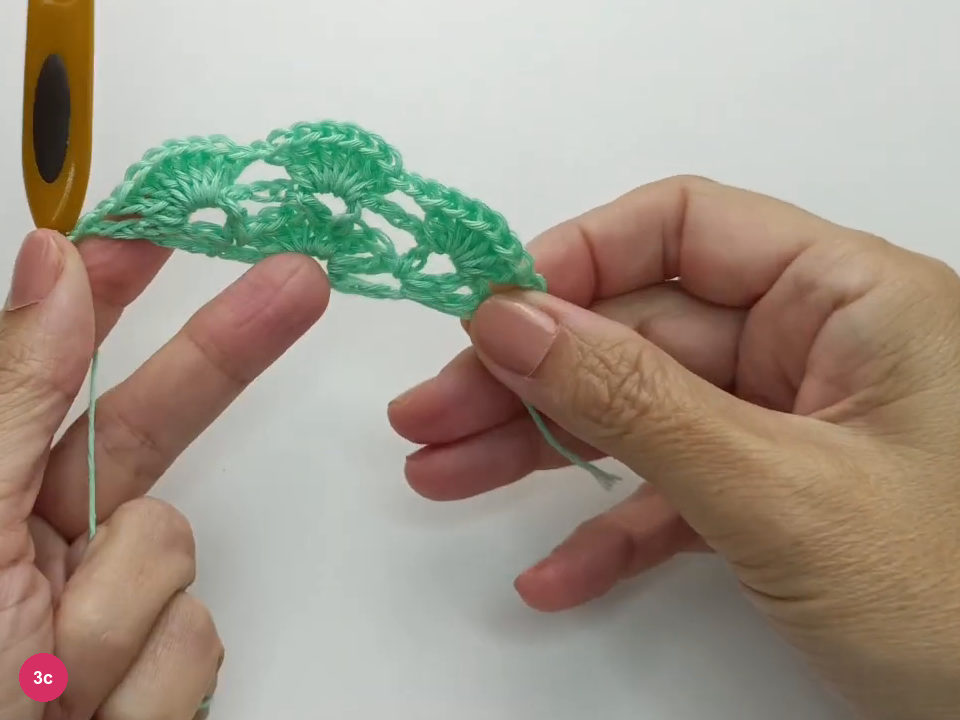
Step 3c: the completed fan row forms a wider triangle. -
4. Build the increase and support row
- Side fan center · sc
- Central fan center · V
- Between placements · ch 3
Ch 4 and turn; make a V-stitch in the opening between the edge dc and the neighboring fan. This edge placement provides room for the next fan row, so do not move the V into the top of the fan.
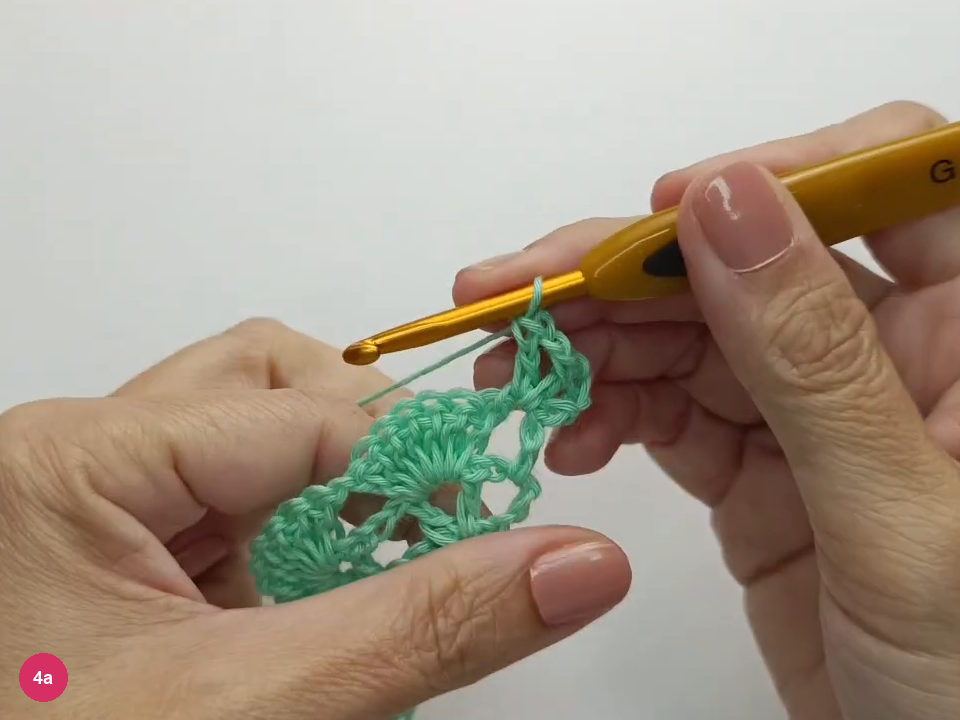
Step 4a: the new edge V is outside the first fan. Ch 3 and sc into the fourth dc of the first side fan. On this row the side fans receive a single crochet at their centers; reserve a V-stitch for the fan at the triangle’s center.
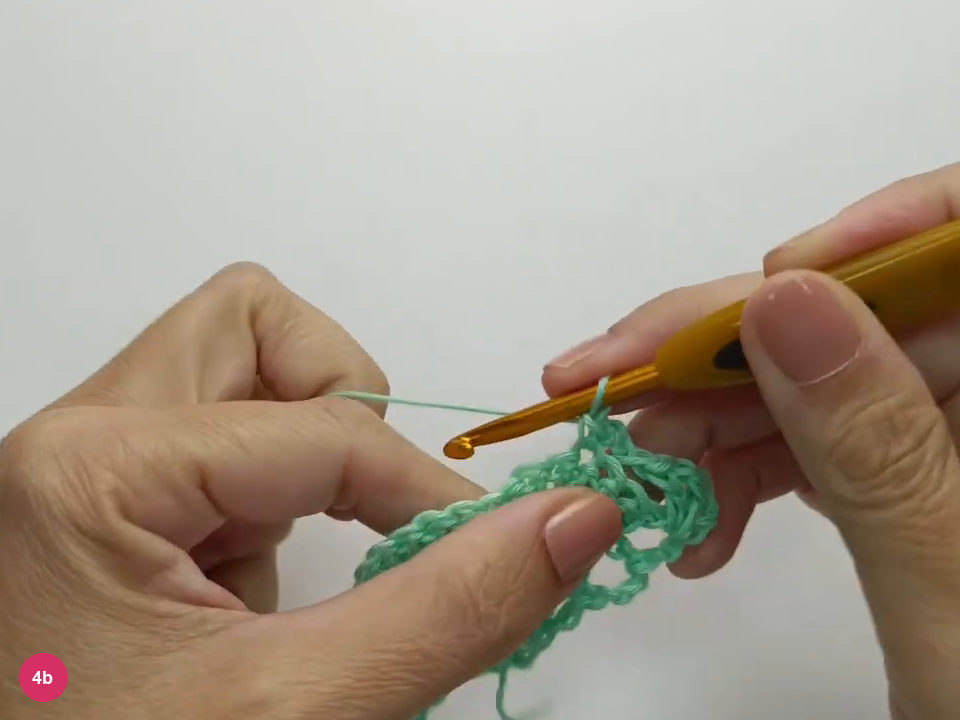
Step 4b: a single crochet anchors the bridge at the side fan’s center. Ch 3 and make a V-stitch in the ch-1 space between the side fan and the central fan. Keep that gap separate from the stitch tops, because this V will carry another fan in the following row.
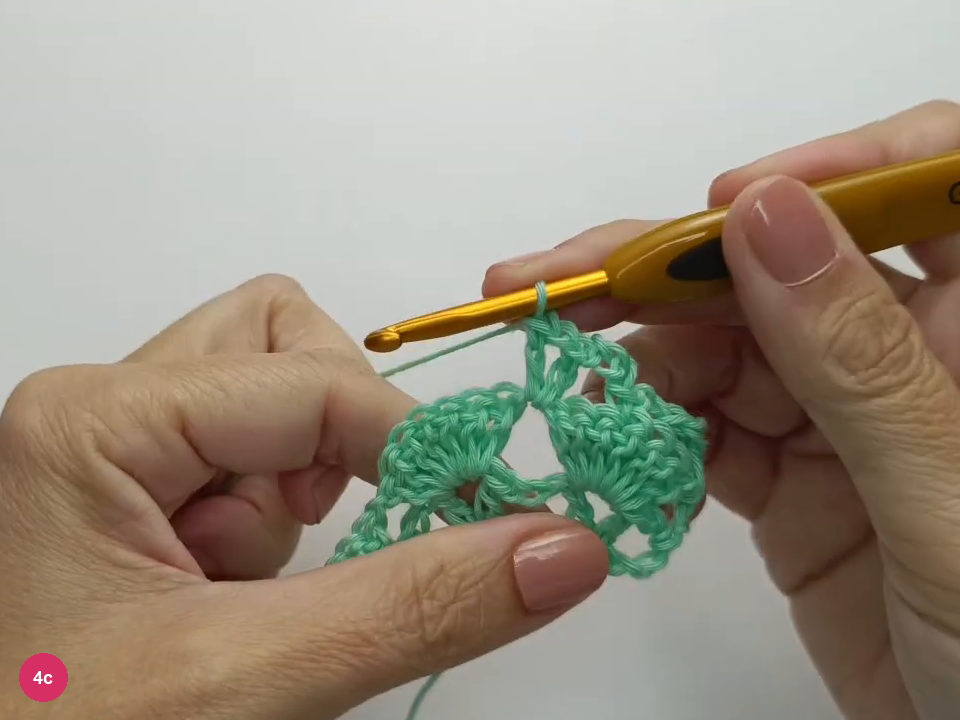
Step 4c: a V-stitch occupies the gap between neighboring fans. Ch 3 and make a V-stitch into the fourth dc of the central fan. This is the important difference at the point: a V replaces the single crochet used on the side fans, allowing the center to keep growing.
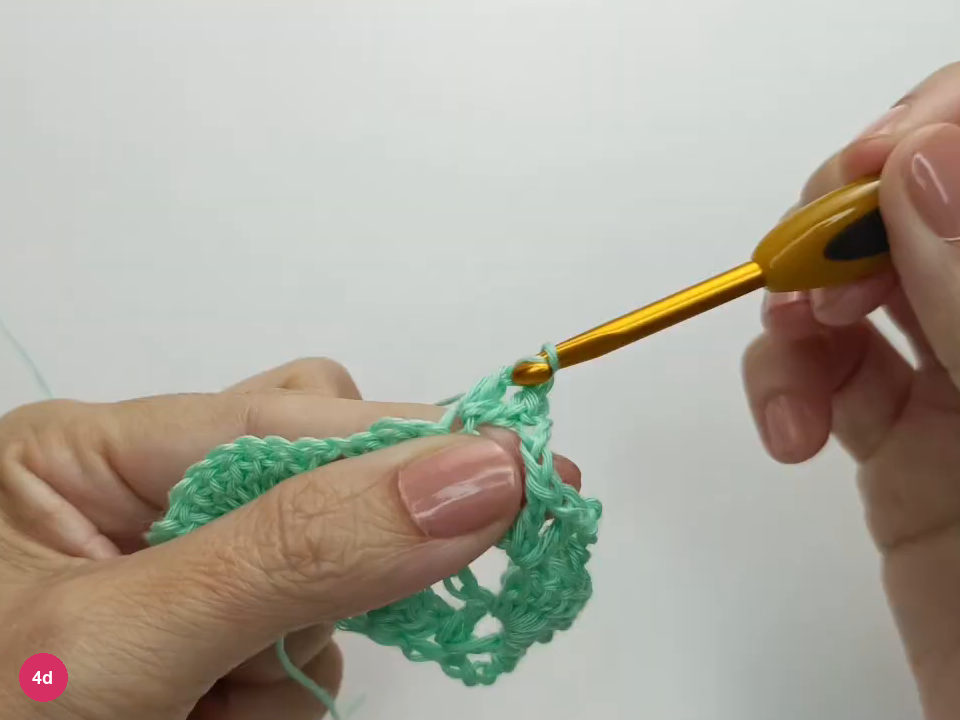
Step 4d: the center fan carries a V-stitch at its middle post. Continue the same placements on the far side: ch-3 bridges, a V between fans and sc at a side fan’s center. At the last edge space work a V, ch 1 and dc, matching the separate outer column at the beginning.
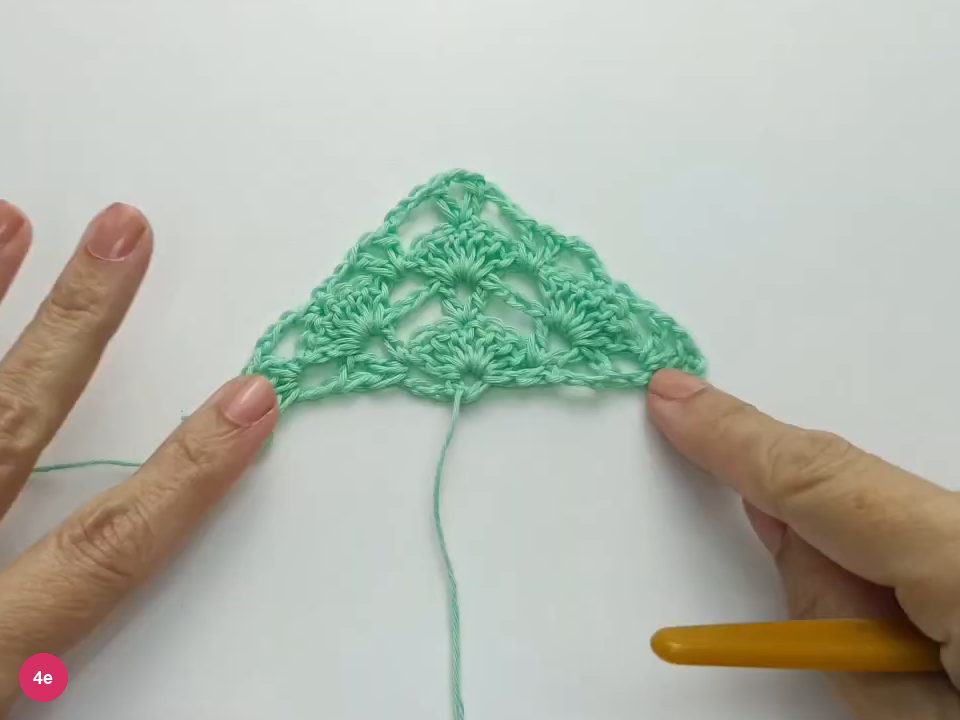
Step 4e: the completed support row retains the center and both edge openings. -
5. Repeat the paired rows to size
- Repeat · fan row + support row
Alternate the fan row and the support row, making seven-dc fans only in V-spaces and separating neighboring fans with ch 1. On each support row use ch-3 bridges, sc over side-fan centers, Vs between fans and a V over the central fan; finish the body after a support row if adding the mesh border.
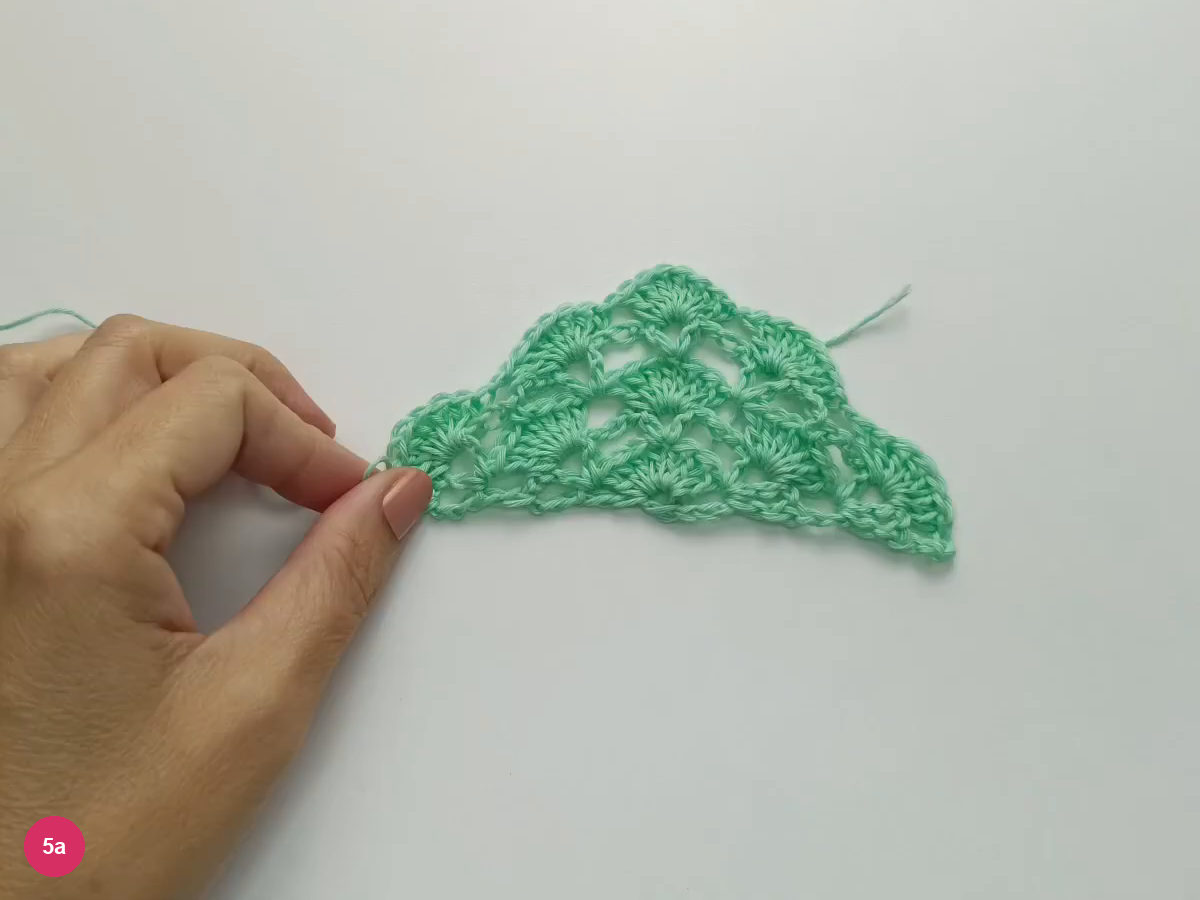
Step 5a: the growing sample shows fans, open bridges and the central point. -
6. Add the shaped mesh border
- Mesh start · ch 6
- Mesh arches · ch 5
- Edge finish · sc, ch 3, dc
- Central increase · sc, ch 5, sc
Ch 6 and turn to begin the first mesh row, then sc into the first V-space. Continue with ch 5 between sc anchors, placing an anchor in each V-space and each sc from the preceding support row.
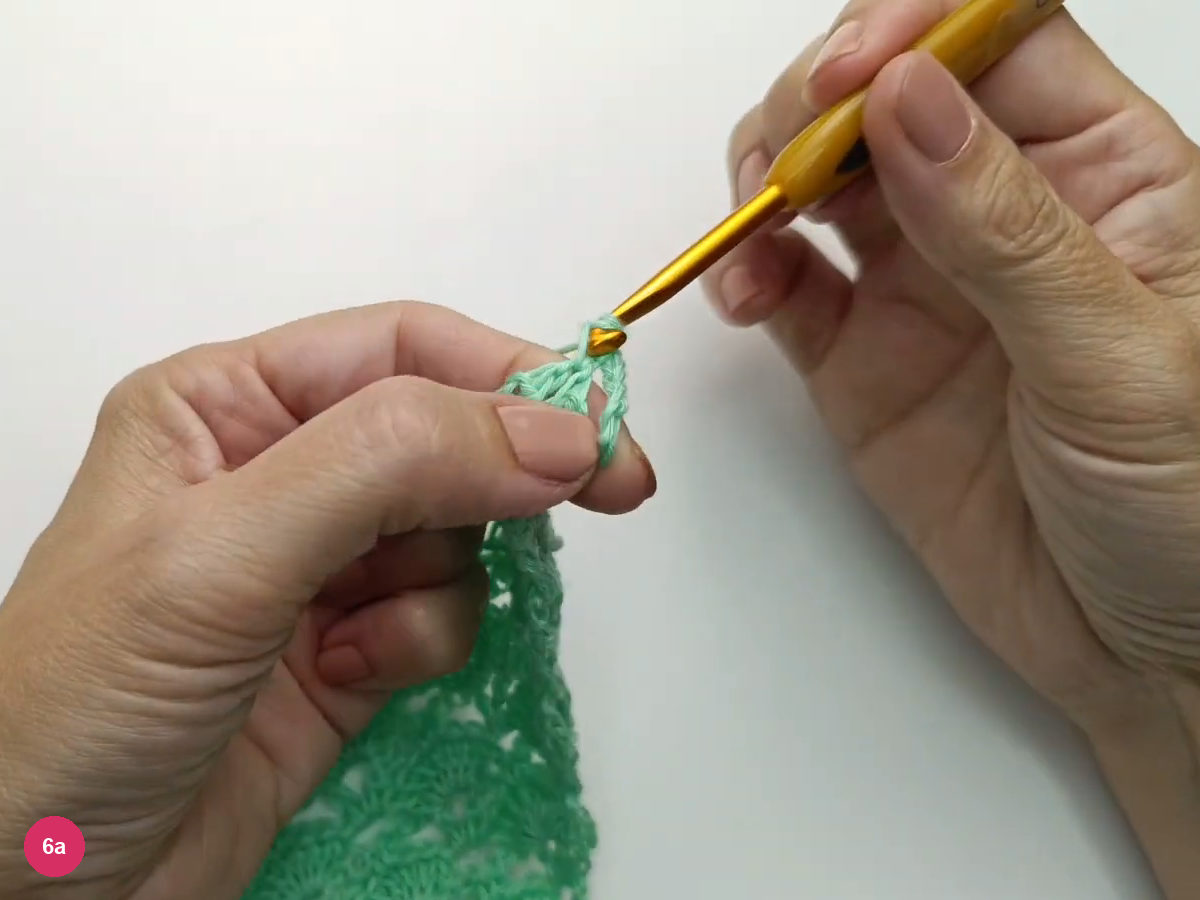
Step 6a: the mesh begins with an open chain edge above the body. At the central V, work sc into its space and continue the ch-5 arches to the next anchor. Keep the central area open and symmetrical instead of adding an unshown fan or a second stitch group there.
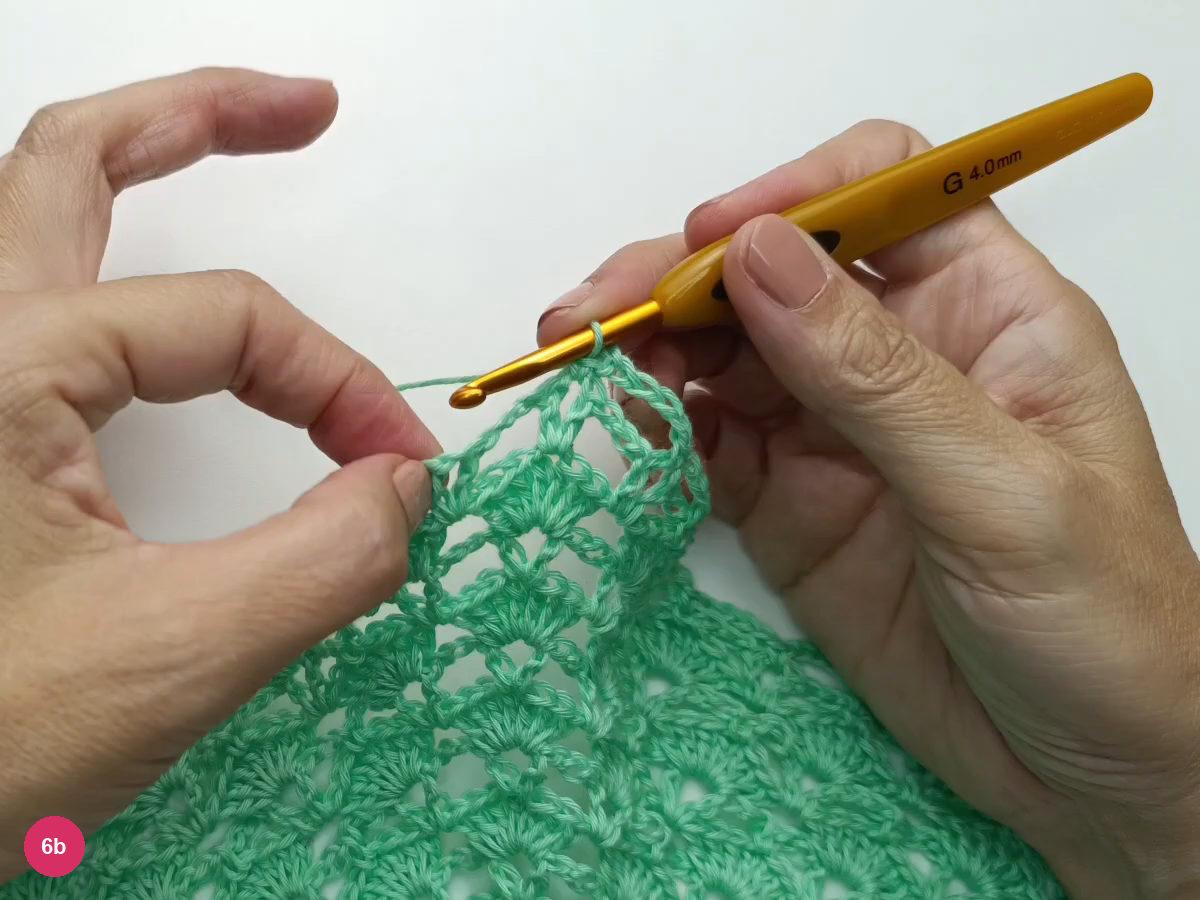
Step 6b: chain arches cross the central V-space of the body. At the opposite edge, finish with ch 3 and dc in the final edge space. This leaves an open end arch rather than a tight solid corner, ready to receive the start of the next mesh row.
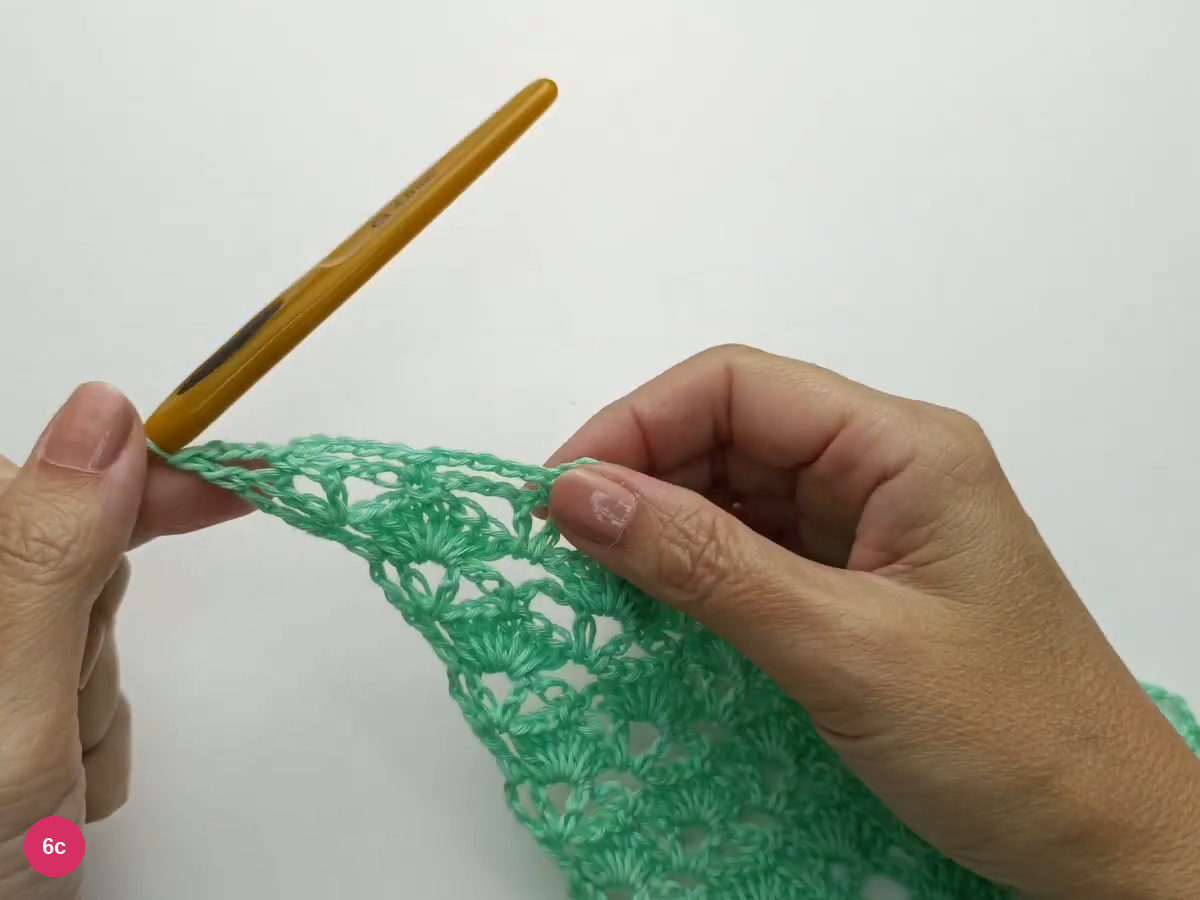
Step 6c: the mesh row ends with a chain-three and double-crochet arch. For the next mesh row, ch 6, turn and sc into the first arch, then repeat ch 5 and sc into successive arches. At the central joining point, pass to the next ch-5 arch as demonstrated instead of anchoring into the joining stitch itself.
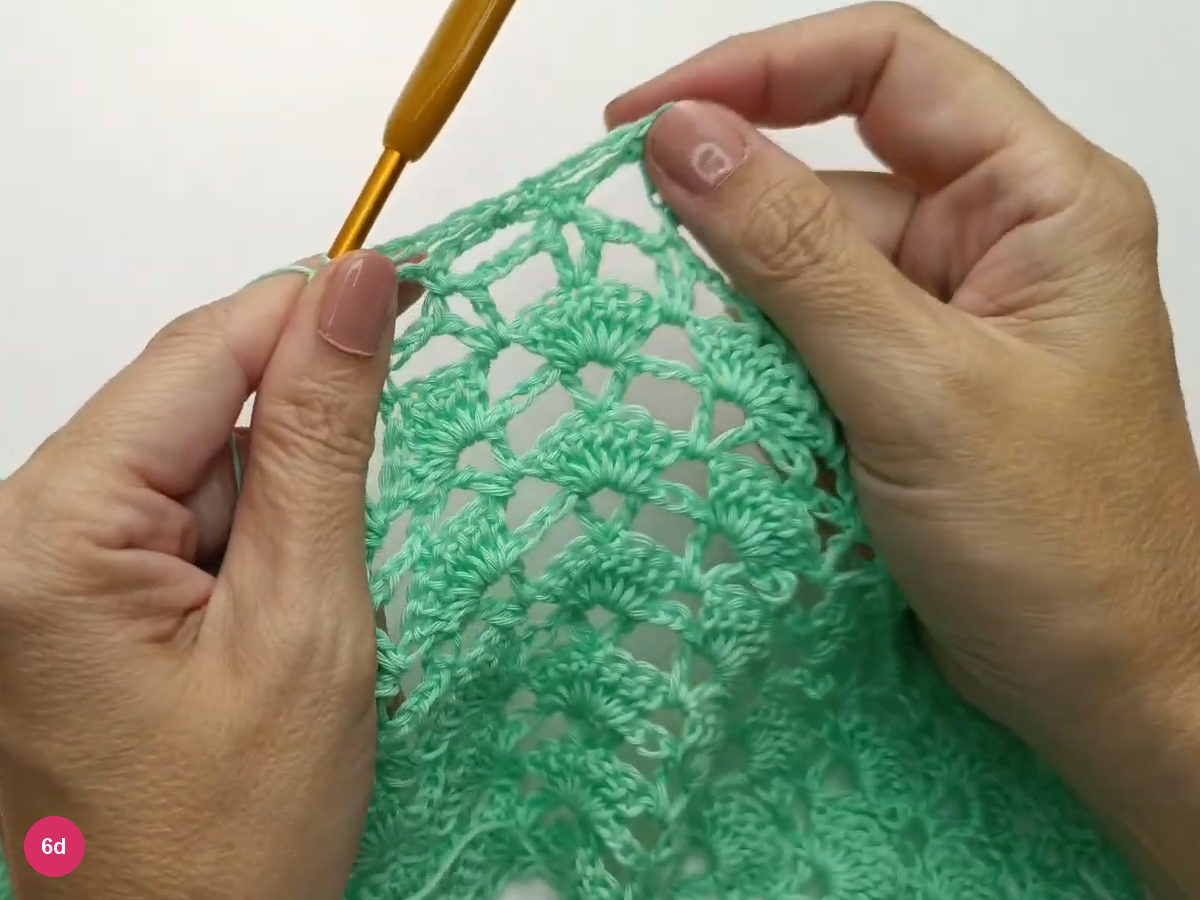
Step 6d: the next mesh row bridges across the central joining point. In the final edge arch work sc, ch 3 and dc in that same arch. Hold the edge open while completing the dc so the turning opening remains distinct from the neighboring mesh hole.
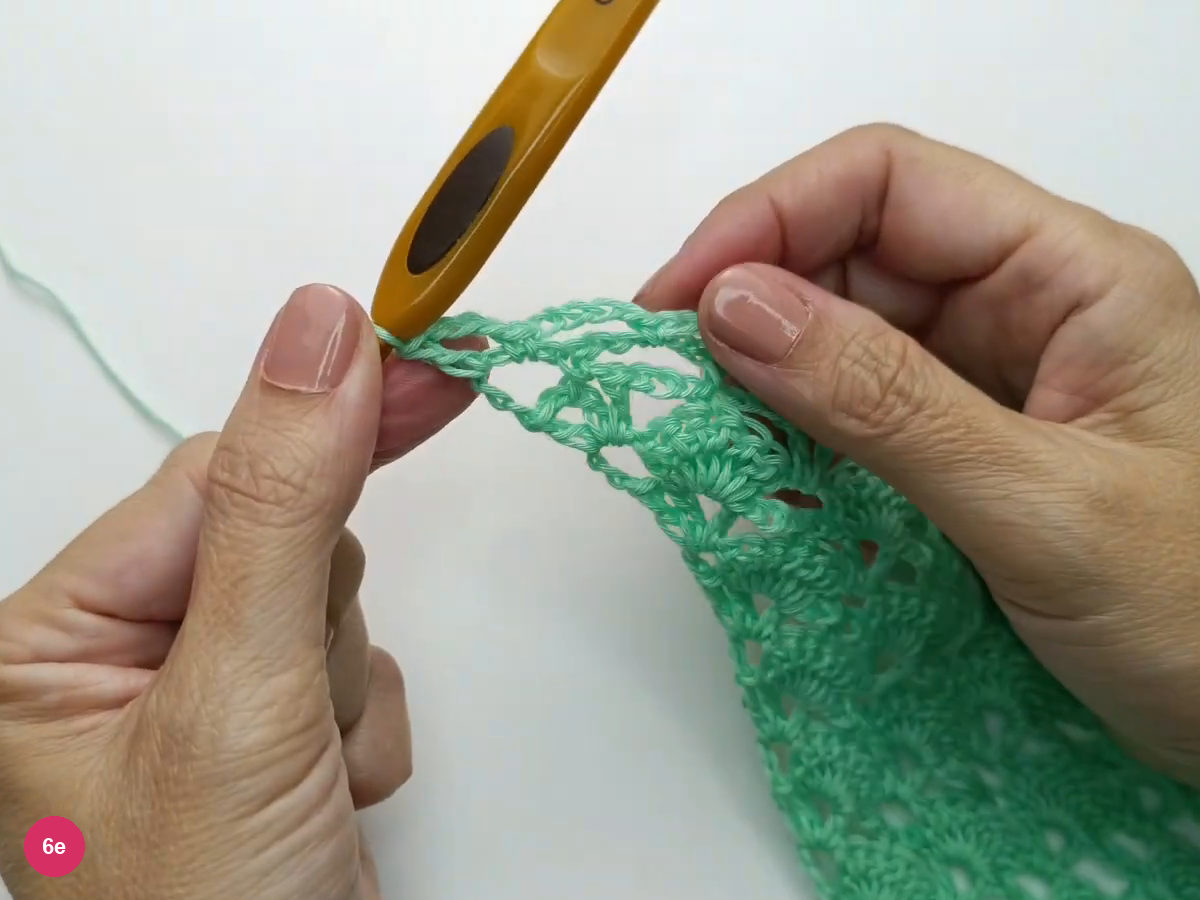
Step 6e: a single crochet, chain-three and double crochet shape the mesh edge. Ch 6, turn and sc into the first arch, then work ch-5 arches to the center. In the central arch work (sc, ch 5, sc), then complete the far side and edges as before. For a deeper band, repeat these three mesh rows in order, keeping the same edge treatment.
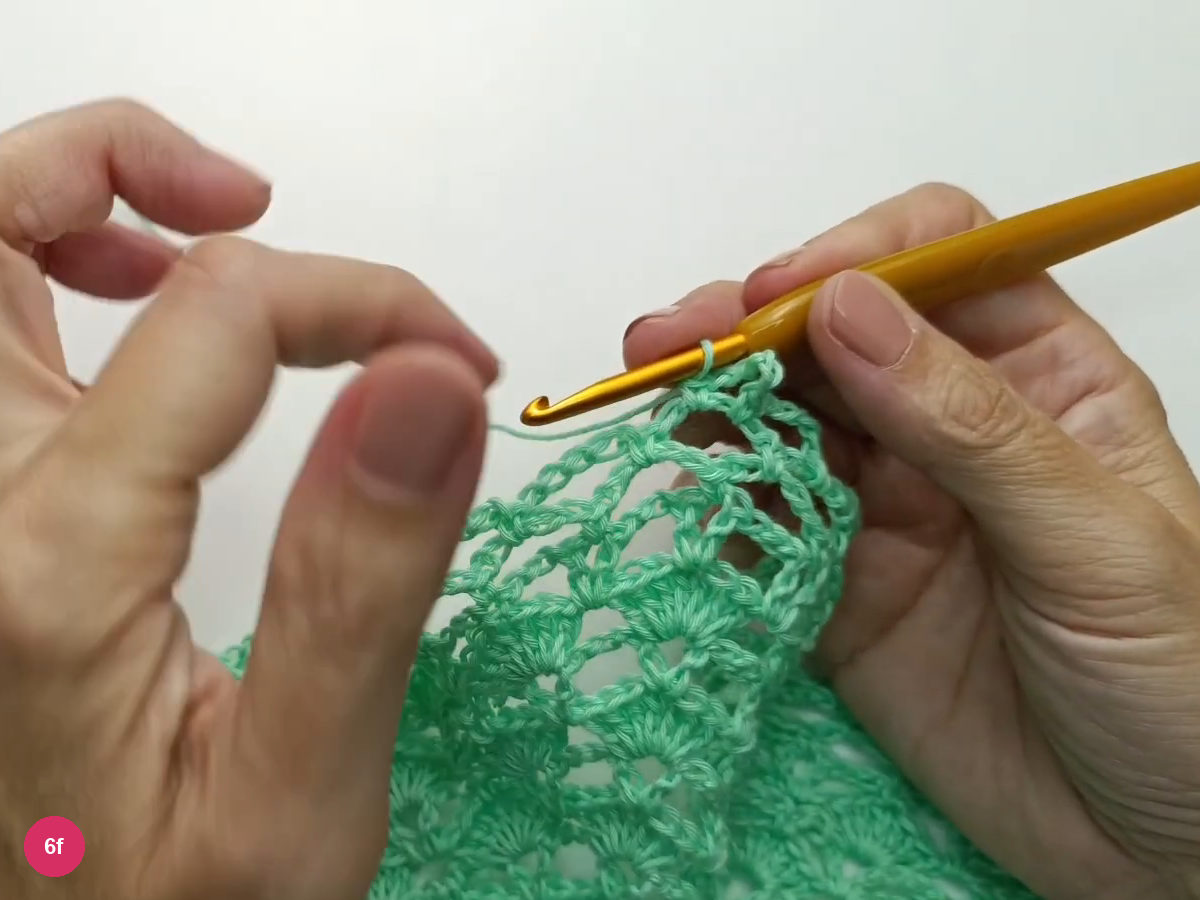
Step 6f: two single crochets share the central arch around a new chain-five arch. -
7. Finish with the crocheted bobble edge
- Bobble · ch 3 + 5 dc
- Closure · third starting chain
- Center · 1 or 2 bobbles
After the mesh reaches the depth you want, ch 1 and sc in the first arch, then ch 3 and work 5 dc in that same arch. These completed posts will be folded into a raised bobble; do not close them together as a cluster.
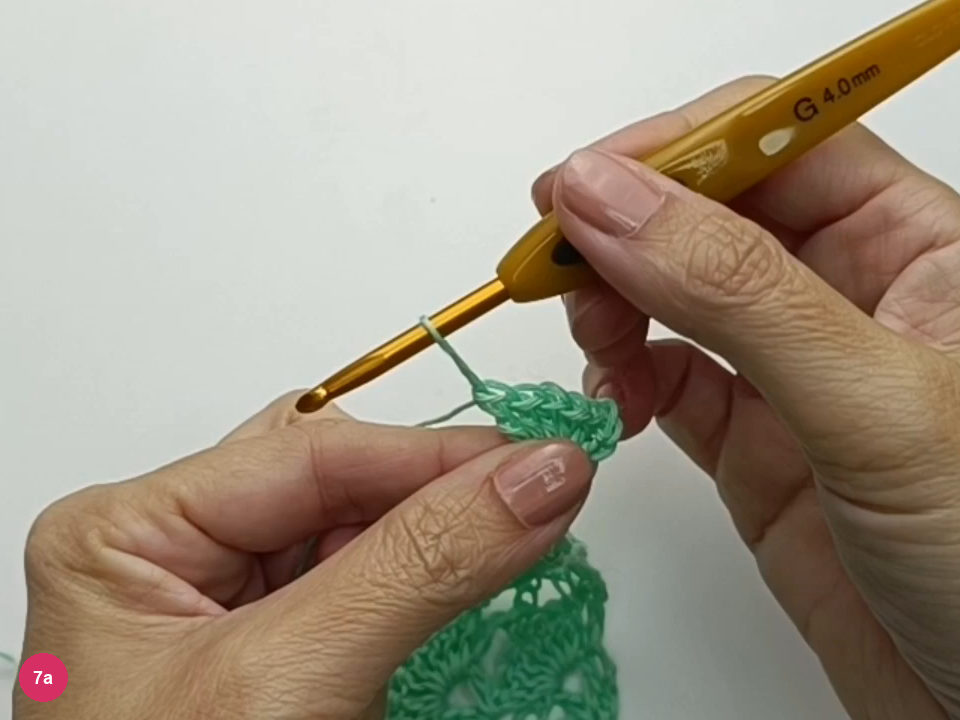
Step 7a: five completed posts stand beside the starting chain in the edge arch. Enlarge the working loop and remove the hook, then insert the hook through the third starting chain and catch the waiting loop. Draw that loop through the chain to fold the posts into a popcorn shape, then ch 1 and sc in the same arch.
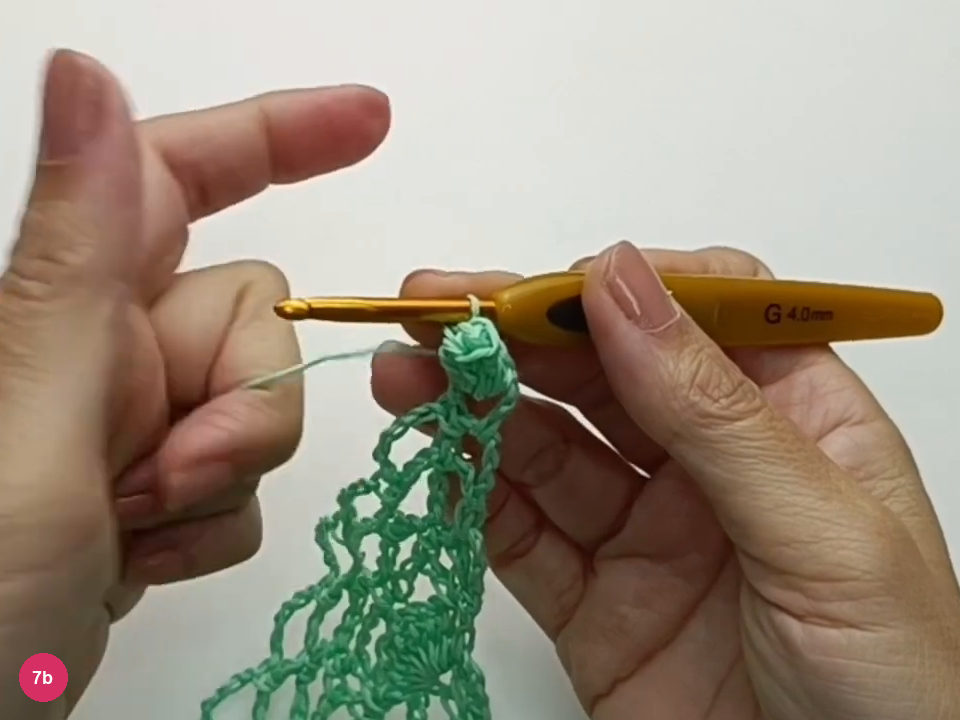
Step 7b: the folded posts form a raised crocheted bobble at the edge. Sc into the sc between this arch and the next one. That small anchor separates neighboring bobbles and helps the raised shapes sit individually instead of merging into a continuous ridge.
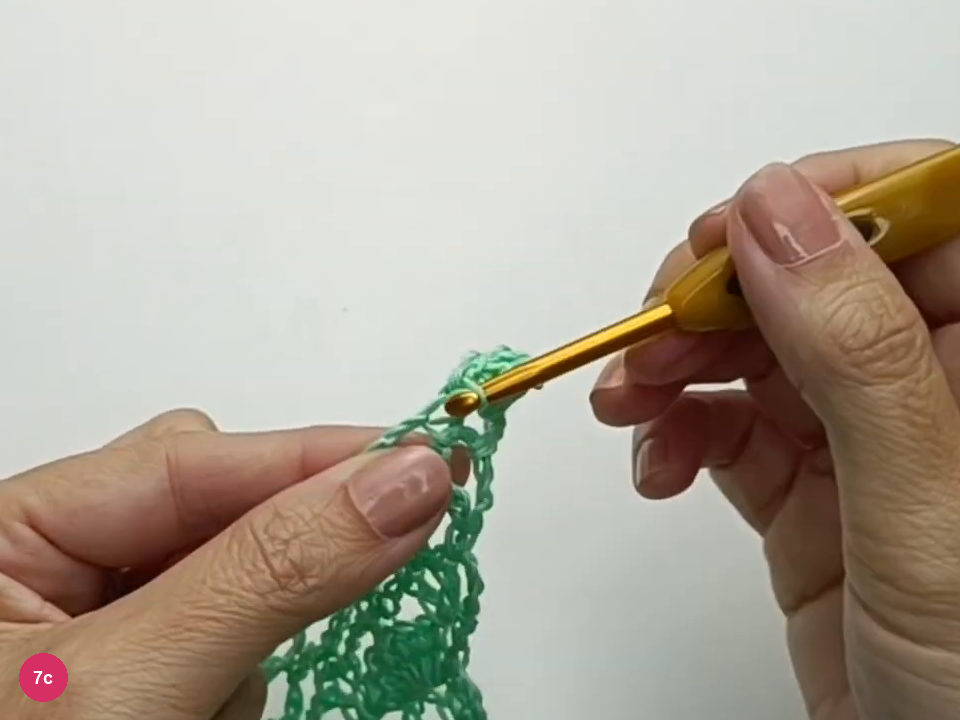
Step 7c: a single crochet separates the bobble from the next arch. Repeat the full bobble in the next arch: sc, ch 3, 5 dc, close through the third chain, ch 1 and sc in the arch. Continue placing a sc on the intervening sc before moving to each new arch.
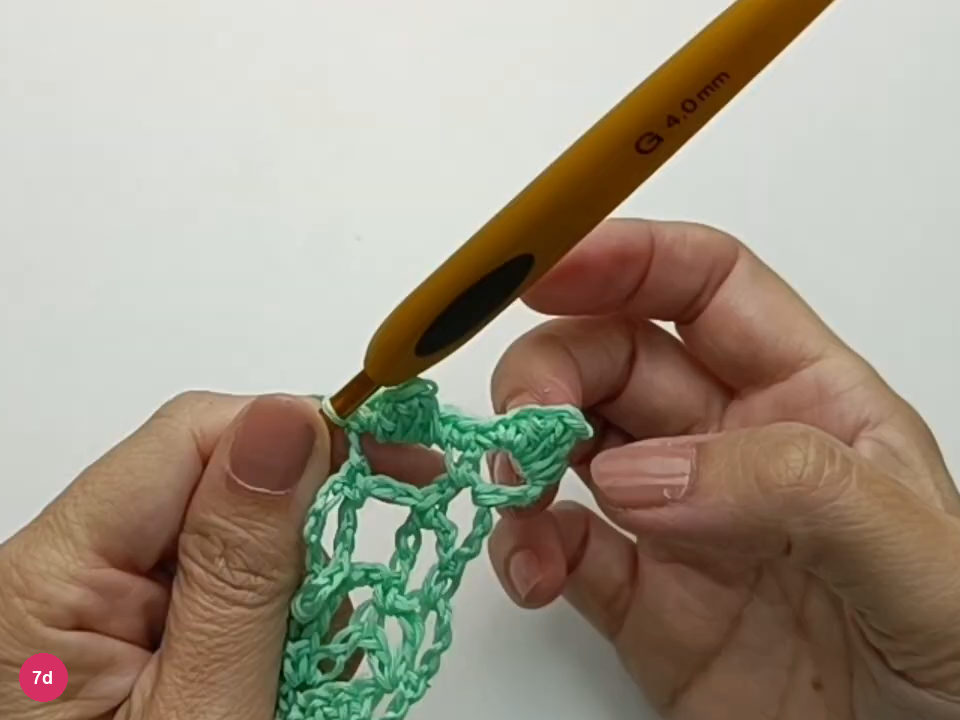
Step 7d: neighboring crocheted bobbles sit on separate mesh arches. At the central arch, make the same bobble and finish it with ch 1 and sc in that arch. You can leave the point with that single bobble, or follow the demonstrated double-bobble point in the next action.
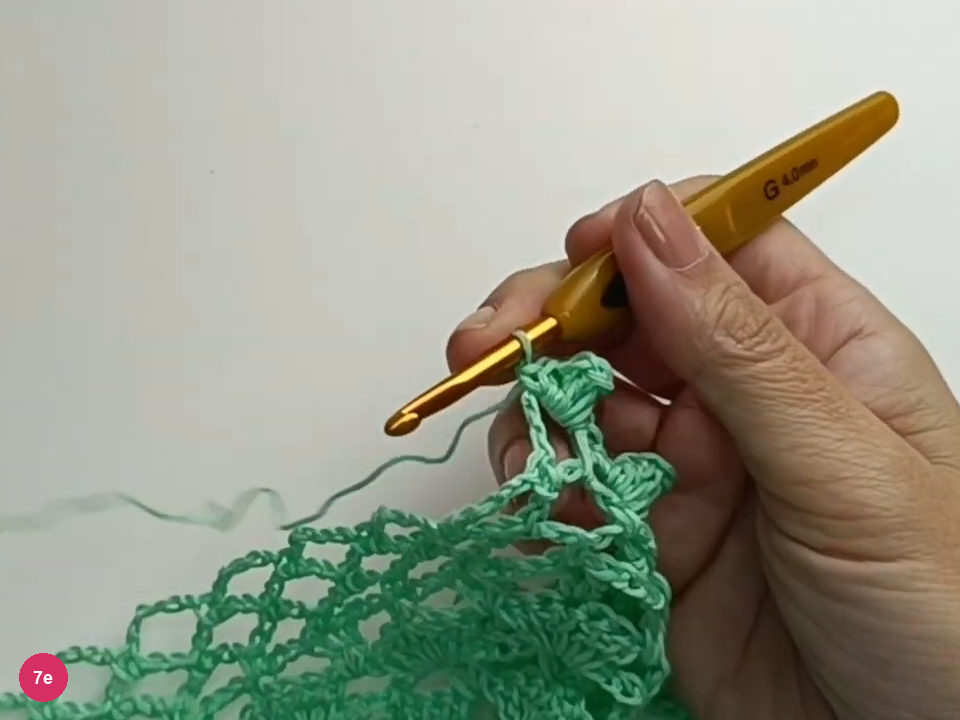
Step 7e: the first bobble is complete inside the central arch. For the double point, ch 3 from that last sc and work another 5 dc into the same central arch. Close through the third chain, ch 1 and sc in the arch, then continue the ordinary bobble-and-separating-sc sequence along the far side.
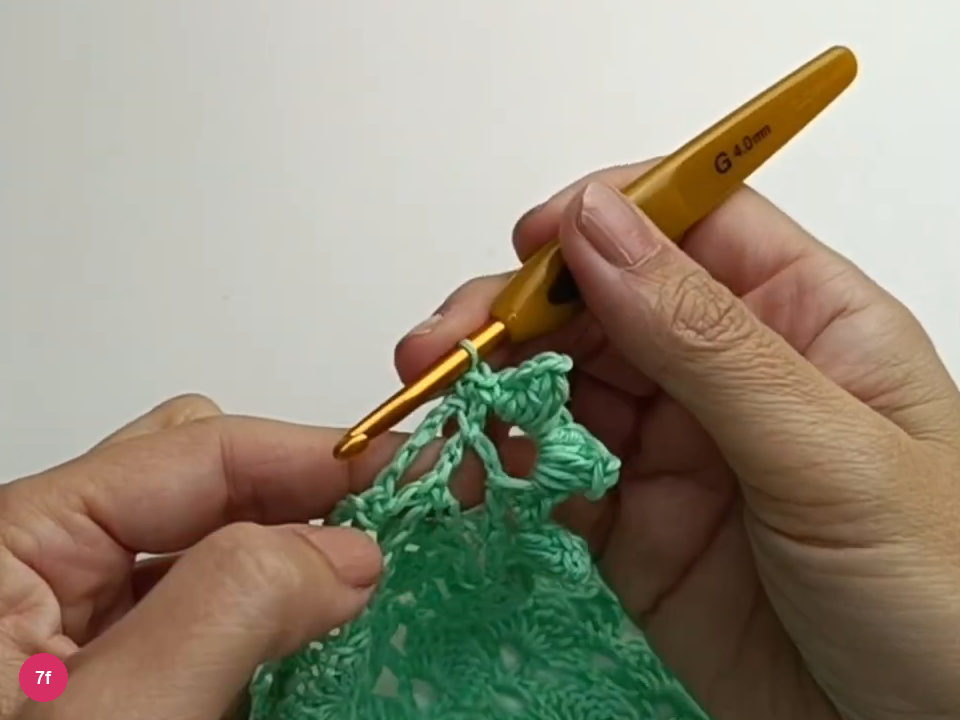
Step 7f: two bobbles share the central arch to emphasize the point. Complete the edge across the remaining arches and weave in the loose yarn ends to finish. The photo shows the completed mint sample before its ends are hidden; the border’s raised details are crocheted popcorns, with no tied yarn tassels.
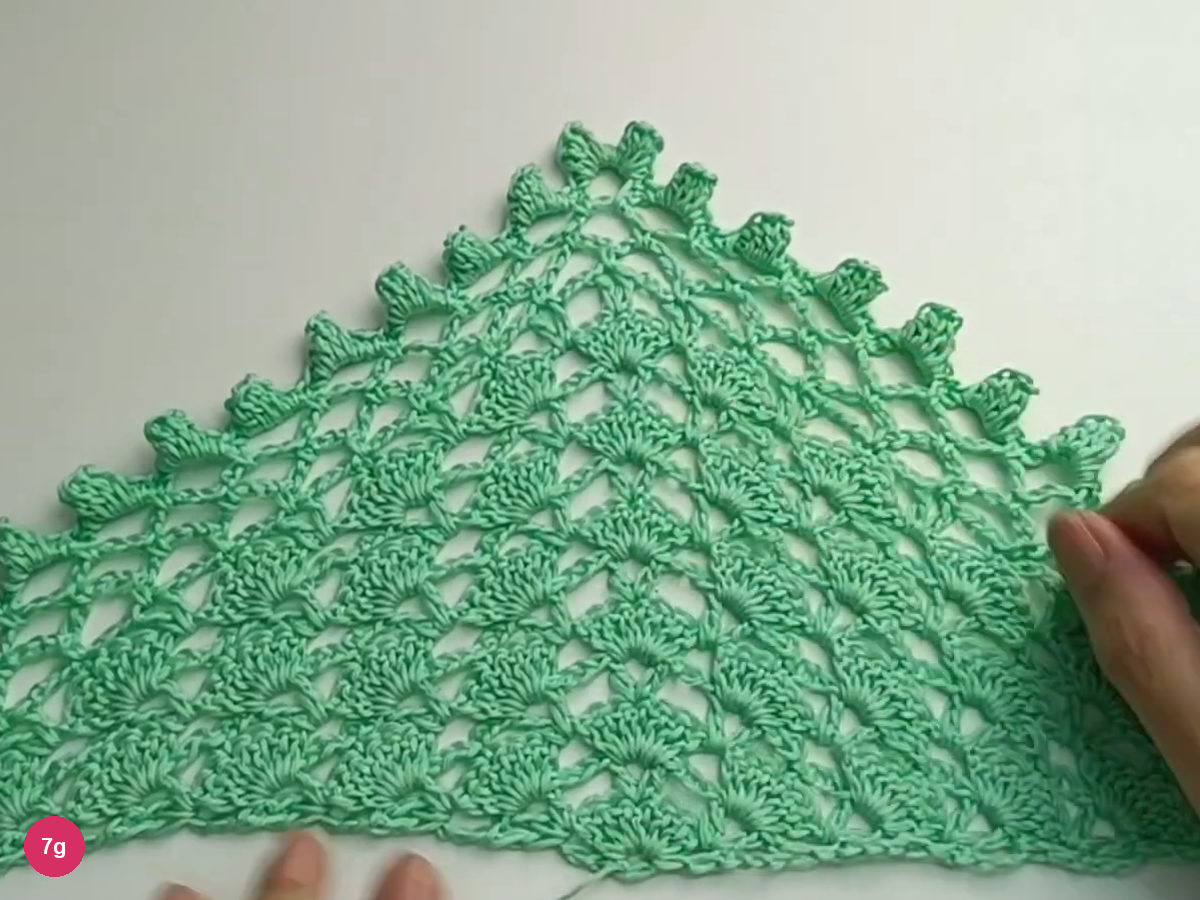
Step 7g: the finished sample has a pointed mesh border and raised crocheted bobbles.
Troubleshooting the lace and edge
The upper edge feels tight. Check the turning chains and the separate edge openings. A tightly pulled starting chain can make the shoulder edge draw inward even when the fans are correct. Keep the chains relaxed enough to sit at the same height as the neighboring posts, rather than stretching the finished fabric to force it flat.
The fans lean or disappear. Confirm that each fan is in a V-space, with its posts sharing that opening. A fan worked into a ch-3 bridge changes the placement of later support stitches. Set the piece down and follow the open V shapes across the preceding row before continuing.
The point loses its outline. Locate the central fan or mesh arch again. In the body, follow the central V rule; in the mesh, follow the three-row sequence: anchor at the center, bridge its joining point, then increase inside the central arch. A marker helps keep the center identifiable as the border widens.
The popcorns look like flat fans. Make sure the waiting loop has passed through the third starting chain before securing it. The posts must fold toward one another to create the raised shape. Compare the edge opening around each bobble as well: tightening the anchor excessively can pull the surrounding mesh out of line.
For another project where small edge placements change the outline, the heart-border doily offers a different lace finish. A scalloped summer headband is another way to explore openwork on a narrower accessory.
Final checklist
- The center line continues through the fan body into the mesh.
- Both shoulder edges retain open turning spaces without drawing inward.
- Every fan sits in a V-space, and the side-fan anchors remain distinct from the central V.
- The mesh arches are open, with the point shaped by the three-row center sequence.
- The raised edge details are crocheted bobbles, and all remaining ends are secured.
This crochet lace shawl is intended as a light layer rather than a dense fabric. Let its open spaces remain visible when arranging it over clothing, and use care appropriate to the chosen yarn when finishing and washing. The almost-1.5 m by 60 cm measurements describe the leaf-green example, not every yarn substitution.
Inspired by Lilacroch’s video tutorial.

Save this pattern for later
Pin it to one of your boards so it’s ready when you have a free evening and the right yarn.