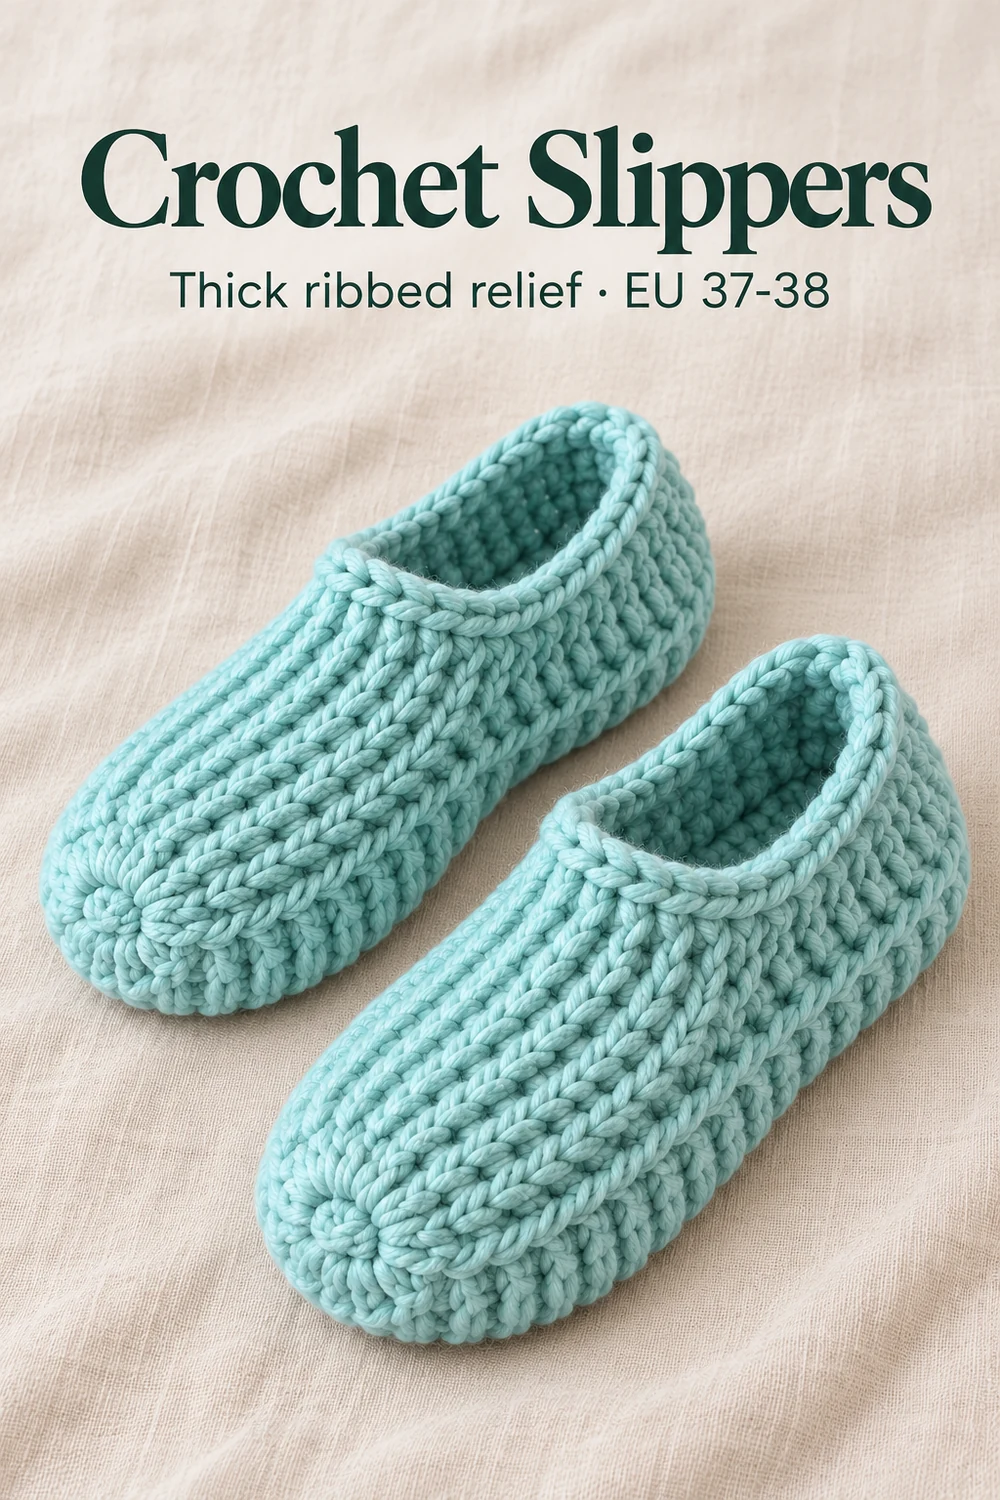
These crochet slippers are worked in thick yarn with a 4 mm hook: a round toe, ribbed relief rounds that form the base and sides, a turned heel and three edge rows for height. The demonstrated pair fits EU 37-38 and measures 24 cm long and 10.5 cm high. The thick, ribbed fabric is made from raised and recessed stitches worked around the posts of the stitches below.
Before you start these crochet slippers
The tutorial uses one size and one yarn, and everything below refers to that yarn: thick yarn, 100 g / 100 m. The video does not name the fibre. If you use a different yarn, choose a hook that gives a dense fabric without gaps, because the ribs only stand out when the stitches are close together.
- Thick yarn, 100 g / 100 m: two balls for the pair.
- 4 mm crochet hook.
- Two stitch markers, scissors and a tape measure.
- A thick needle or a small hook to hide the tails.
Size: the demonstrated slippers fit EU 37-38, with an insole of 24 cm, and finish 24 cm long and 10.5 cm high. To change the length, add or remove pattern rounds and heel rows, and try the toe part on your foot as you go. The video does not give a size chart for other sizes.
US terms: ch = chain; sl st = slip stitch; dc = double crochet. A raised stitch is a dc worked from the front around the post of the stitch below. A recessed stitch is a dc worked from the back around the post. These are the creator’s words for the front-post and back-post stitches.
How it is built: a small round forms the toe, and 15 pattern rounds of raised and recessed stitches grow it into a cup. The heel part is then worked in turned rows on one side of the cup, folded back and joined, and three edge rounds raise the opening. There is no separate sole piece, so the same ribbed fabric covers the base and the sides.
Reading the stitches: in the ribbed rounds the raised stitches stand out in front like small ridges, while the recessed stitches sit behind them. If you can find that difference on your own work after the first pattern round, you are on track; if the ridges and recesses look the same, undo the round and check which side of each post you entered.
Crochet slipper pattern: from the ring to the heel
-
Make the ring and round 1
- Ring · ch 2
- Rnd 1 · 14 dc + ch 2 = 15
Wind the yarn around two fingers, ready to pull the working yarn through the wrap with the hook and make an adjustable ring.
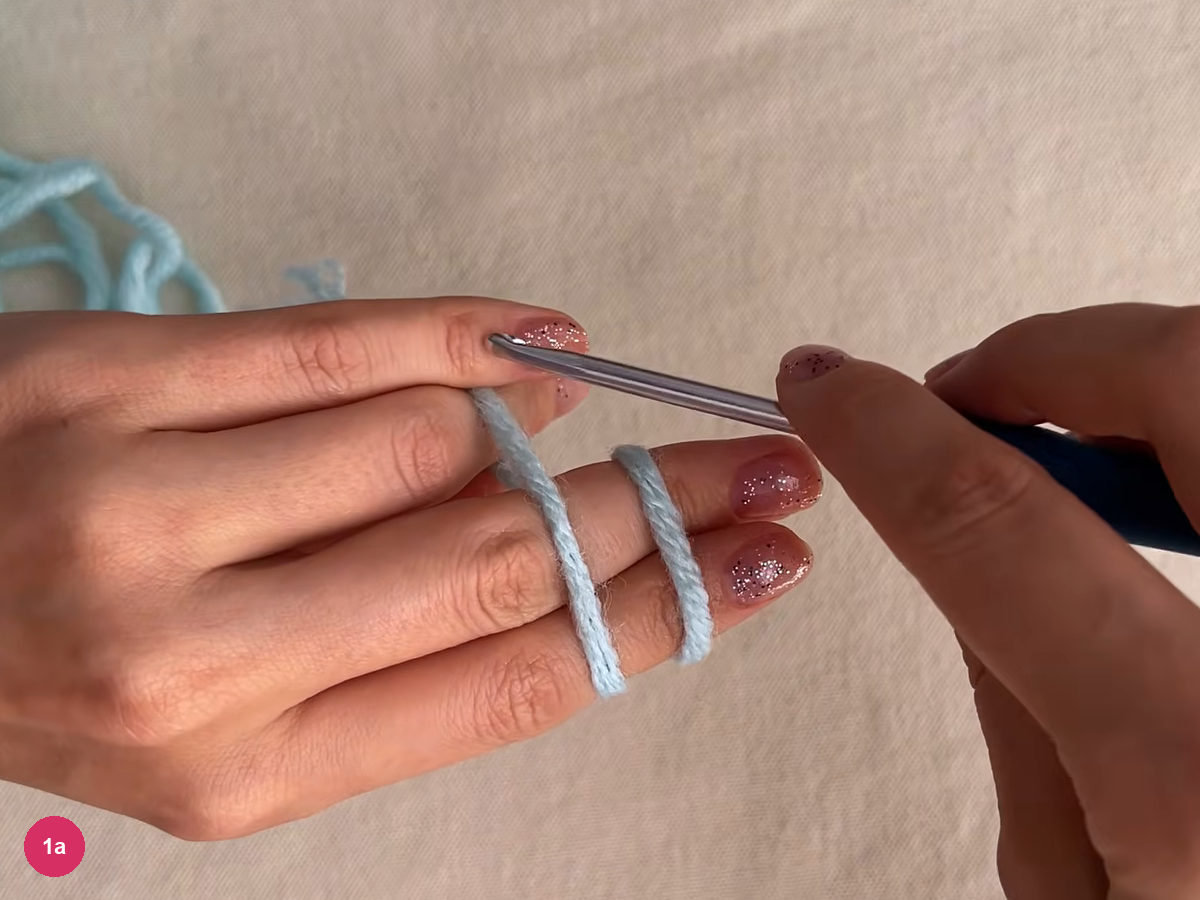
Step 1a: wind the yarn around two fingers to start the ring. Ch 2, then work 14 dc into the ring; the ch 2 counts as the 15th stitch. Tighten the tail now and then so the ring closes as it fills.
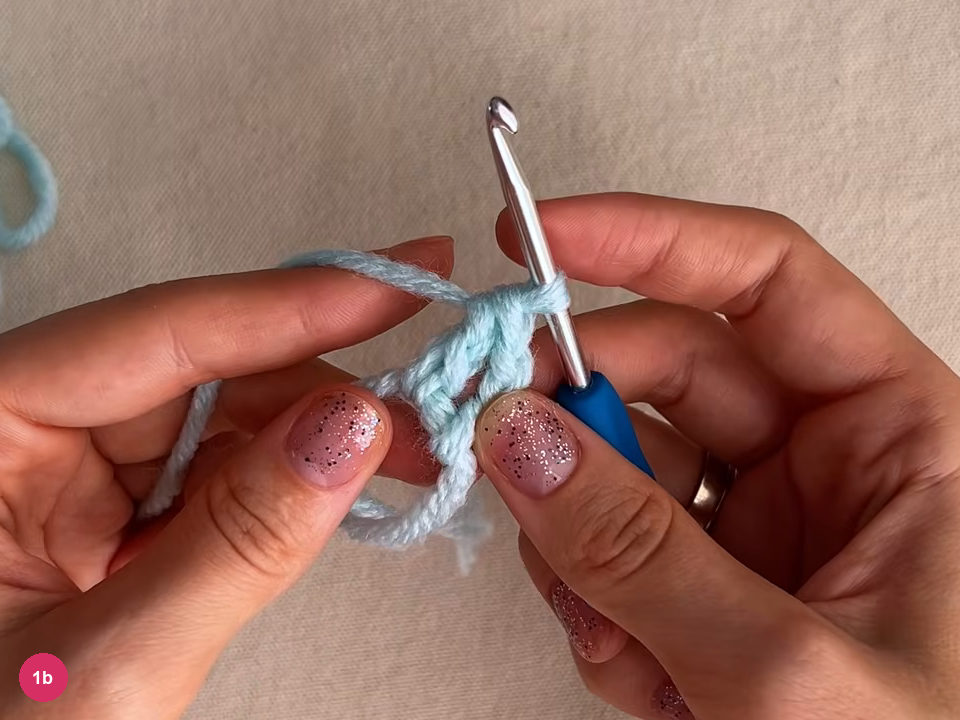
Step 1b: the first dc are worked into the ring. Pull the tail to close the centre, then join with a sl st into the first dc of the round, not into the turning chain.
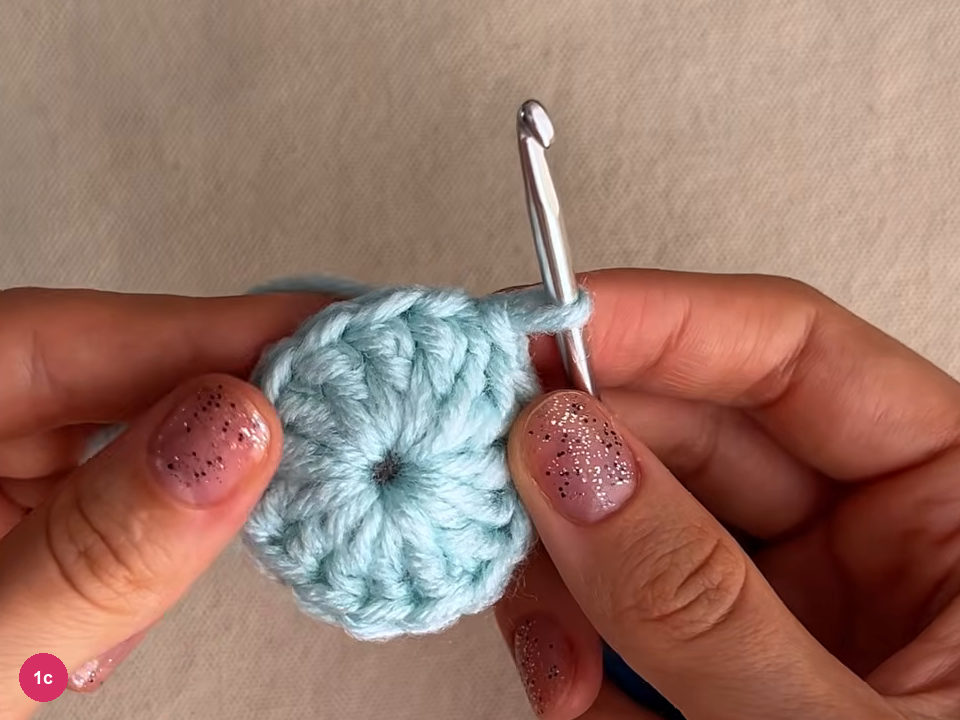
Step 1c: close the ring and join the round. -
Round 2: double the stitches
- Rnd 2 · 30 dc
Ch 2, then work 2 dc into the top two loops of each stitch of round 1. The ch 2 and the dc beside it make the first pair.
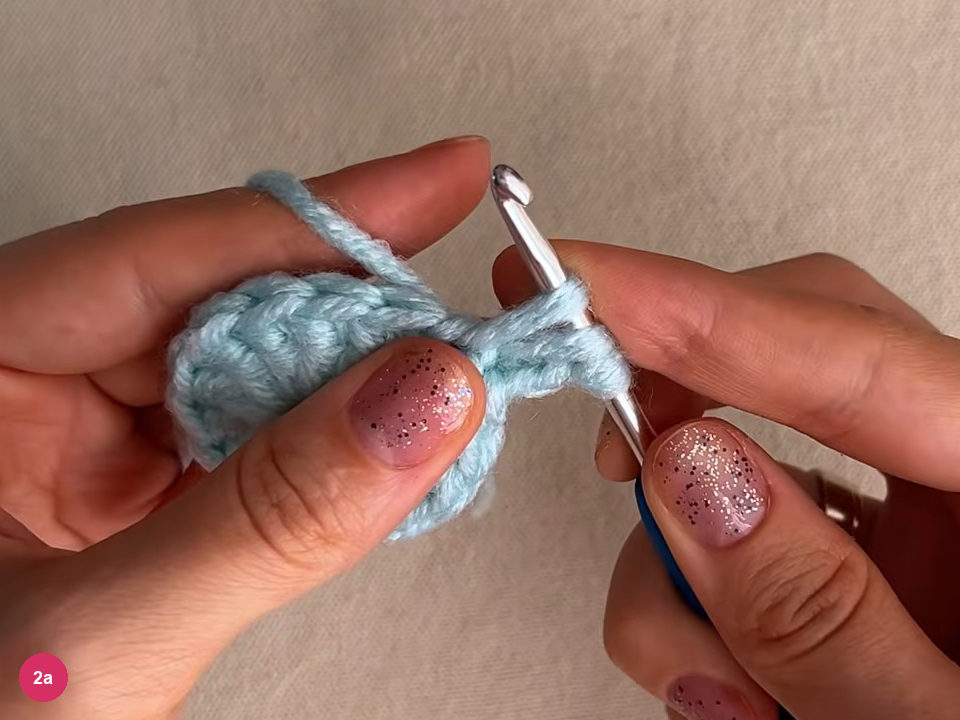
Step 2a: round 2 starts with two dc in each stitch. Keep working two dc into every stitch until you have 30 dc, then join with a sl st at the start of the round. Count before you go on.
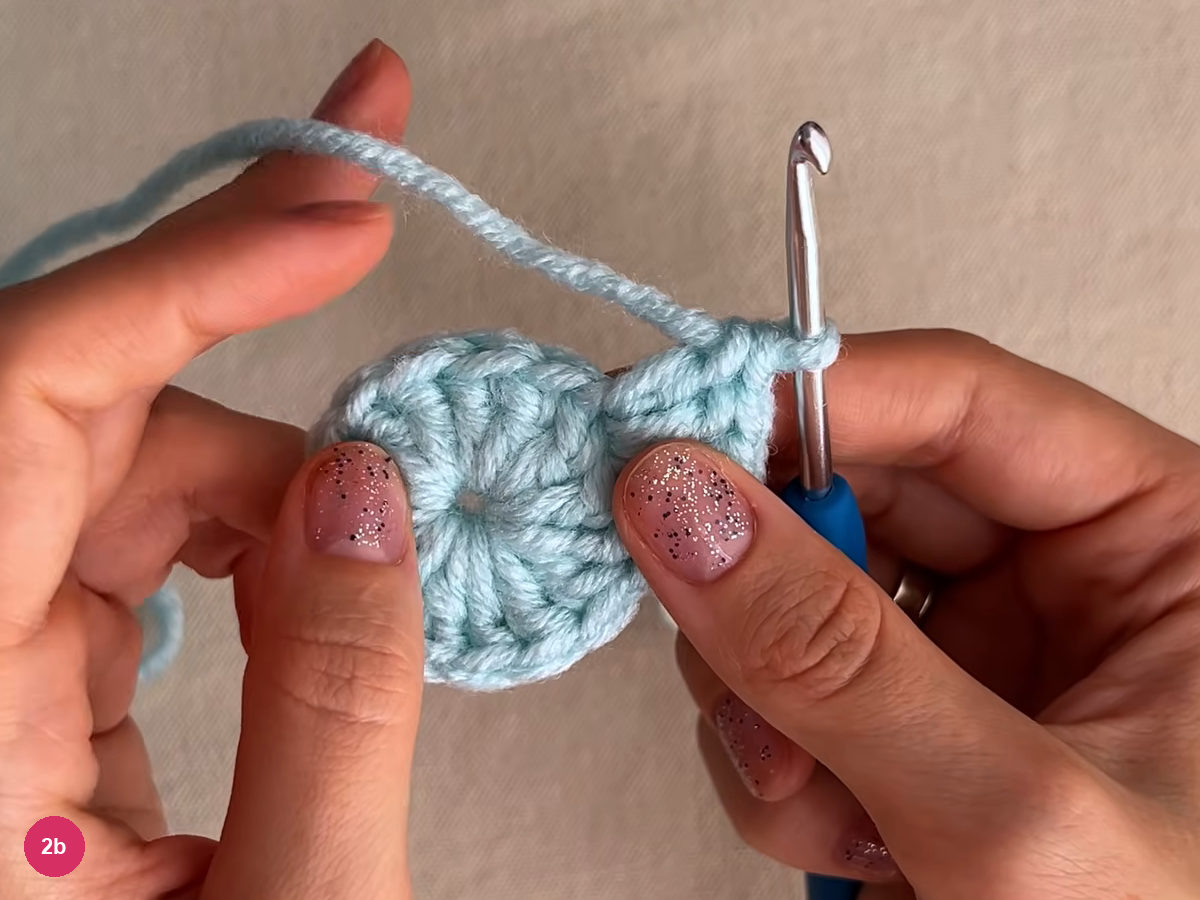
Step 2b: 30 dc complete the second round. -
Round 3: the relief pattern
- No turning chain
- Marker in the first stitch
- 9 raised · 3 recessed · 3 raised
- 9 recessed · 3 raised · 3 recessed = 30 sts
Begin the raised stitches with no turning chain: yarn over, push the hook in front of the first stitch and around its post, and finish a dc.
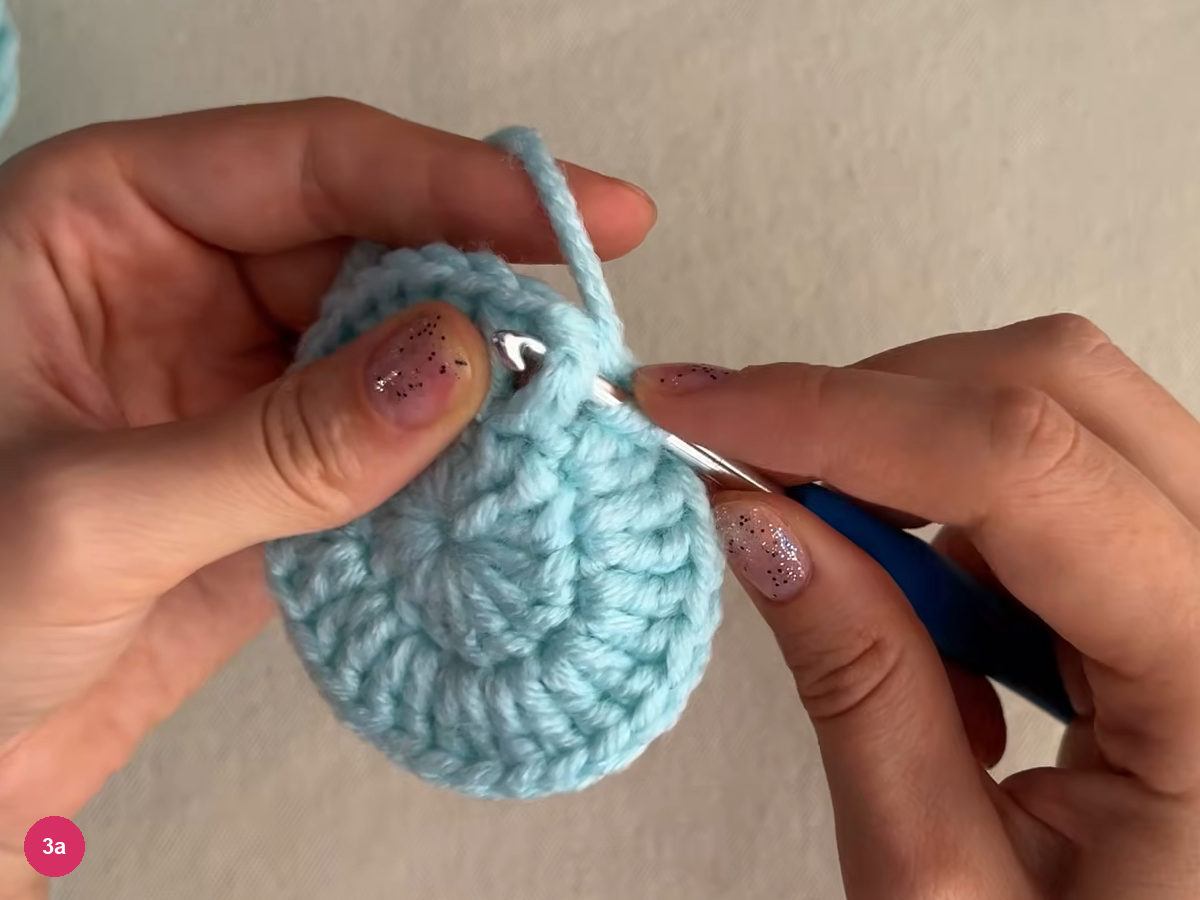
Step 3a: the hook goes around the post of the first stitch. Repeat the raised stitch around the post of the next stitch until you have 9 raised dc in a row.
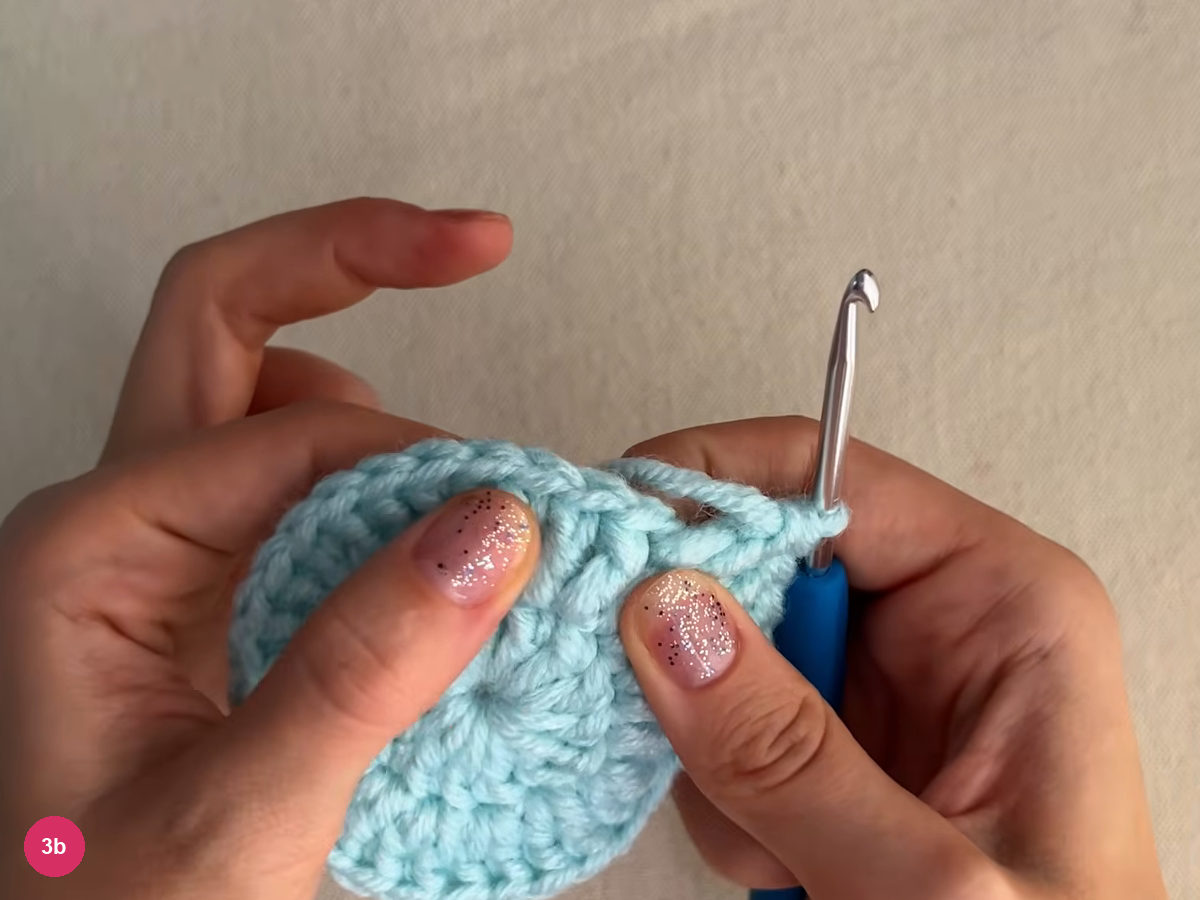
Step 3b: a row of raised stitches builds along the edge. Switch to recessed stitches, still with no turning chain. Yarn over, take the hook behind the post of the next stitch from the back and work 3 dc.
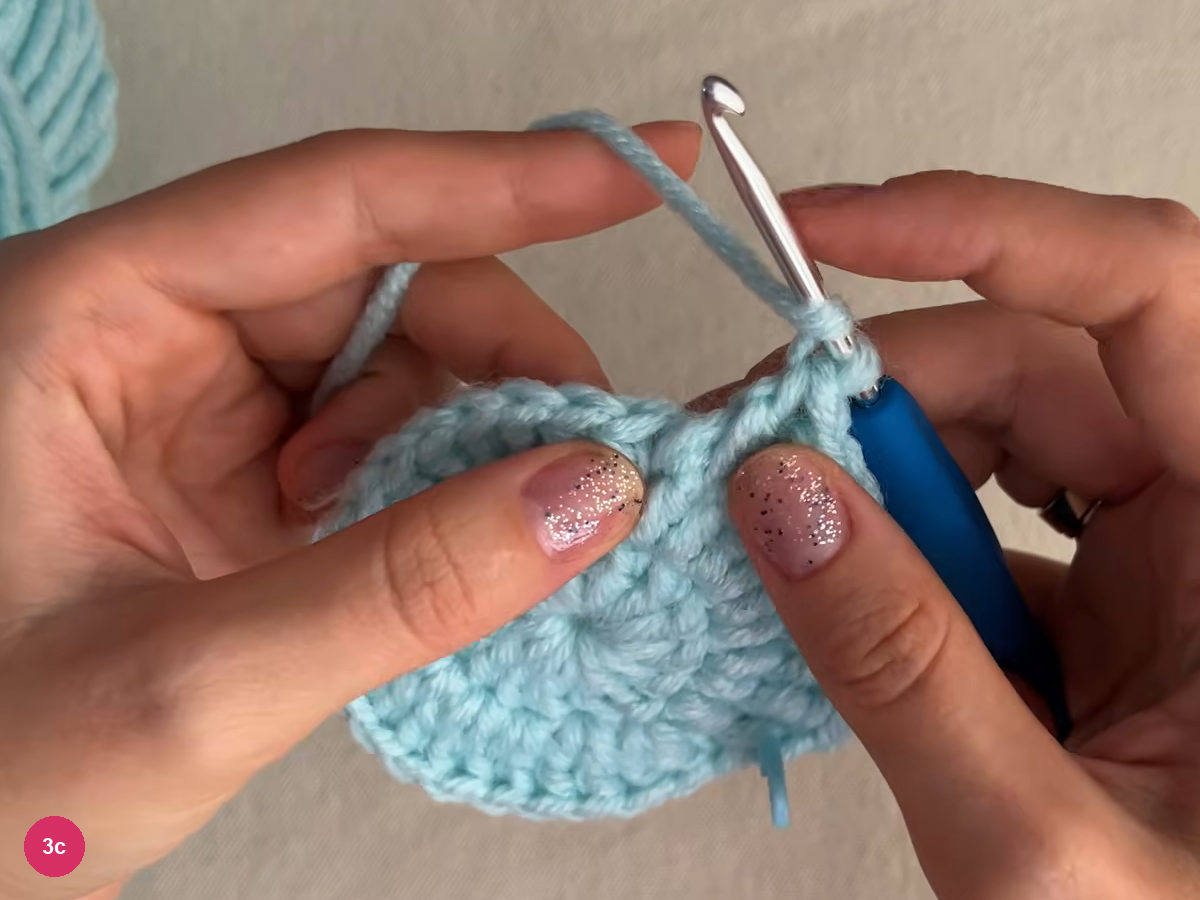
Step 3c: the hook returns behind the posts for recessed stitches. Return to the front for 3 raised stitches, again around the posts.
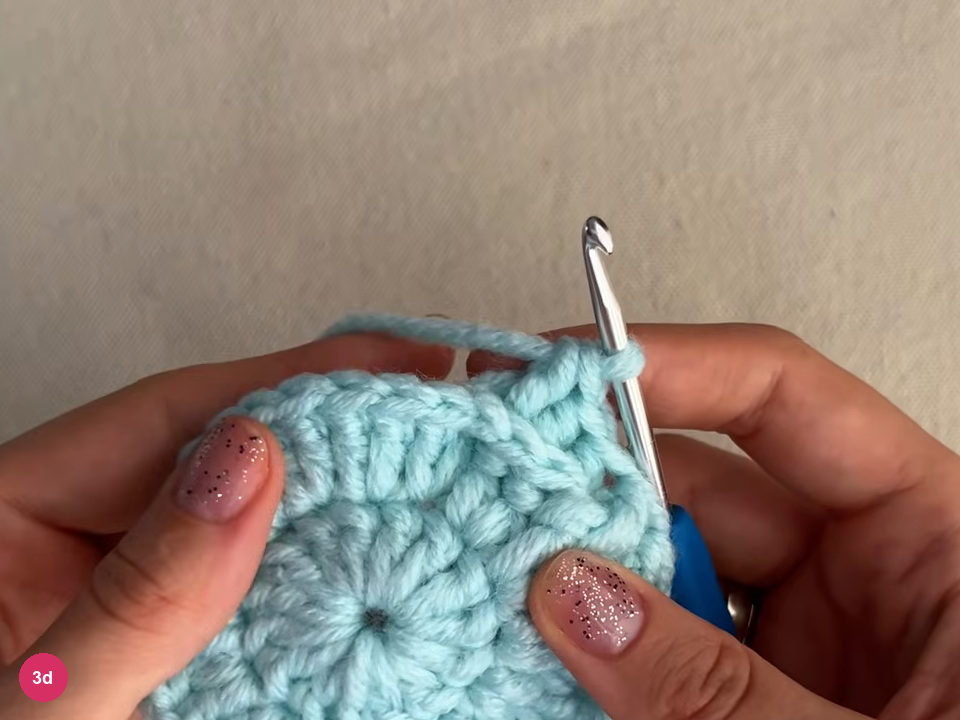
Step 3d: three raised stitches follow. Work 9 recessed stitches next, each one made behind the post of the stitch below.
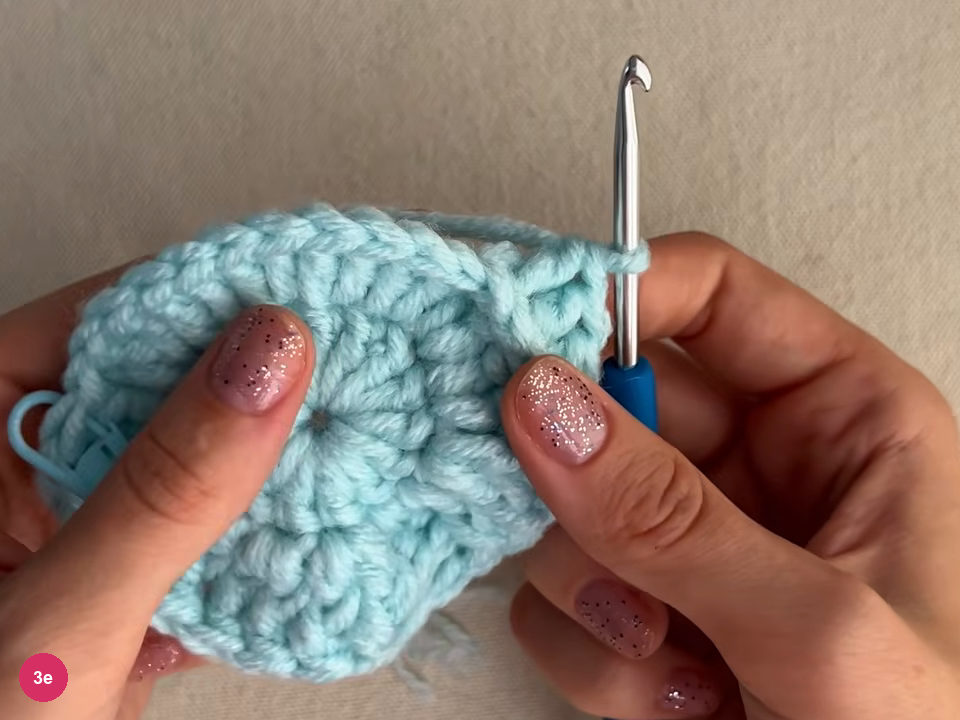
Step 3e: nine recessed stitches come next. Finish the round with 3 raised and 3 recessed stitches; the marker in the first stitch shows how far you have come.
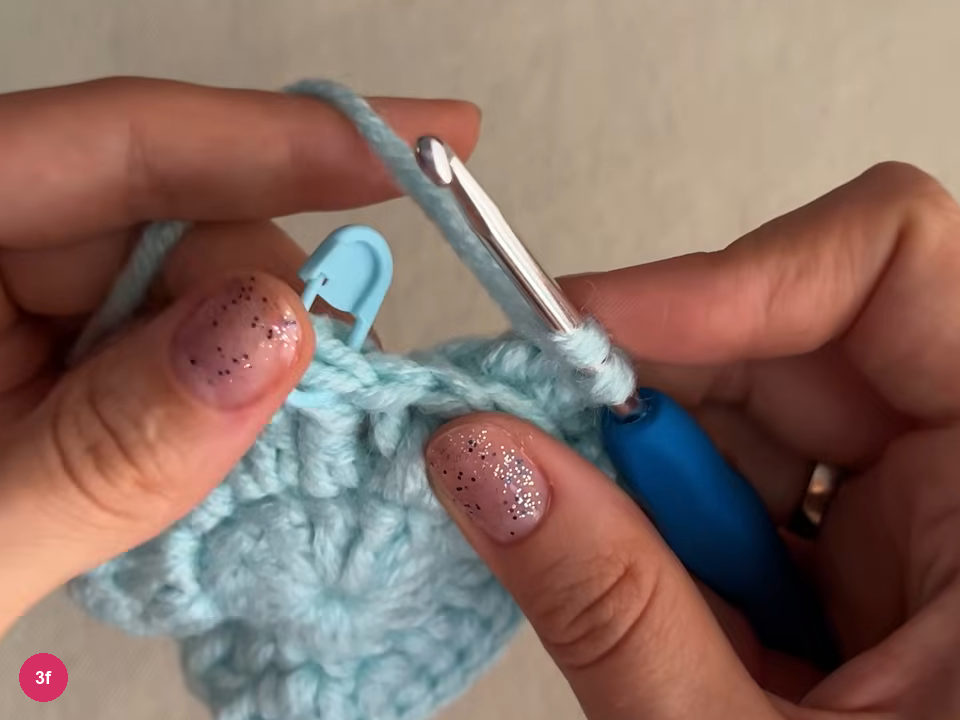
Step 3f: the marker shows the first stitch as the round closes. Close the round with a sl st at the marker, then take the marker out. The 30-stitch repeat of 9, 3, 3, 9, 3, 3 is now complete.
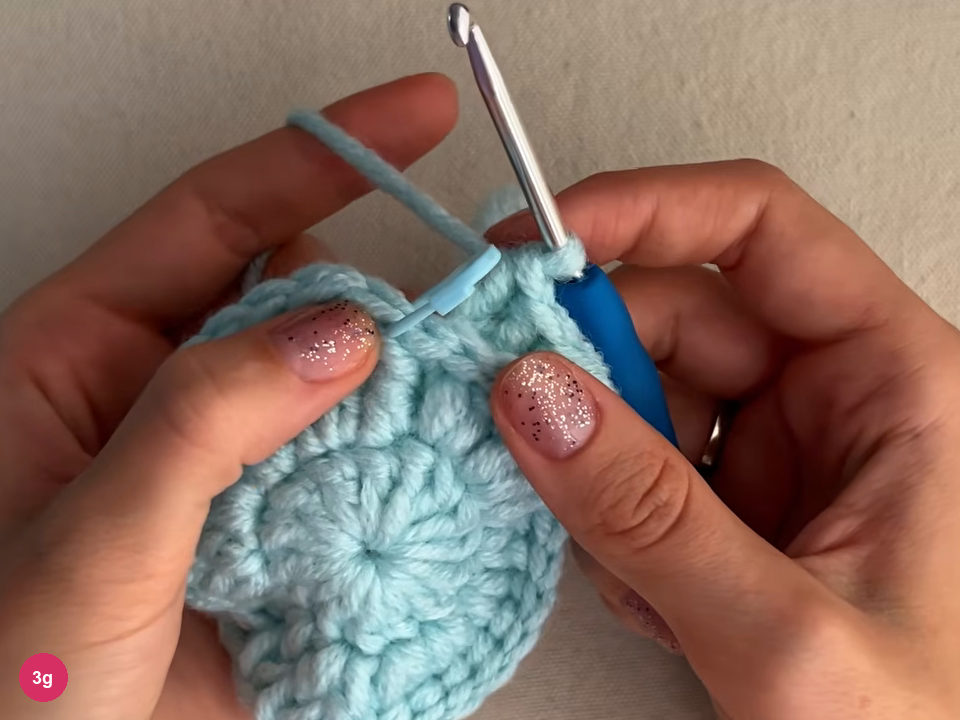
Step 3g: the marker shows where the round closes. -
Repeat the relief rounds
- 15 pattern rounds
- 17 rounds counting from the ring
Start each new round at once, without a turning chain, and work every stitch the same way as the one below it: raised around raised, recessed around recessed.
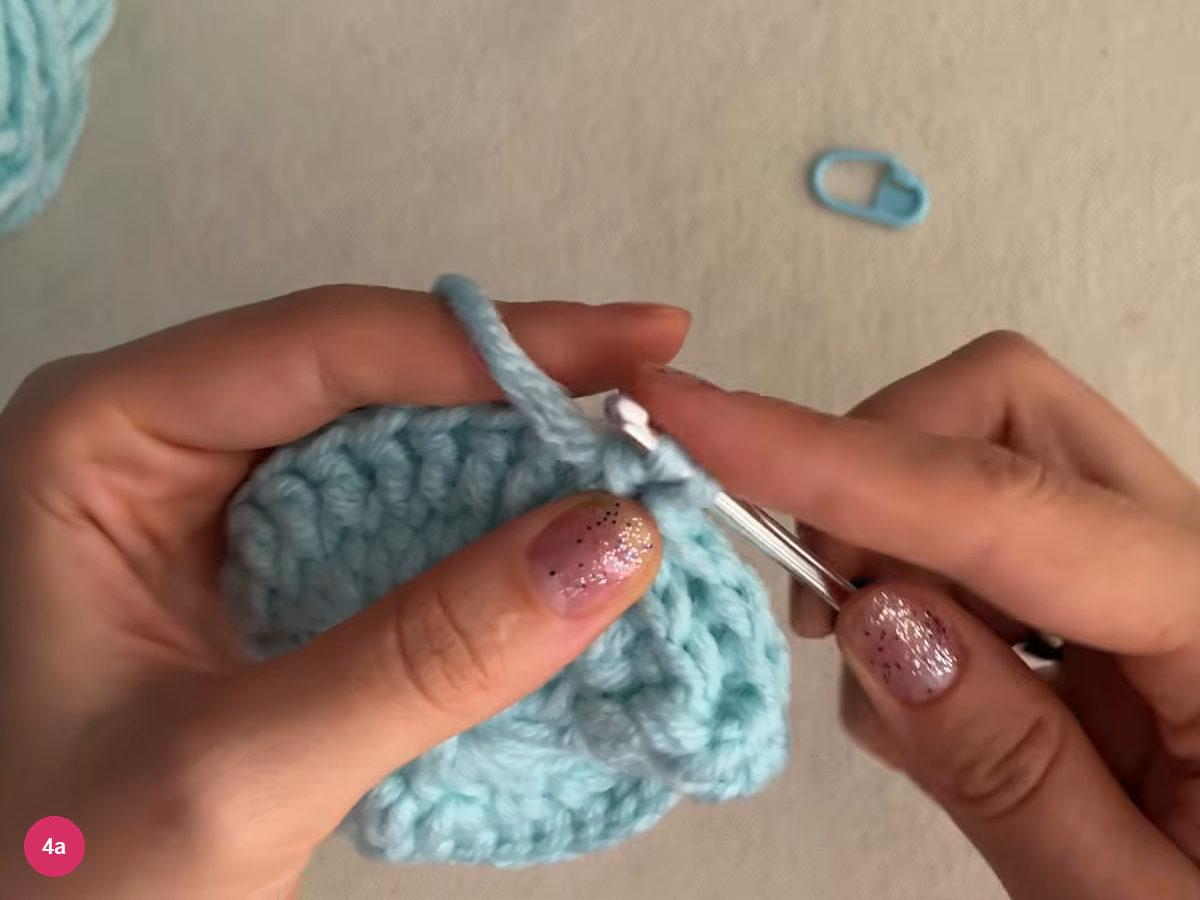
Step 4a: the next round starts straight away. Repeat until you have 15 pattern rounds. The piece cups into a toe, and the raised stitches line up into ribs along the sole and sides.
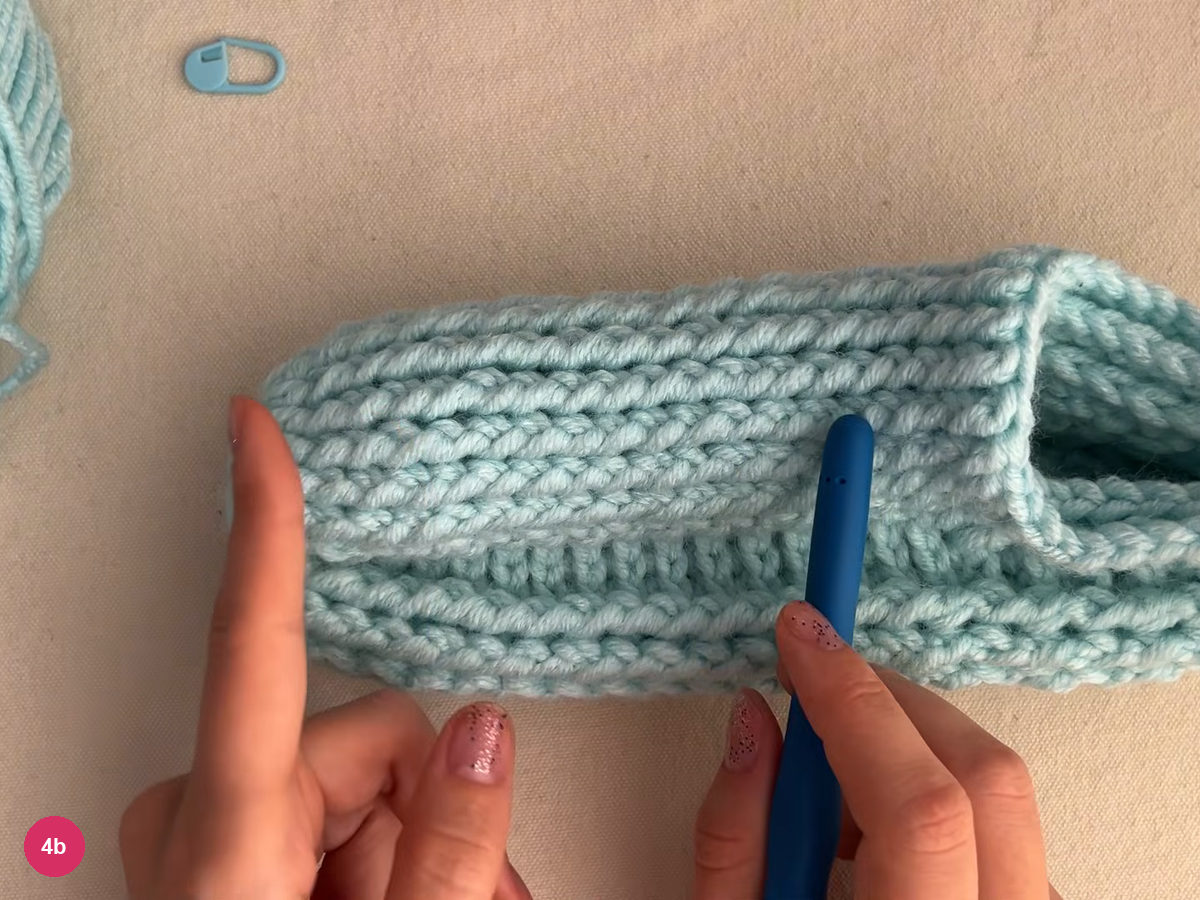
Step 4b: ribs line up along the sole and sides. -
Work the heel rows
- Heel · 8 rows
- Ch 2 and turn each row
- Toe section left unworked
Ch 2 and turn. Work back along the pattern for the heel part only and leave the toe part unworked. The ch 2 counts as the first stitch, so start in the 2nd stitch.
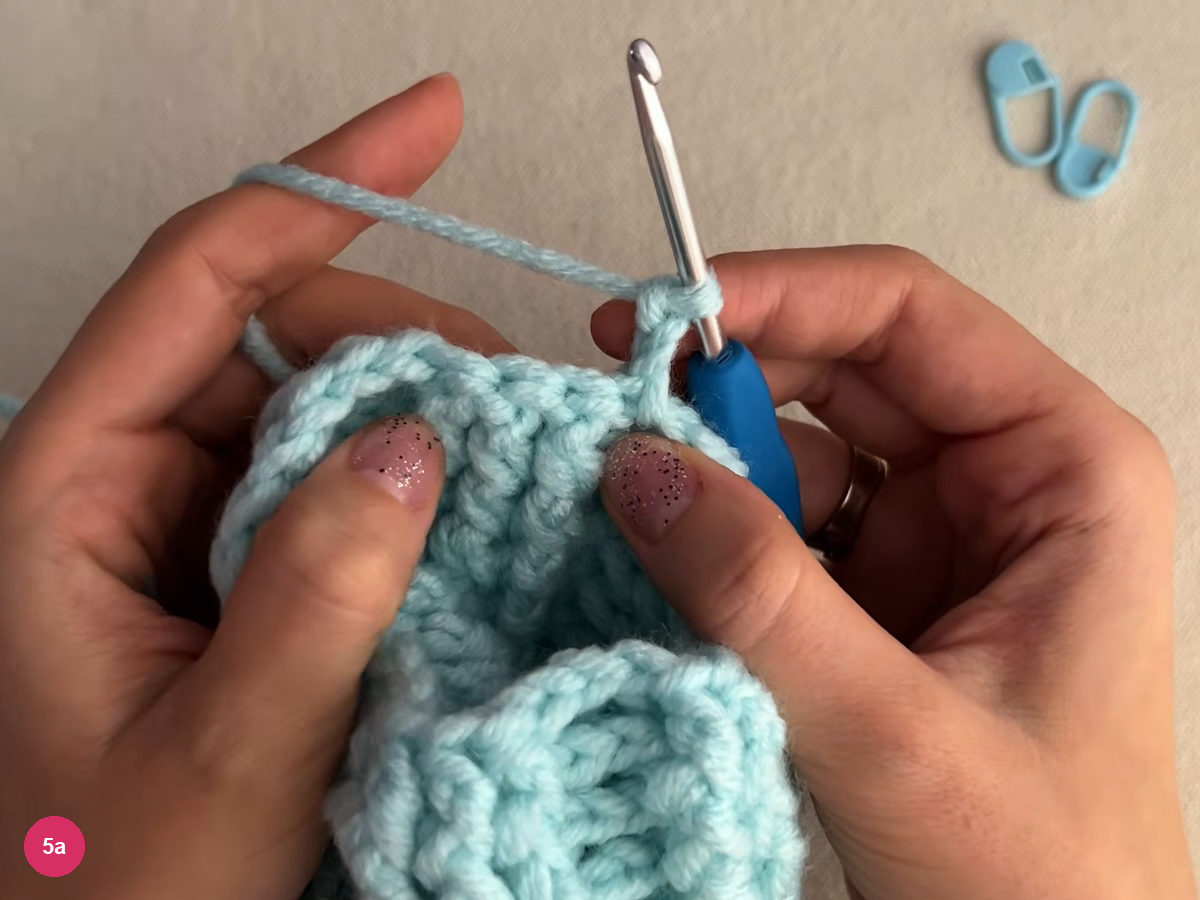
Step 5a: the heel rows start with ch 2 and a turn. At the end of each row ch 2 and turn. Follow the raised and recessed pattern as it shows on each side, so the ribs continue.
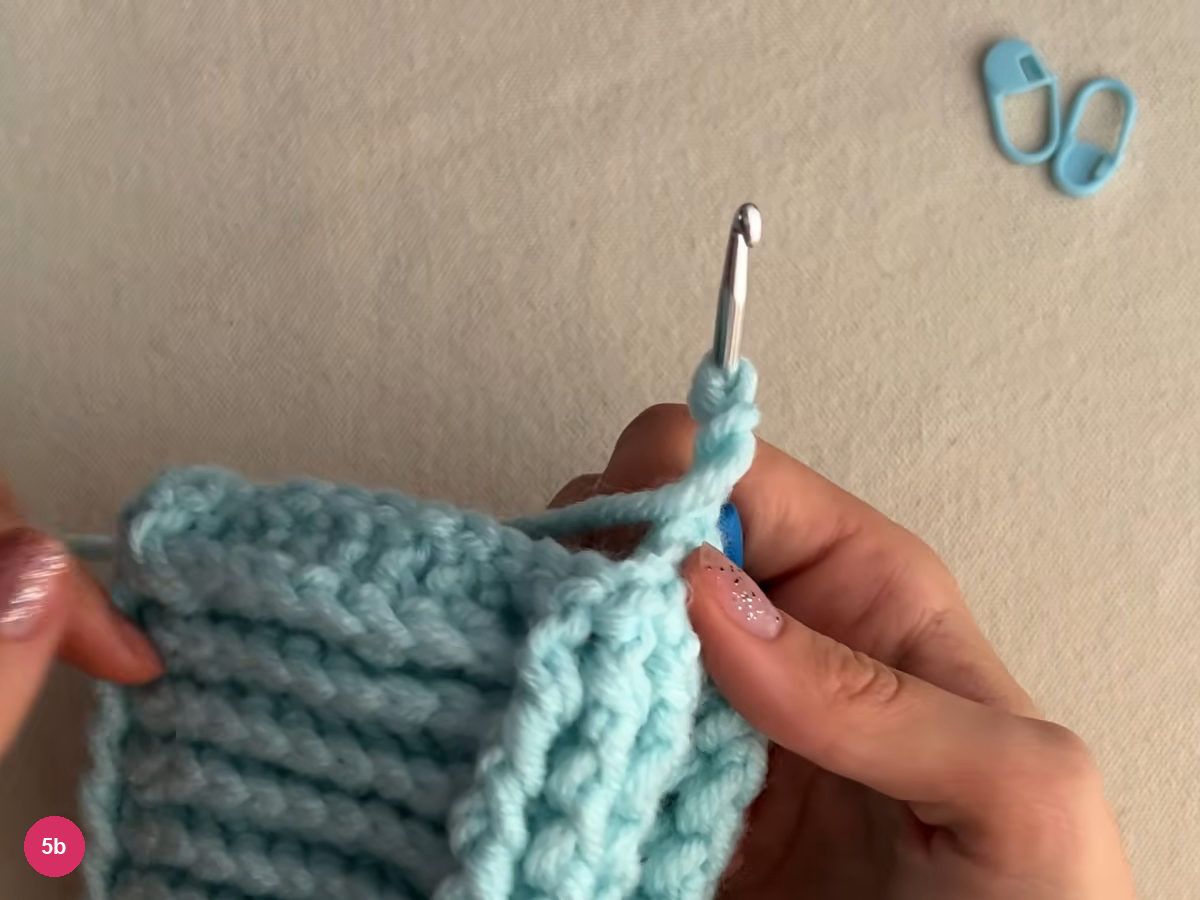
Step 5b: the ribs continue as the rows turn. Stop at 8 heel rows. With the 15 pattern rounds this fits EU 37-38; for a longer foot, add rounds and rows, trying the toe part on as you go.
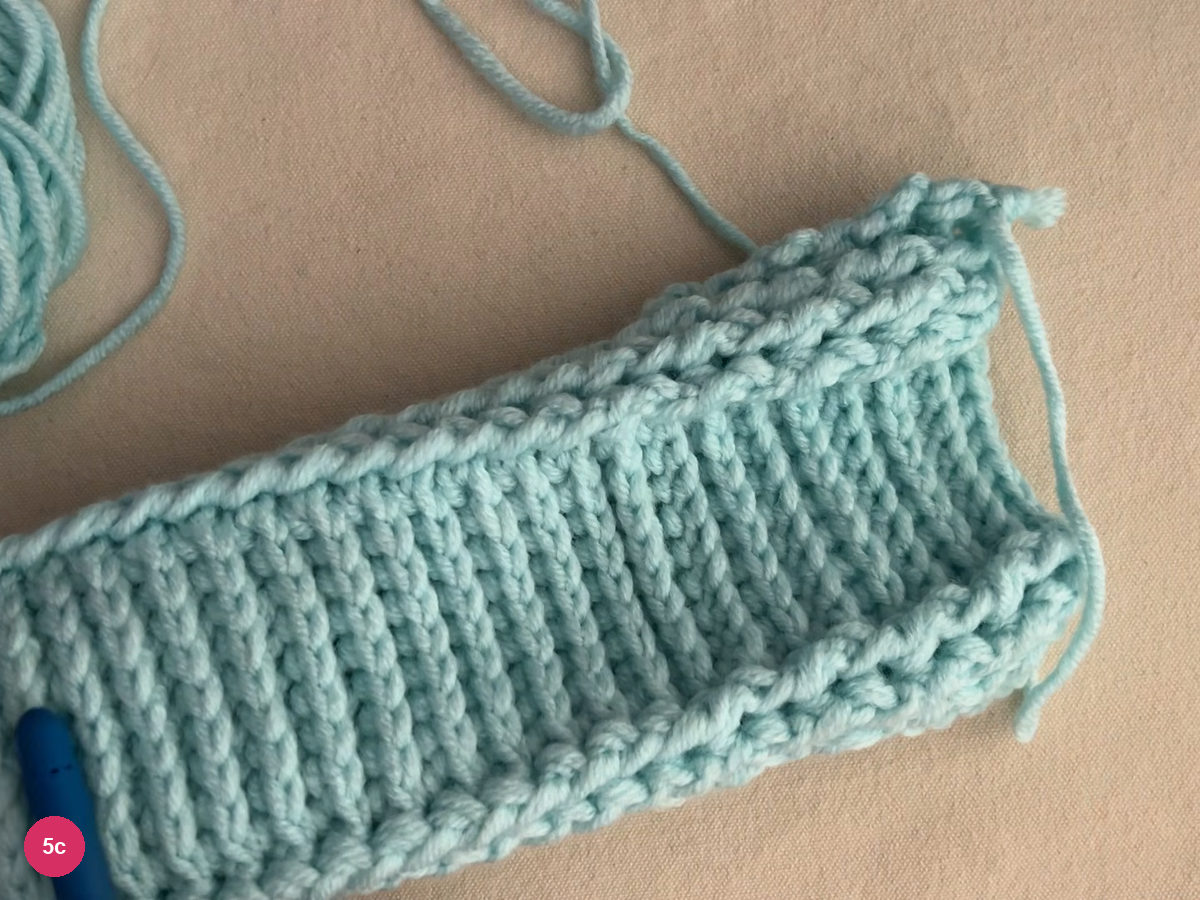
Step 5c: the heel part has 8 rows. -
Join the heel
With the right side facing you, fold the two heel parts back toward the sole and join them with sl st, taking the hook under the inner bars of both edges.
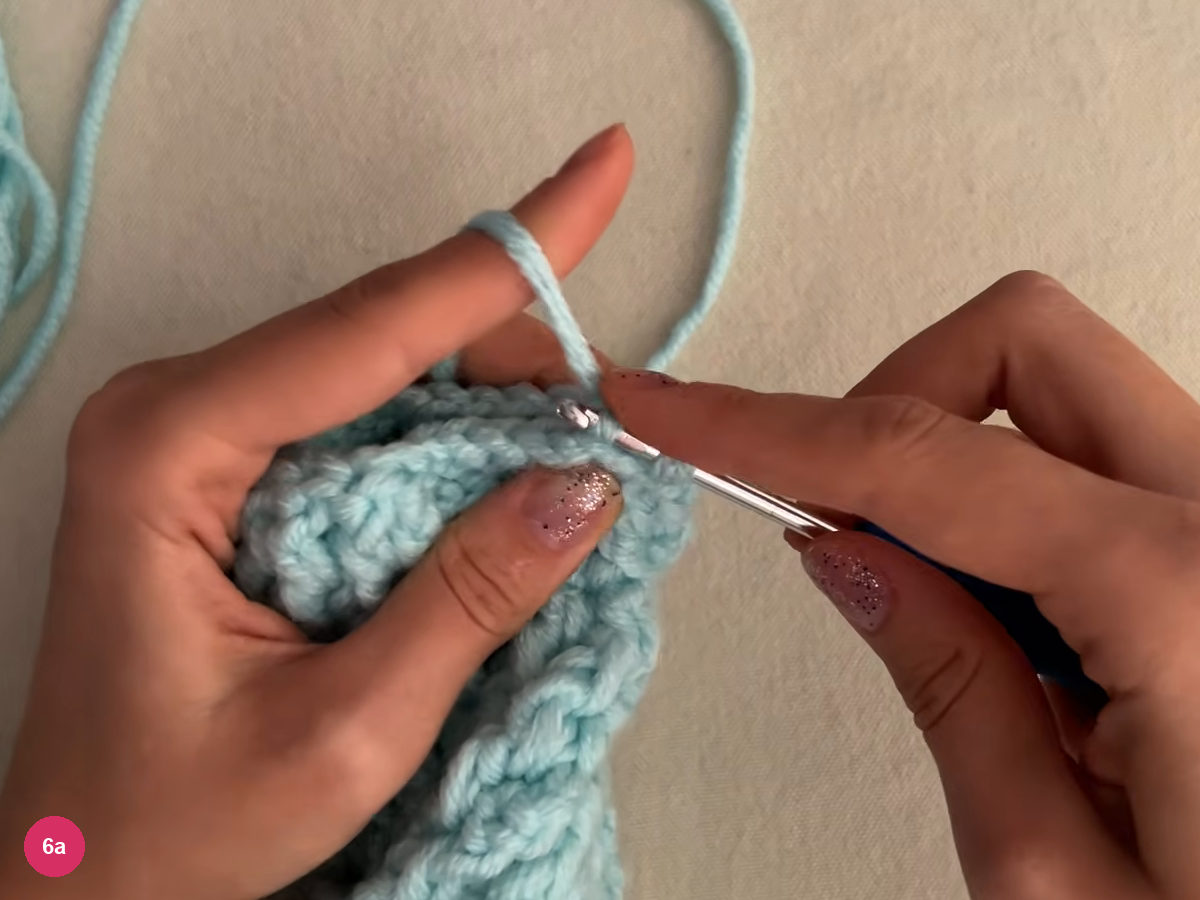
Step 6a: the folded edges are joined with sl st. Fasten off when the heel is closed and turn the slipper right side out.
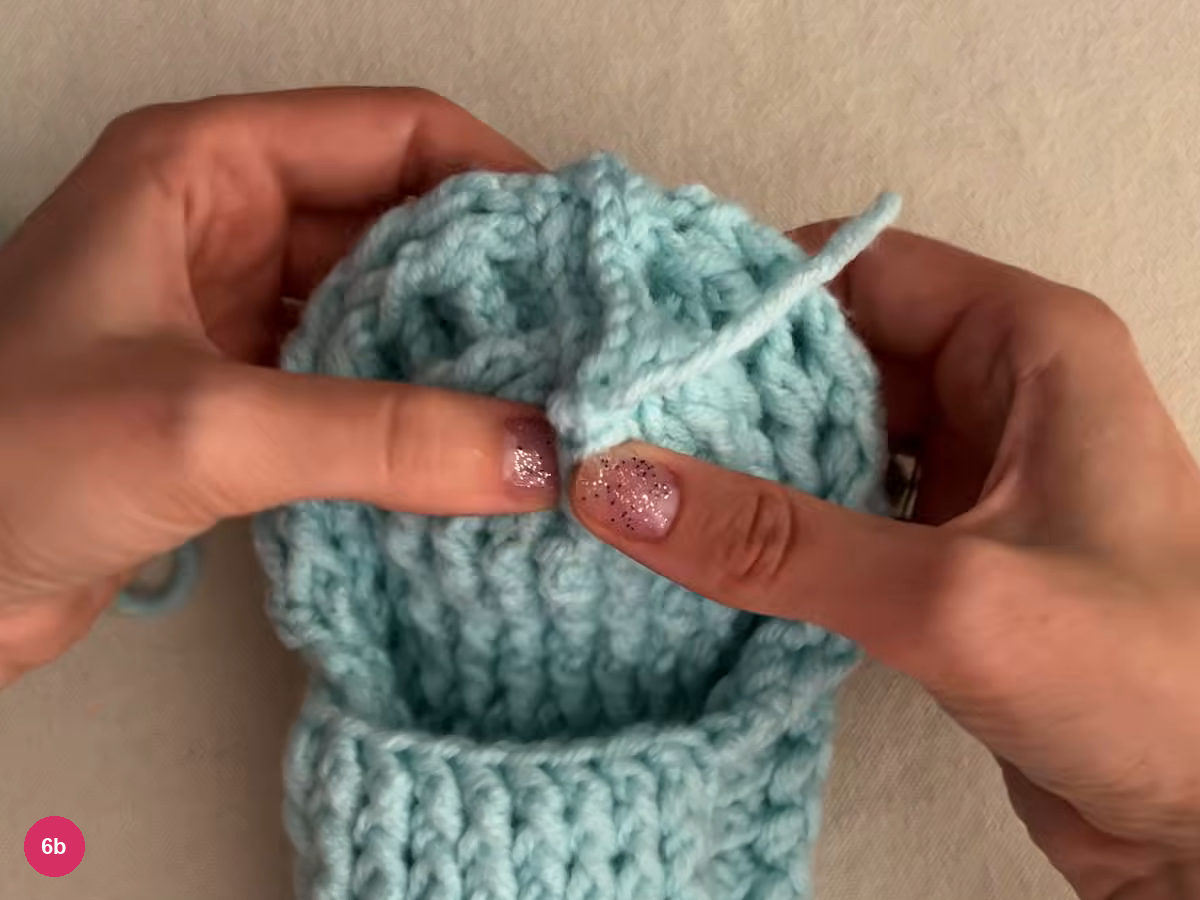
Step 6b: the heel seam is closed. -
Work the edge rows
- Edge rows · 3
- Raised stitches only
Join the yarn at a raised stitch near the back of the heel, ch 2, and work dc into the raised stitches only. Leave the recessed stitches unworked.
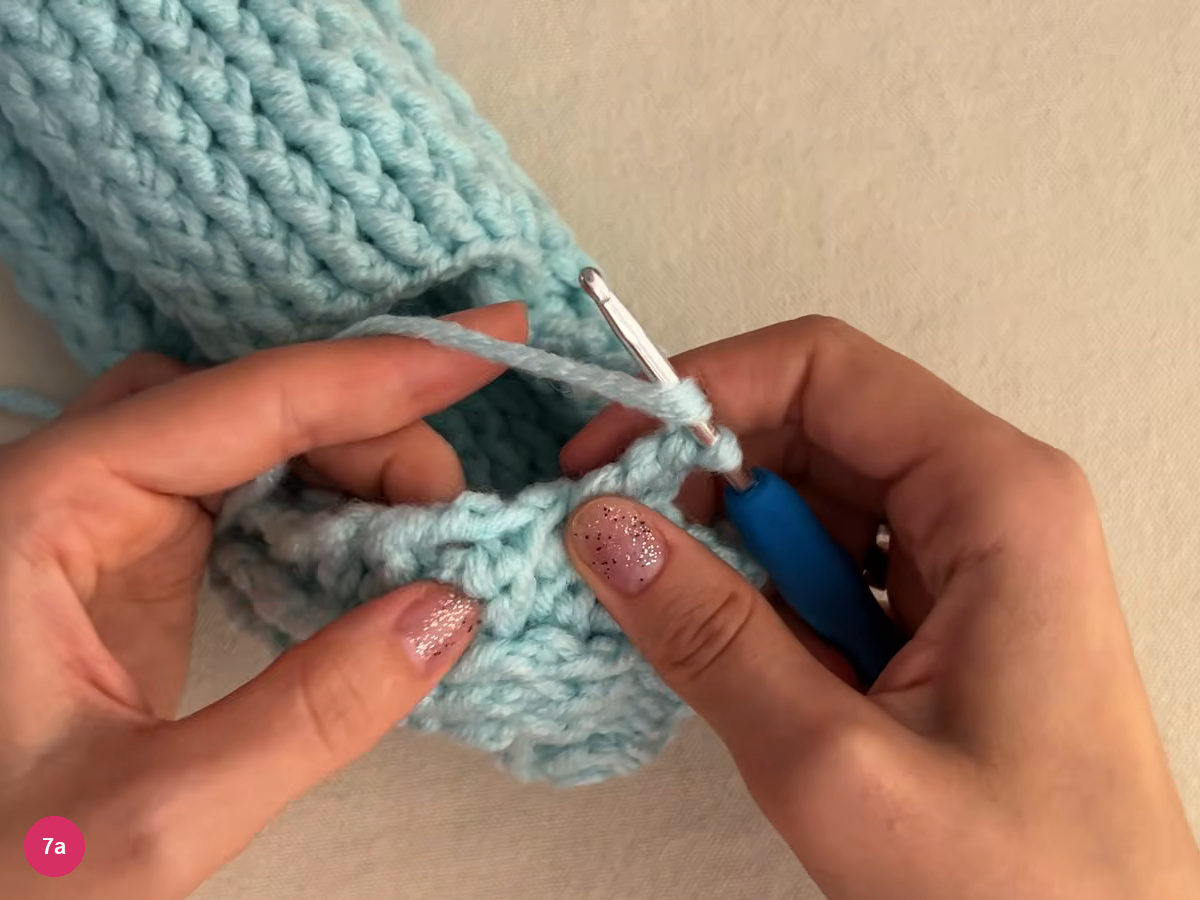
Step 7a: the edge round begins with ch 2 at a raised stitch. Where the heel part meets the body, work one dc through both parts at the corner.
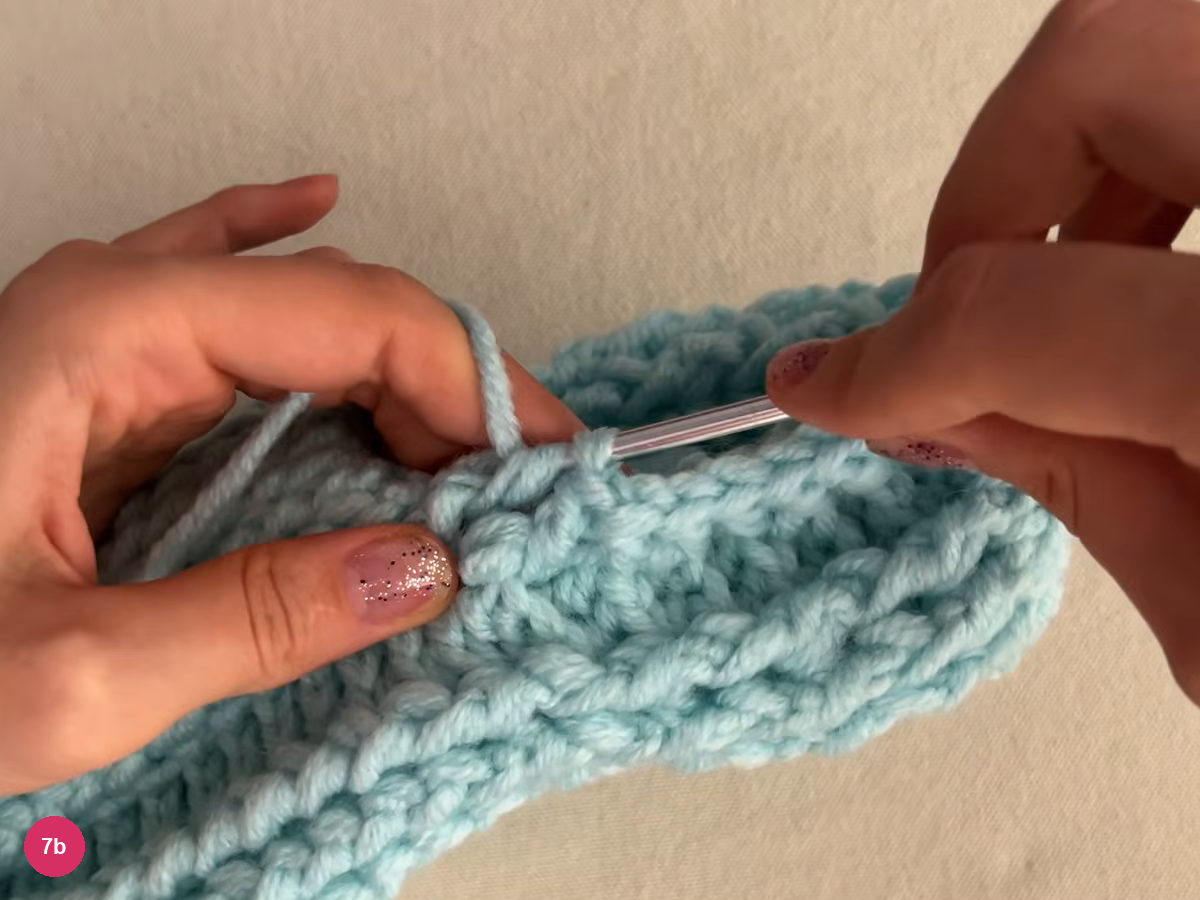
Step 7b: one stitch covers both parts at the corner. Join each round with a sl st at the heel, ch 2 and carry on. Work 3 edge rounds in all; they build the sides up so the slipper stays on the foot.
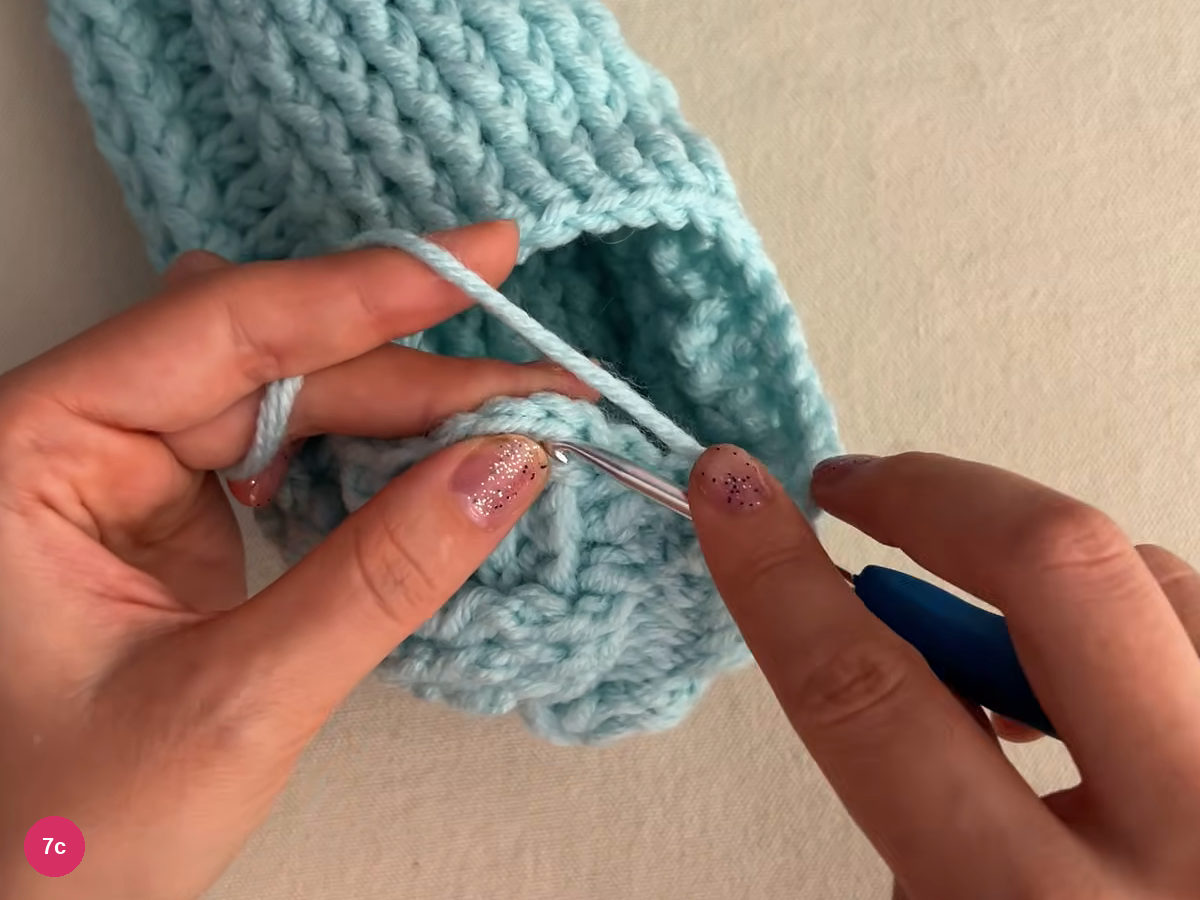
Step 7c: each edge round is joined and the next one begins. Finish with an invisible join: pass the yarn through the previous stitch, under its two bars, so the end sits level with the row, then secure the tail and cut it.
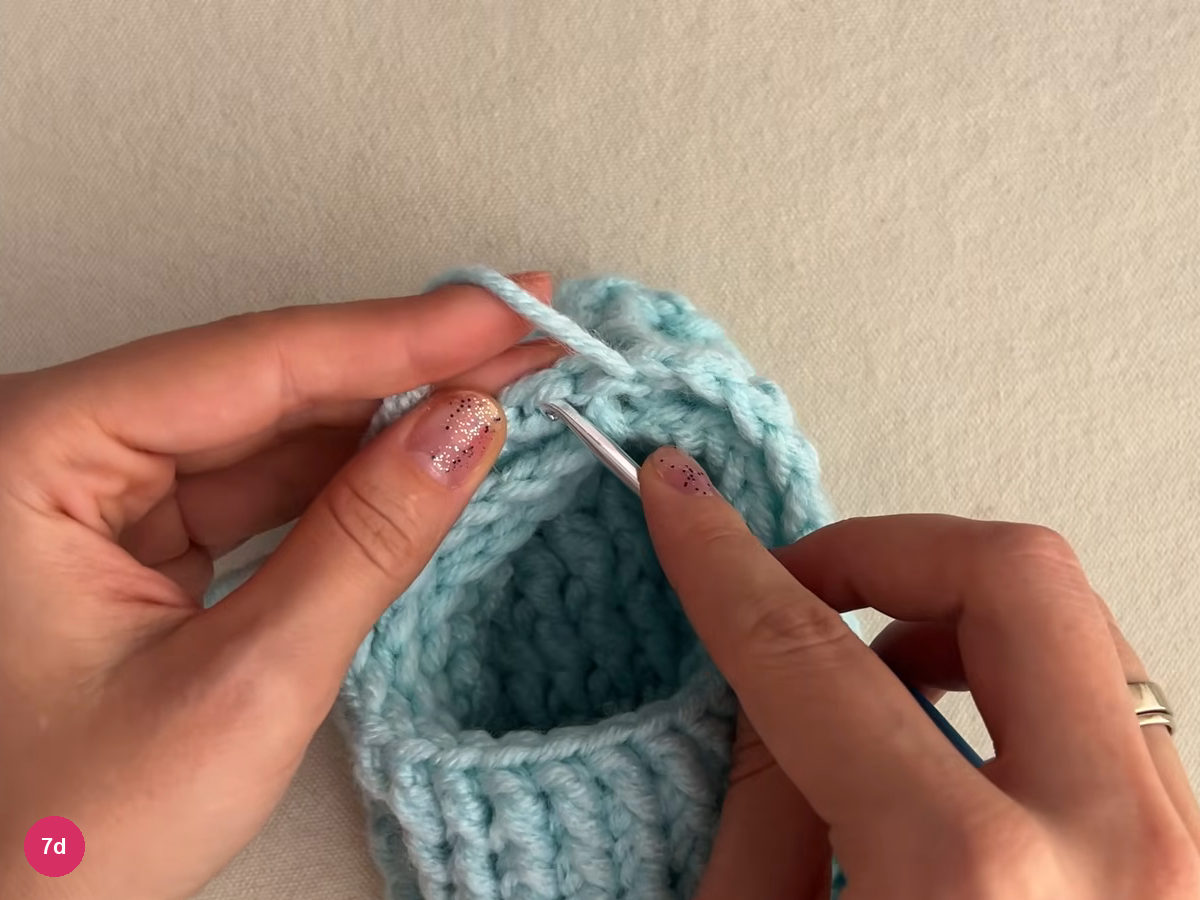
Step 7d: the last stitch is closed level with the round. -
Check the finished slipper
Lay the finished slipper on its side. Ribs run along the sole and the sides, and the edge rows make a low collar. The demonstrated slipper is 24 cm long and 10.5 cm high.
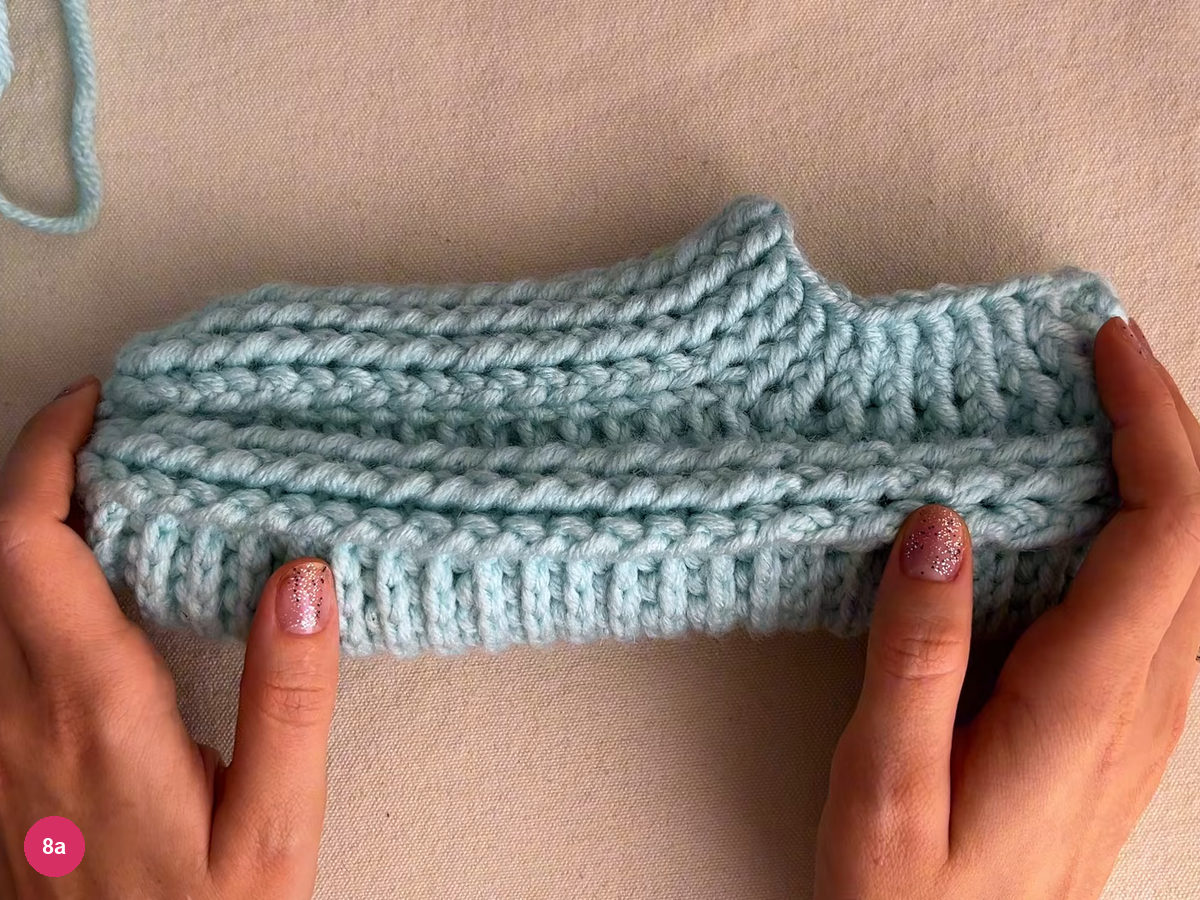
Step 8a: ribs run along the sole and sides. Try the slipper on. In the demonstration the pair is worn on a tiled floor, where the round toe and the ribbed sides show; see the note on grip below before you wear yours on smooth floors.
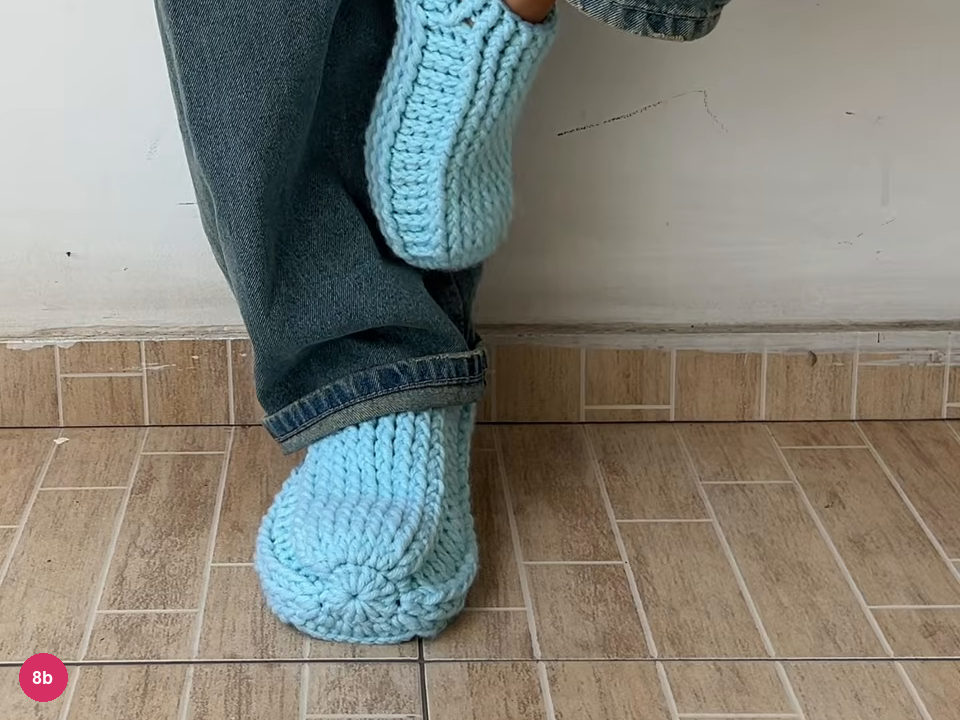
Step 8b: the slipper on a tiled floor.
Safety note: grip on smooth floors
The video does not show an anti-slip sole. Thick crochet fabric can slide on tile, laminate or polished wood, so add a non-slip backing or grip dots to the sole before wearing these slippers on smooth floors, and keep stairs for shoes with grip.
Troubleshooting the slippers
The slipper is too short or too long: change the number of pattern rounds and heel rows. The creator suggests trying the toe part on before the heel, then adding more rows if the foot needs them.
The ribs look uneven: recount the 30 stitches of the first pattern round. Every raised stitch must sit around a raised stitch and every recessed stitch around a recessed one.
The hook catches while making recessed stitches: keep the work as it is and insert the hook from behind rather than flipping the piece over.
The slipper slips off at the heel: the edge rows add height at the heel so the slipper stays on the foot. Work all three edge rounds, and try the slipper on before closing the last one.
Final check
- 30 stitches in each pattern round, in groups of 9, 3, 3, 9, 3, 3.
- 15 pattern rounds and 8 heel rows for EU 37-38.
- Heel folded and joined with slip stitches; the seam sits at the back.
- Three edge rounds worked, with the raised stitches only.
- Tails hidden inside and the pair tried on.
- Non-slip backing added before wearing on smooth floors.
Looking for another cold-weather project in thick yarn? The crochet beanie and the crochet scarf make a matching set, and the crochet poncho covers the shoulders when the house is cold.
Inspired by GYSEVAKAT – crochet by Kat’s video tutorial.

Save this pattern for later
Pin it to one of your boards so it’s ready when you have a free evening and the right yarn.