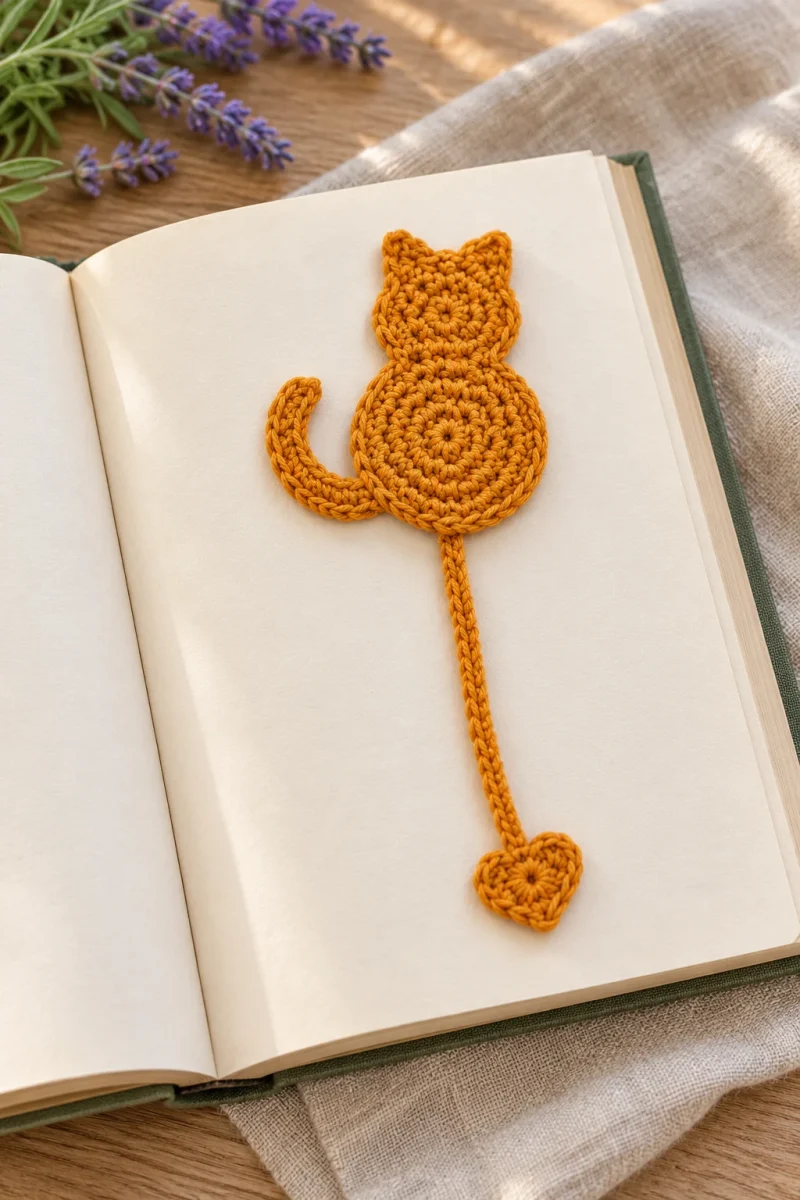
This crochet cat bookmark pairs a small flat cat silhouette with a long cord and a tiny heart. The cat has a round body, a simple head with pointed ears and a short curled tail. The separate heart-ended cord runs between the pages, allowing the cat to stay visible beyond the book’s edge.
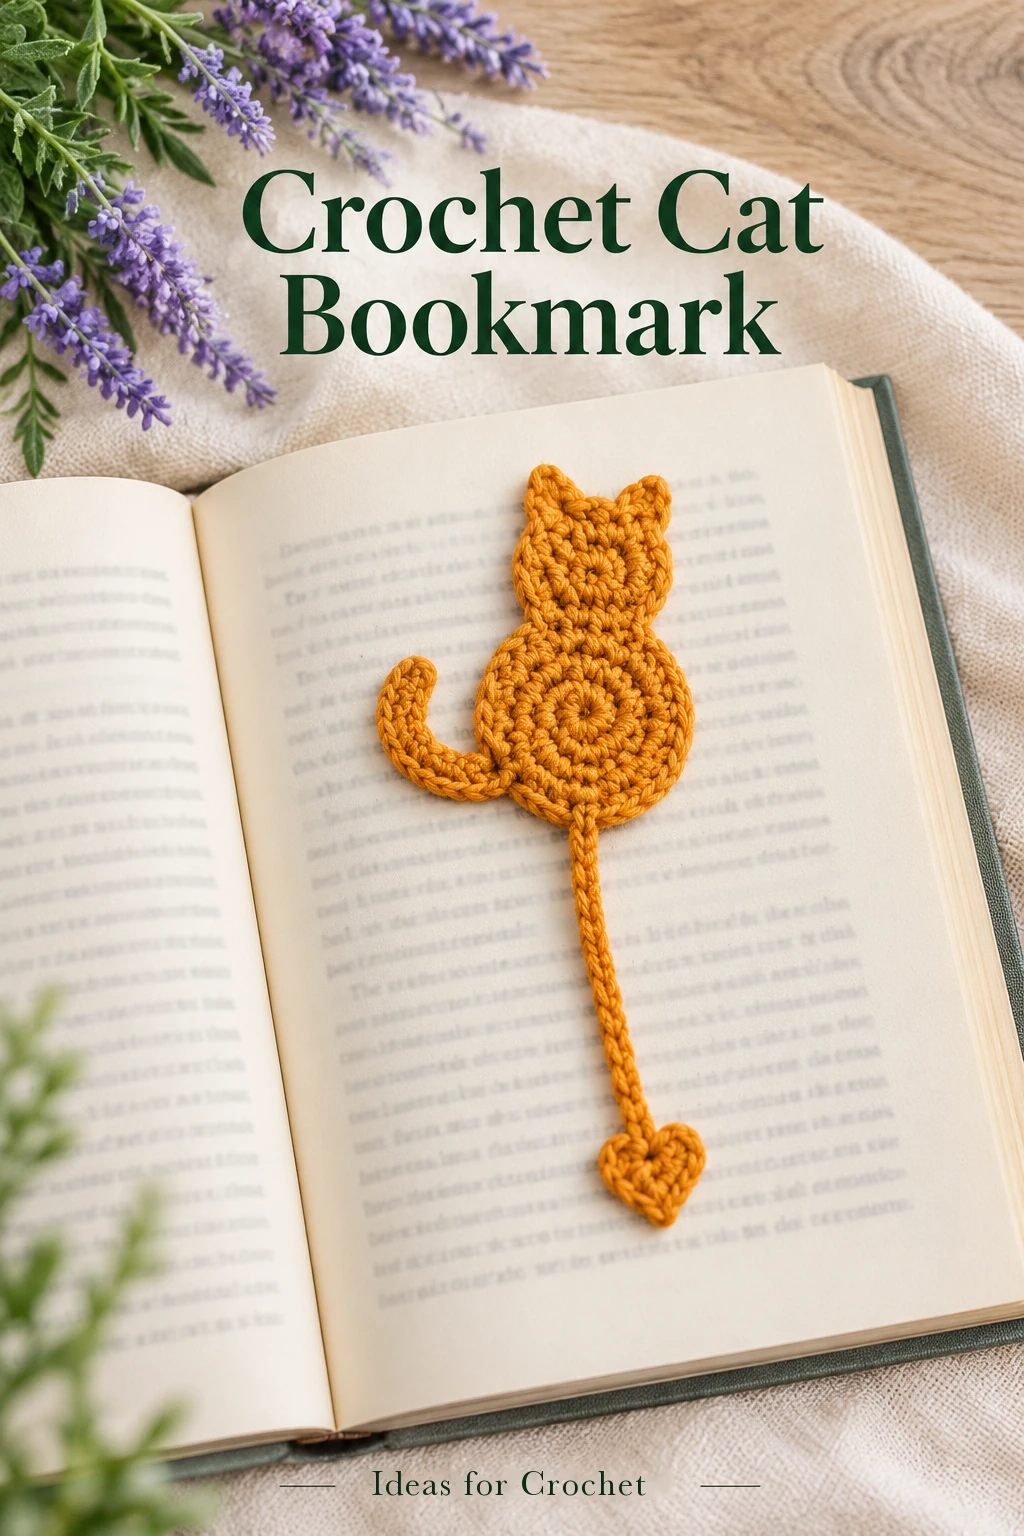
The body and details are worked in the same yarn or fine cord, so the piece has a quiet, graphic outline. There is no face to embroider and no stuffing to add. A pumpkin-colored version suits the shape especially well, but the same construction also looks lovely in cream or soft mint.
Materials and stitch guide
- 2 mm cord or a suitable smooth yarn; the creator uses pumpkin-colored cord.
- 3.5 mm crochet hook, plus a smaller hook for hiding the ends if useful.
- Scissors and a yarn needle.
US terms: ch = chain, sc = single crochet, hdc = half double crochet, dc = double crochet, sl st = slip stitch, inc = two sc in one stitch and dec = sc2tog. The circular body and small head use sc. The little heart uses dc and hdc. When joining the body rounds with the creator’s loop-transfer method, the imitation joining position counts as a stitch; do not add it on top of an already complete round count.
Make the cat silhouette
-
Start the six-stitch body center
Make an adjustable ring. The demonstration works five sc, then forms the sixth stitch-top position with its concealed loop-transfer join. Tighten the center and check that six positions can be counted. For that join, enlarge the working loop, draw it from the front to the back beneath the first stitch’s top loops, then bring the working yarn forward through the indicated loops to form the missing braid.
Use the embedded close-up to practice that transfer. Keep the imitation stitch the same width as its neighbors, and include it once when counting the next round.
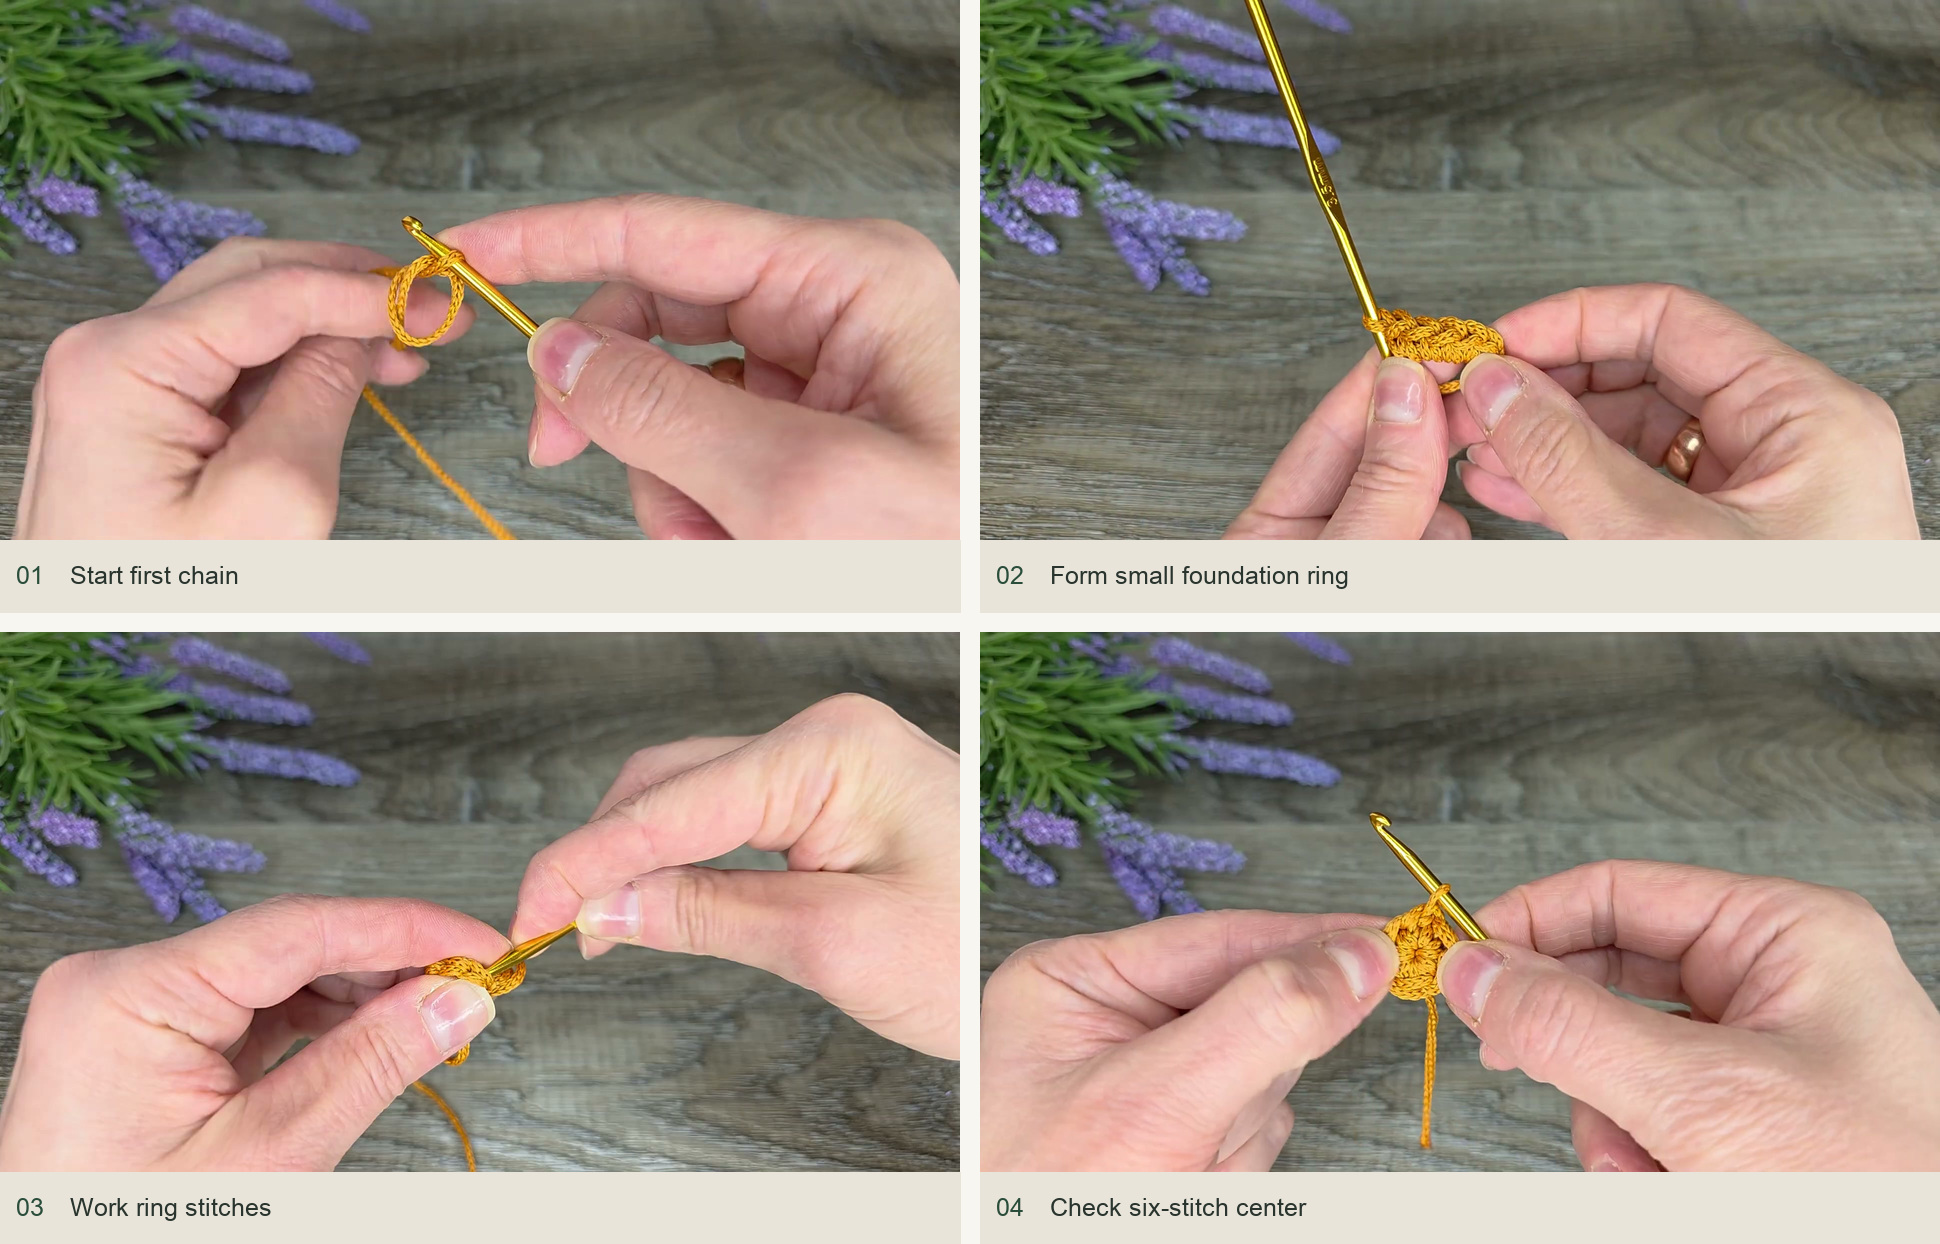
Source demonstration: Start first chain → Form small foundation ring → Work ring stitches → Check six-stitch center -
Increase to a twenty-four-stitch disk
Round 2 increases in every position for 12 sc. Round 3 alternates one sc with an increase for 18 sc. Round 4 alternates an increase with two ordinary sc for 24 sc, offsetting the increases from those of the preceding round. Join each round with the same concealed method. The disk should remain flat and circular. Crochet over the short starting end where convenient, then secure it fully during finishing.
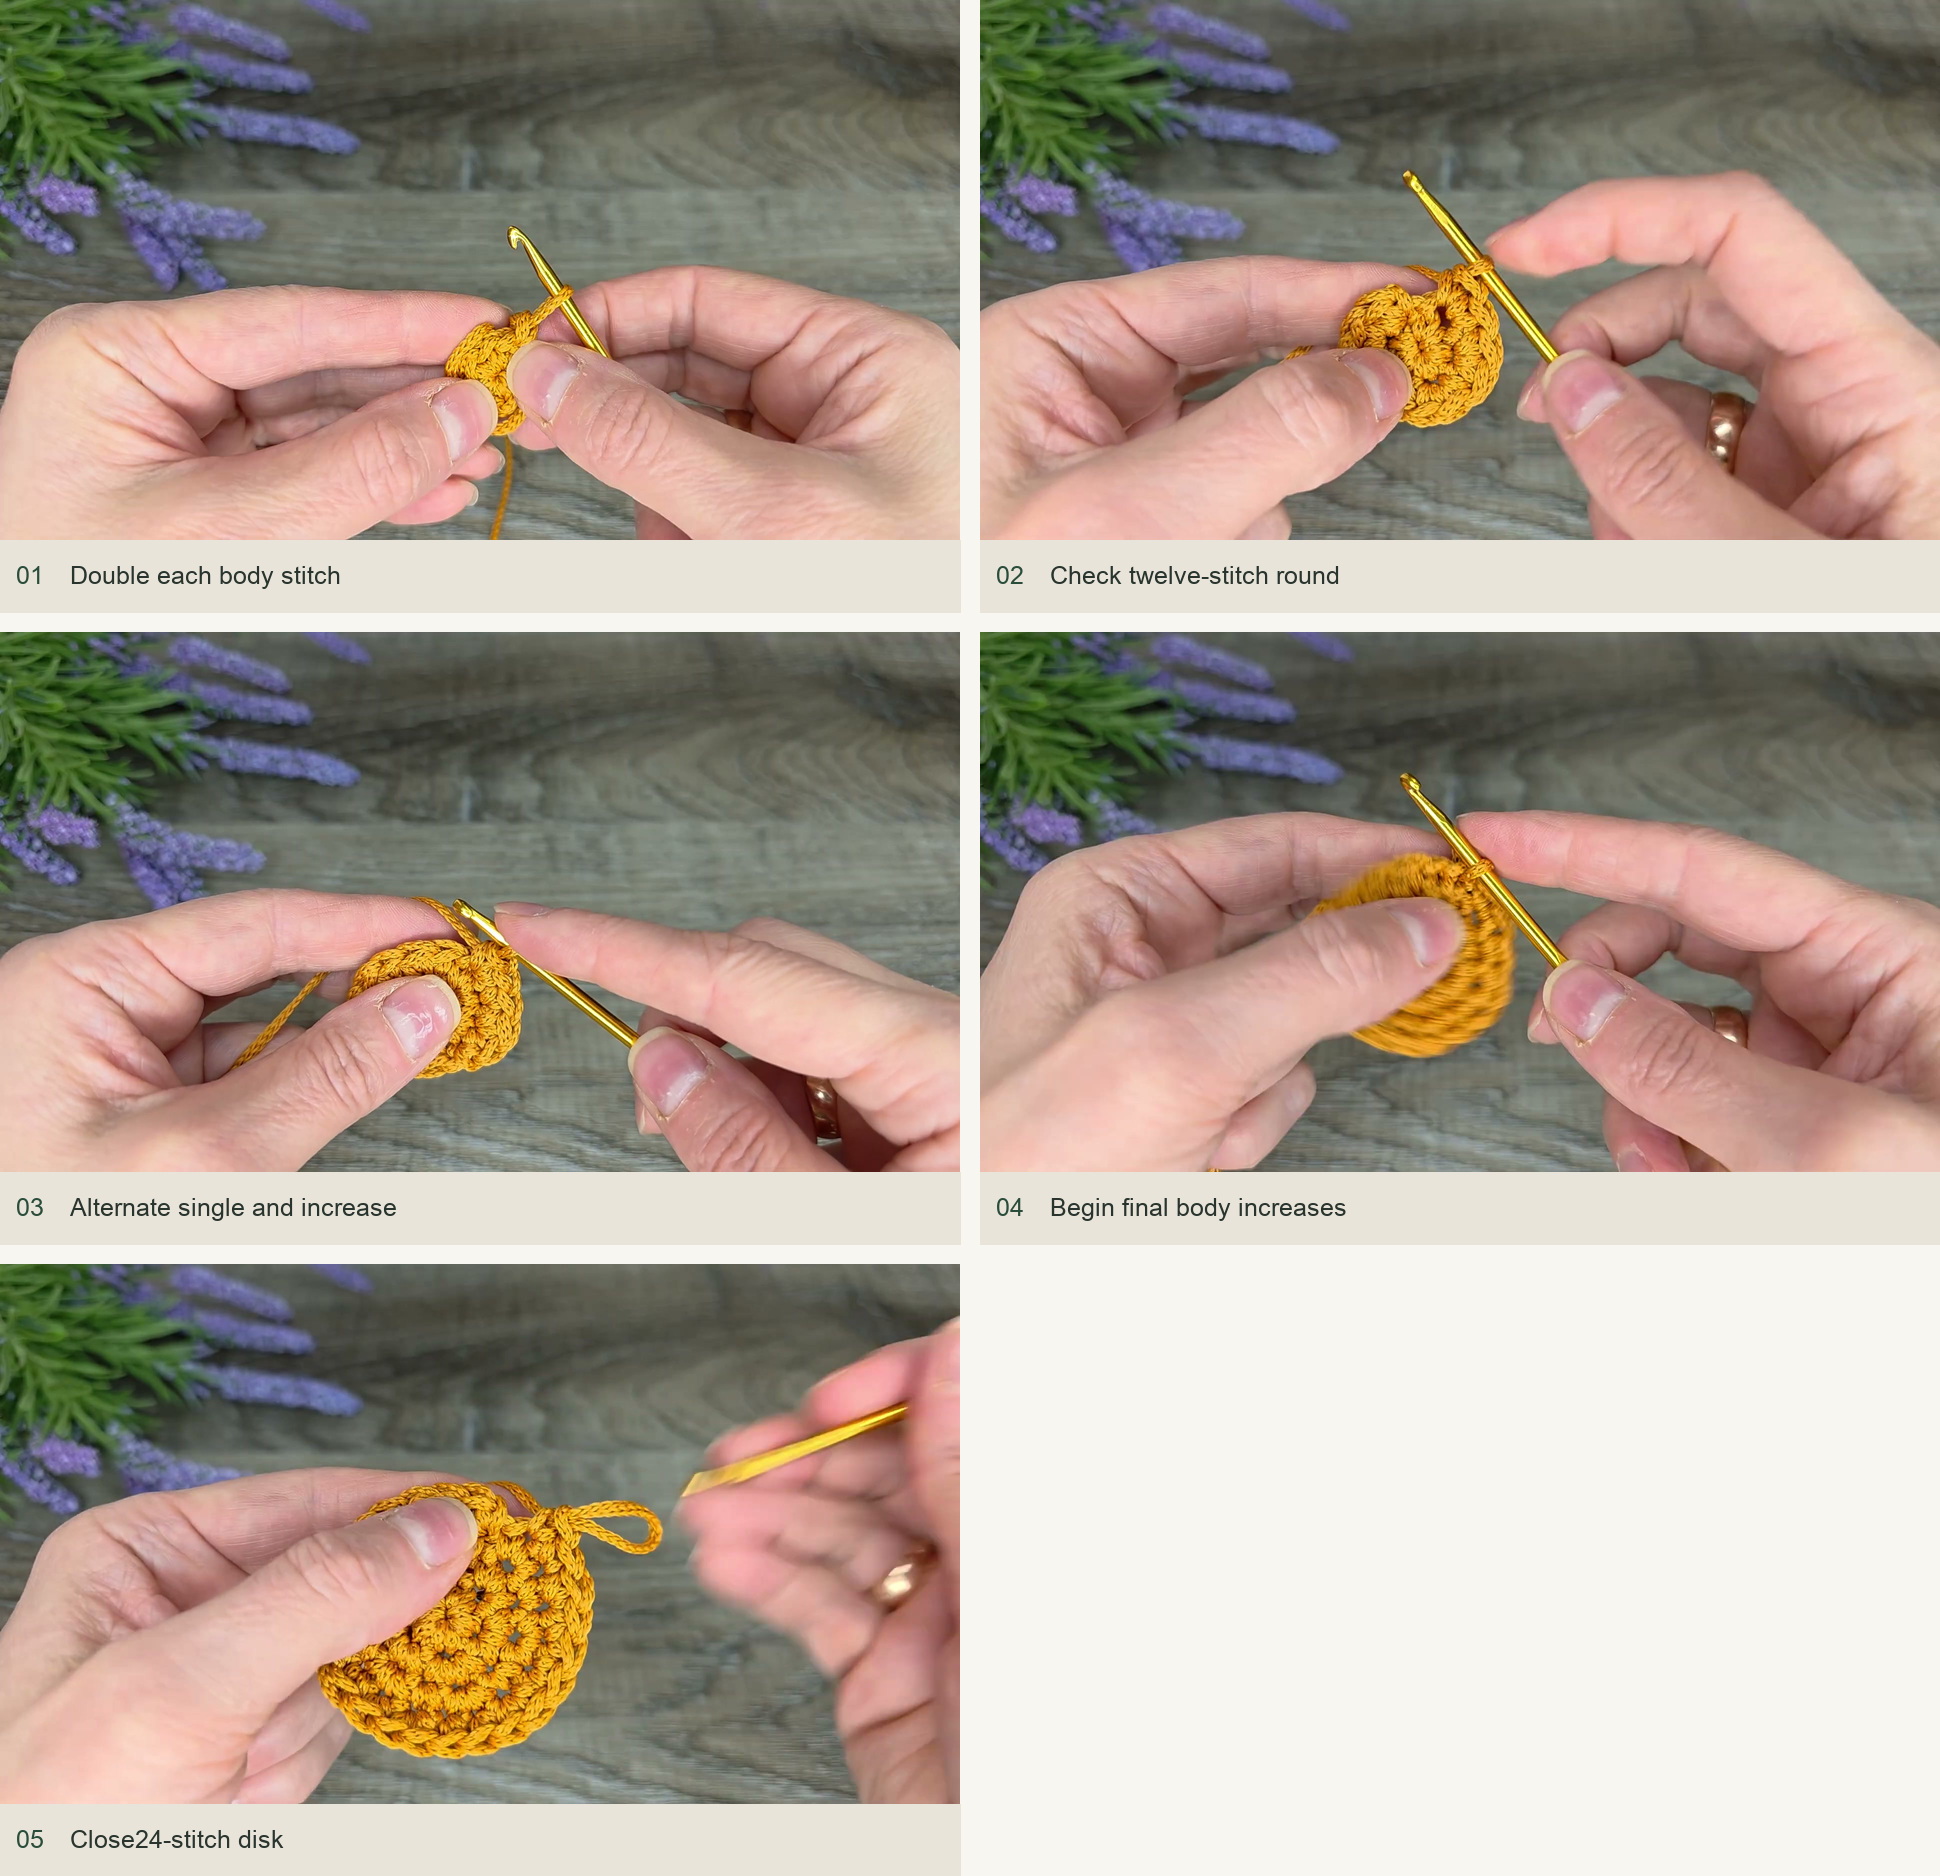
Source demonstration: Double each body stitch → Check twelve-stitch round → Alternate single and increase → Begin final body increases → Close24-stitch disk -
Shape the small head
From the body’s joining area, work the four sc positions that form the head’s first row. Ch 1 and turn. Increase in the first stitch, work one sc in each of the next two stitches and increase in the last: six sc. Ch 1 and turn. Dec across the first two stitches, work two sc and dec across the final pair: four sc. Ch 1, turn and work one sc in each of those four stitches.
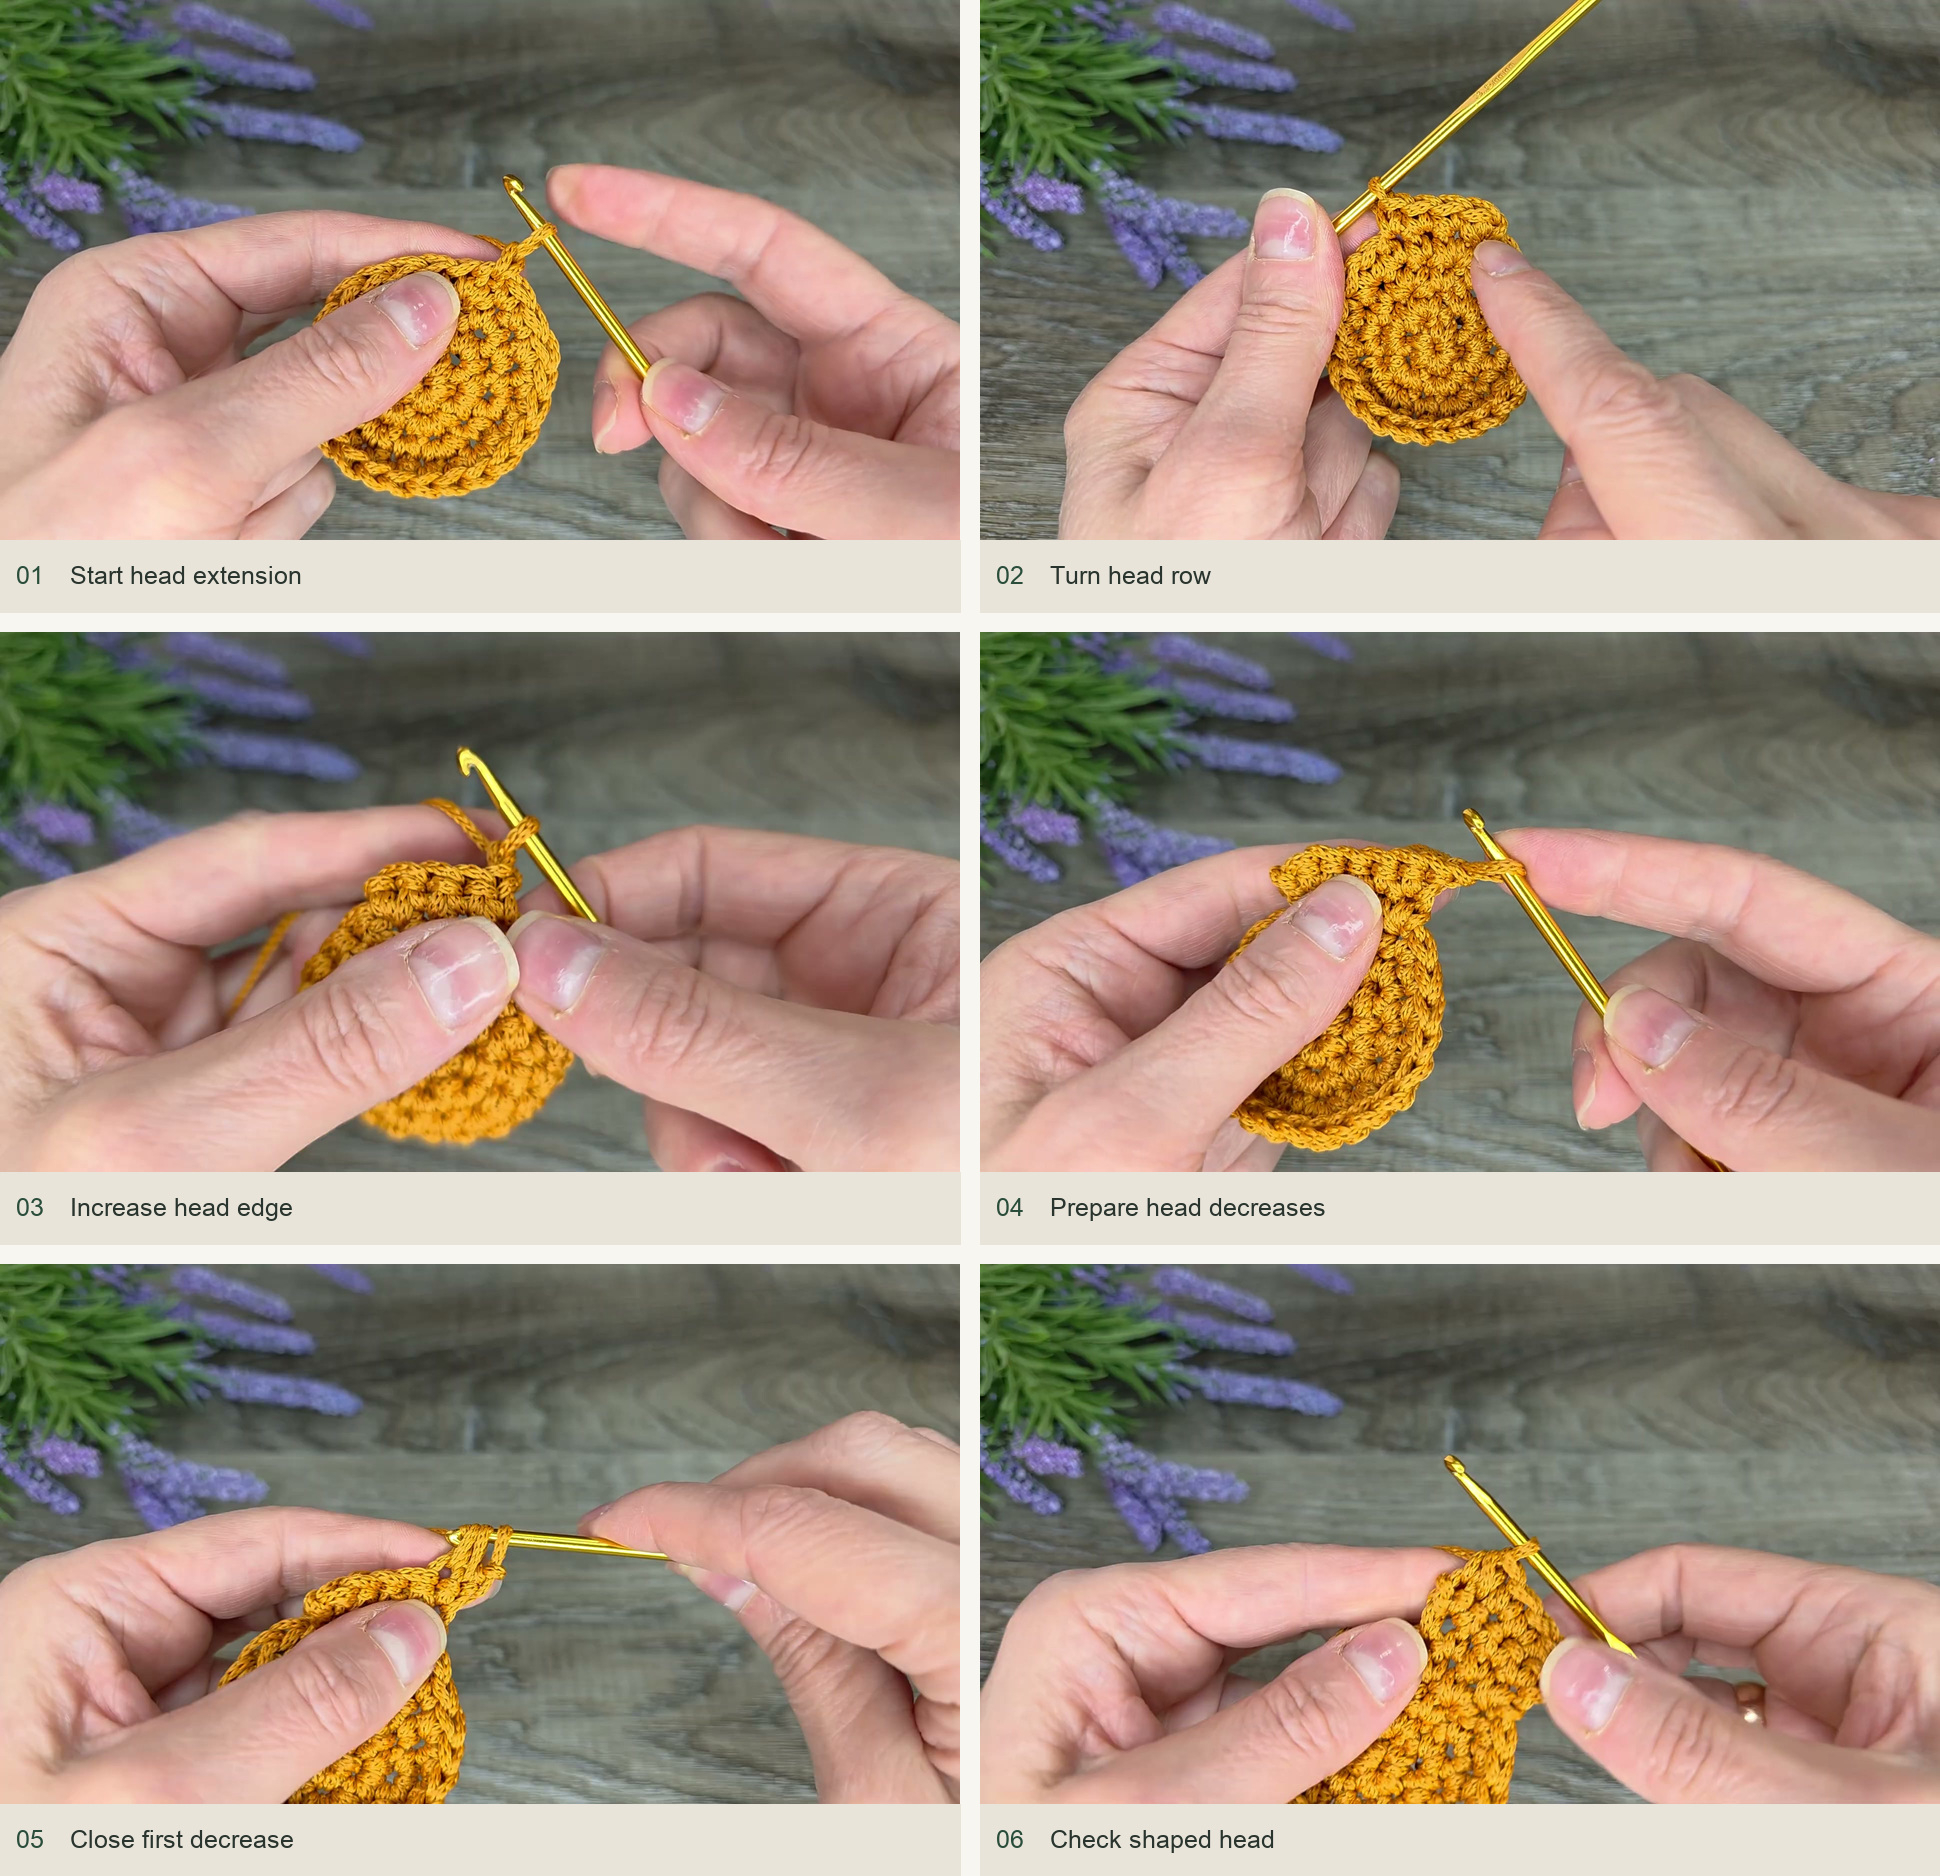
Source demonstration: Start head extension → Turn head row → Increase head edge → Prepare head decreases → Close first decrease → Check shaped head -
Add the two pointed ears
Ch 3 and turn. Work an sc in the first head stitch to form the first small ear point. Slip stitch in the next two stitches and in the final fourth stitch. From that final position, ch 3 and work an sc back into the same position to make the second point. Both ears rise directly from the head edge; no separate pieces need sewing.
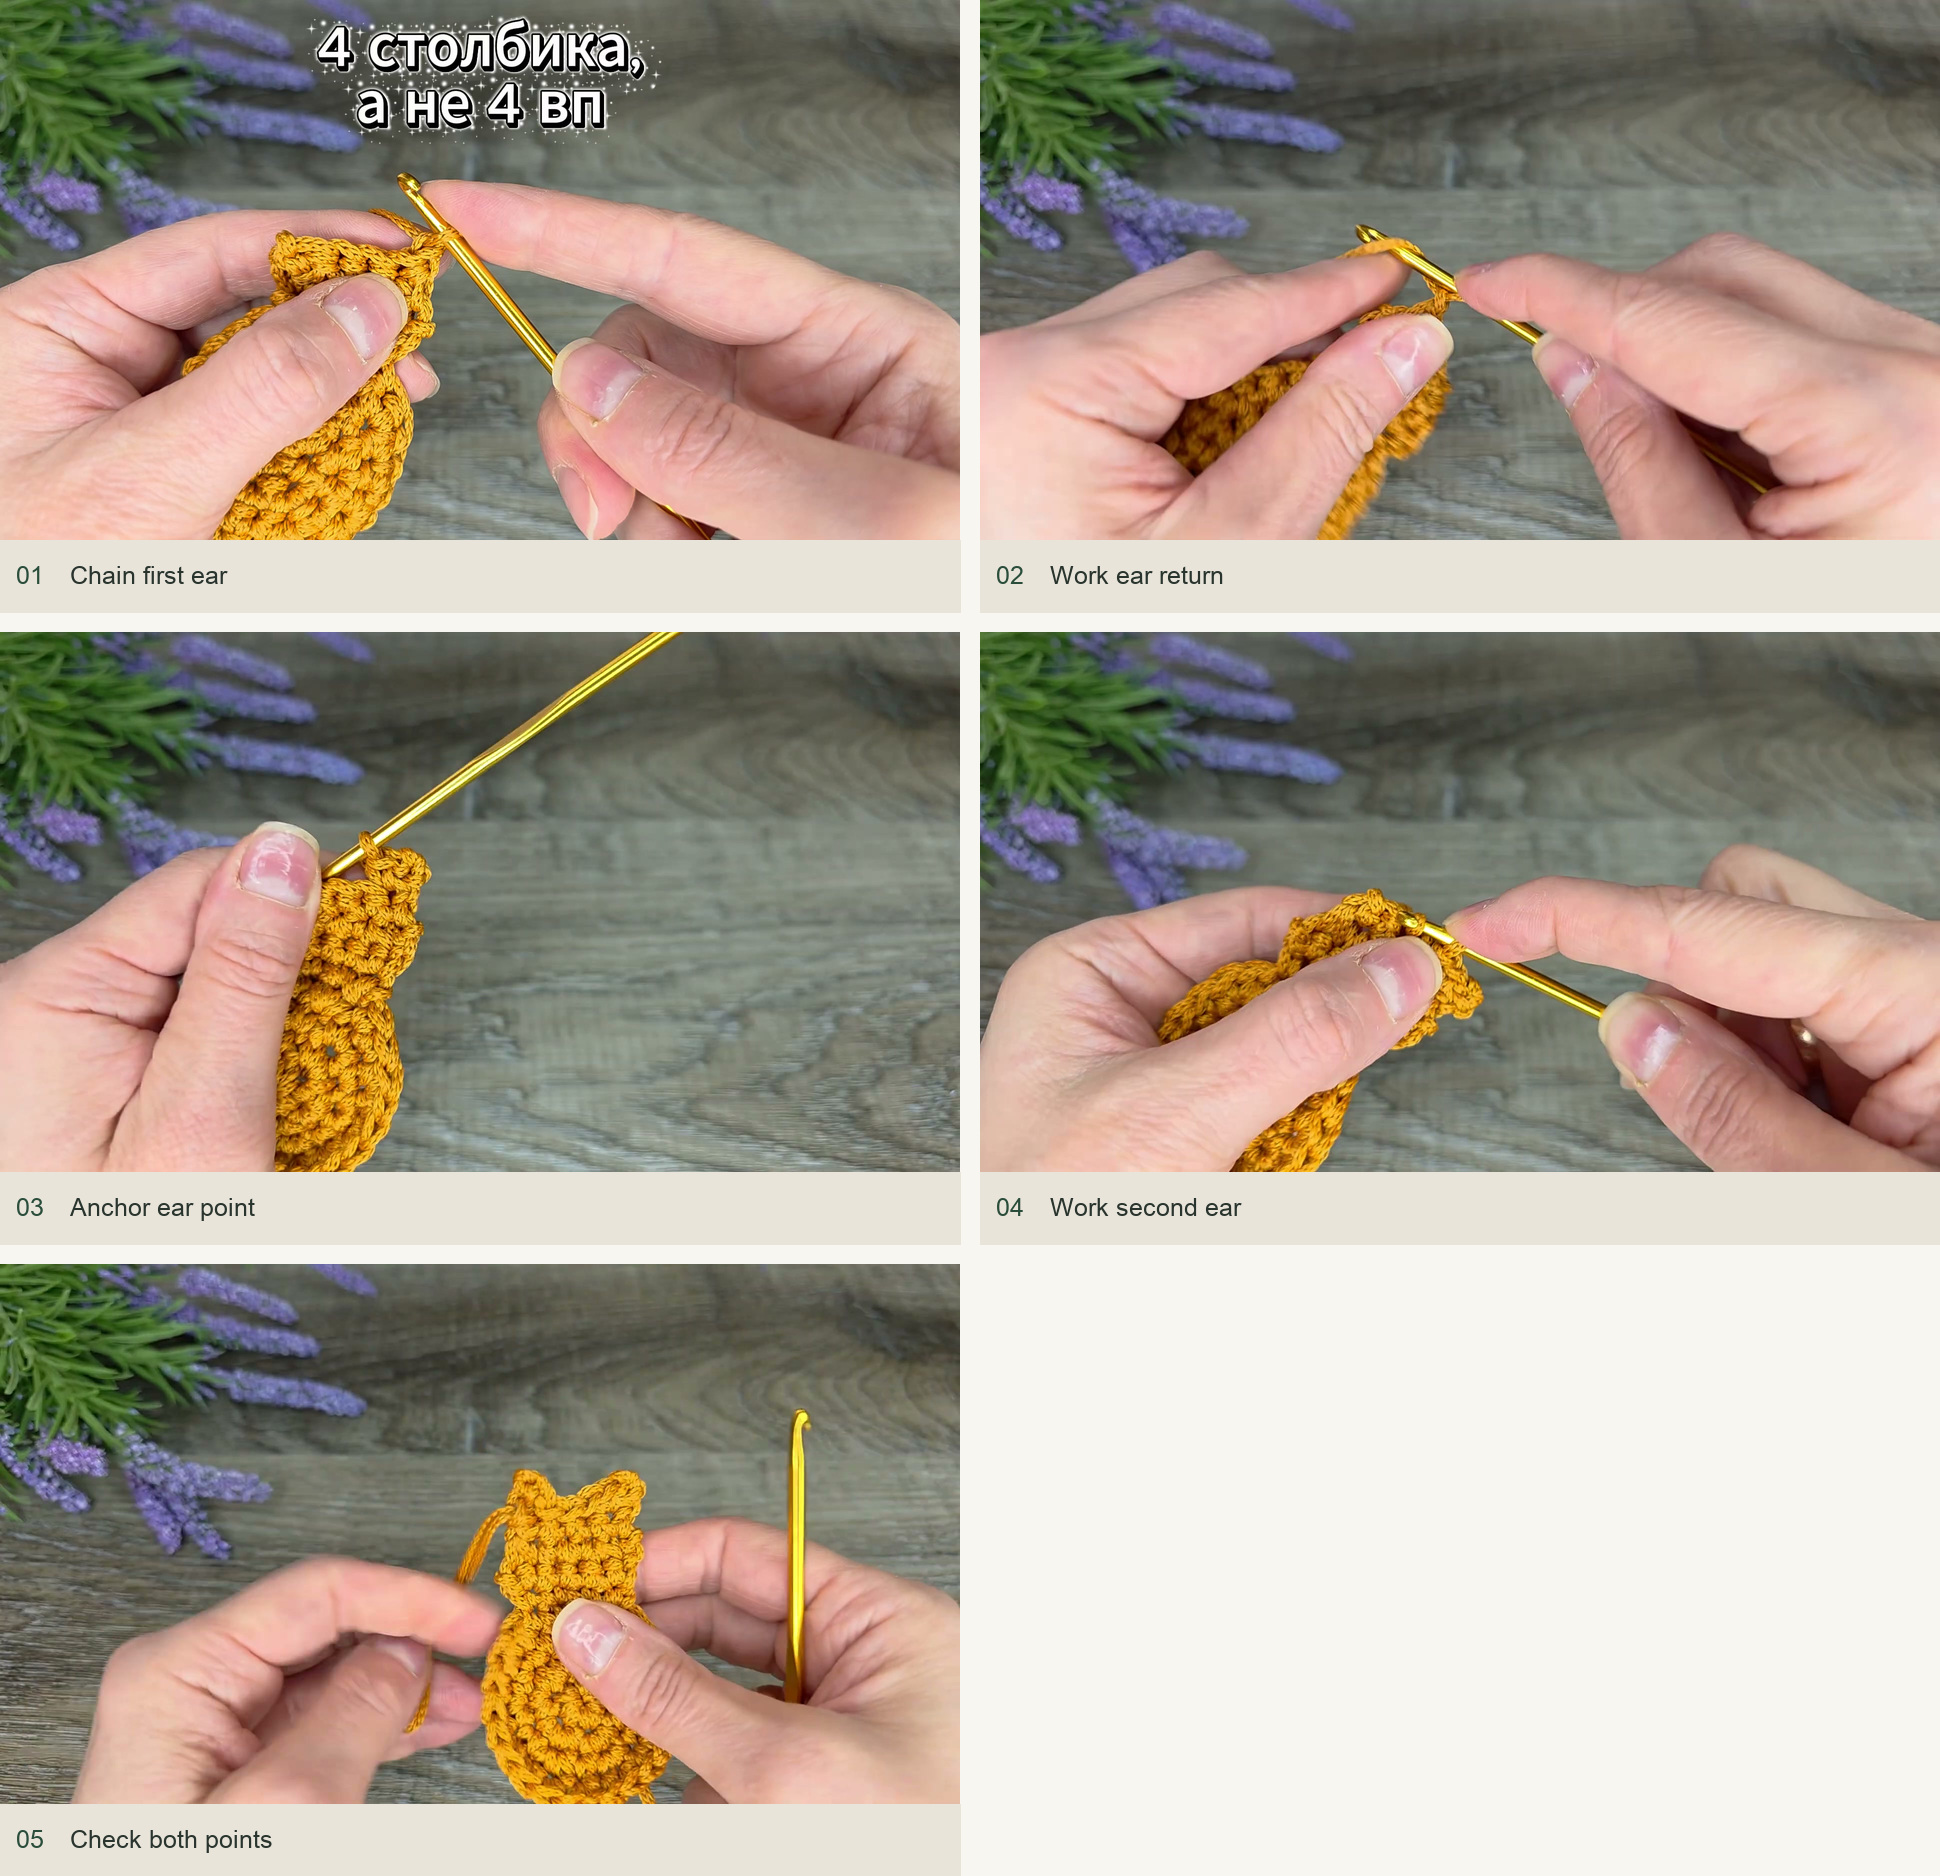
Source demonstration: Chain first ear → Work ear return → Anchor ear point → Work second ear → Check both points -
Outline the head, body and short tail
Work three sc evenly down the first head edge and a sl st where the head meets the body. Slip stitch around the body’s top braids to the chosen tail position. The creator uses about seven slip stitches before beginning the tail. Ch 11 plus one turning chain, then work eleven sc back along the chain’s back bumps. The narrow strip naturally curves. Slip stitch into its starting body position.
Continue slip stitching around the remaining body edge. Work three sc up the other side of the head and join beside the first ear. Secure and hide the end on the reverse. If using synthetic cord, finish its ends with a method appropriate to the material; a carefully hidden adhesive-sealed end is an alternative to melting it.
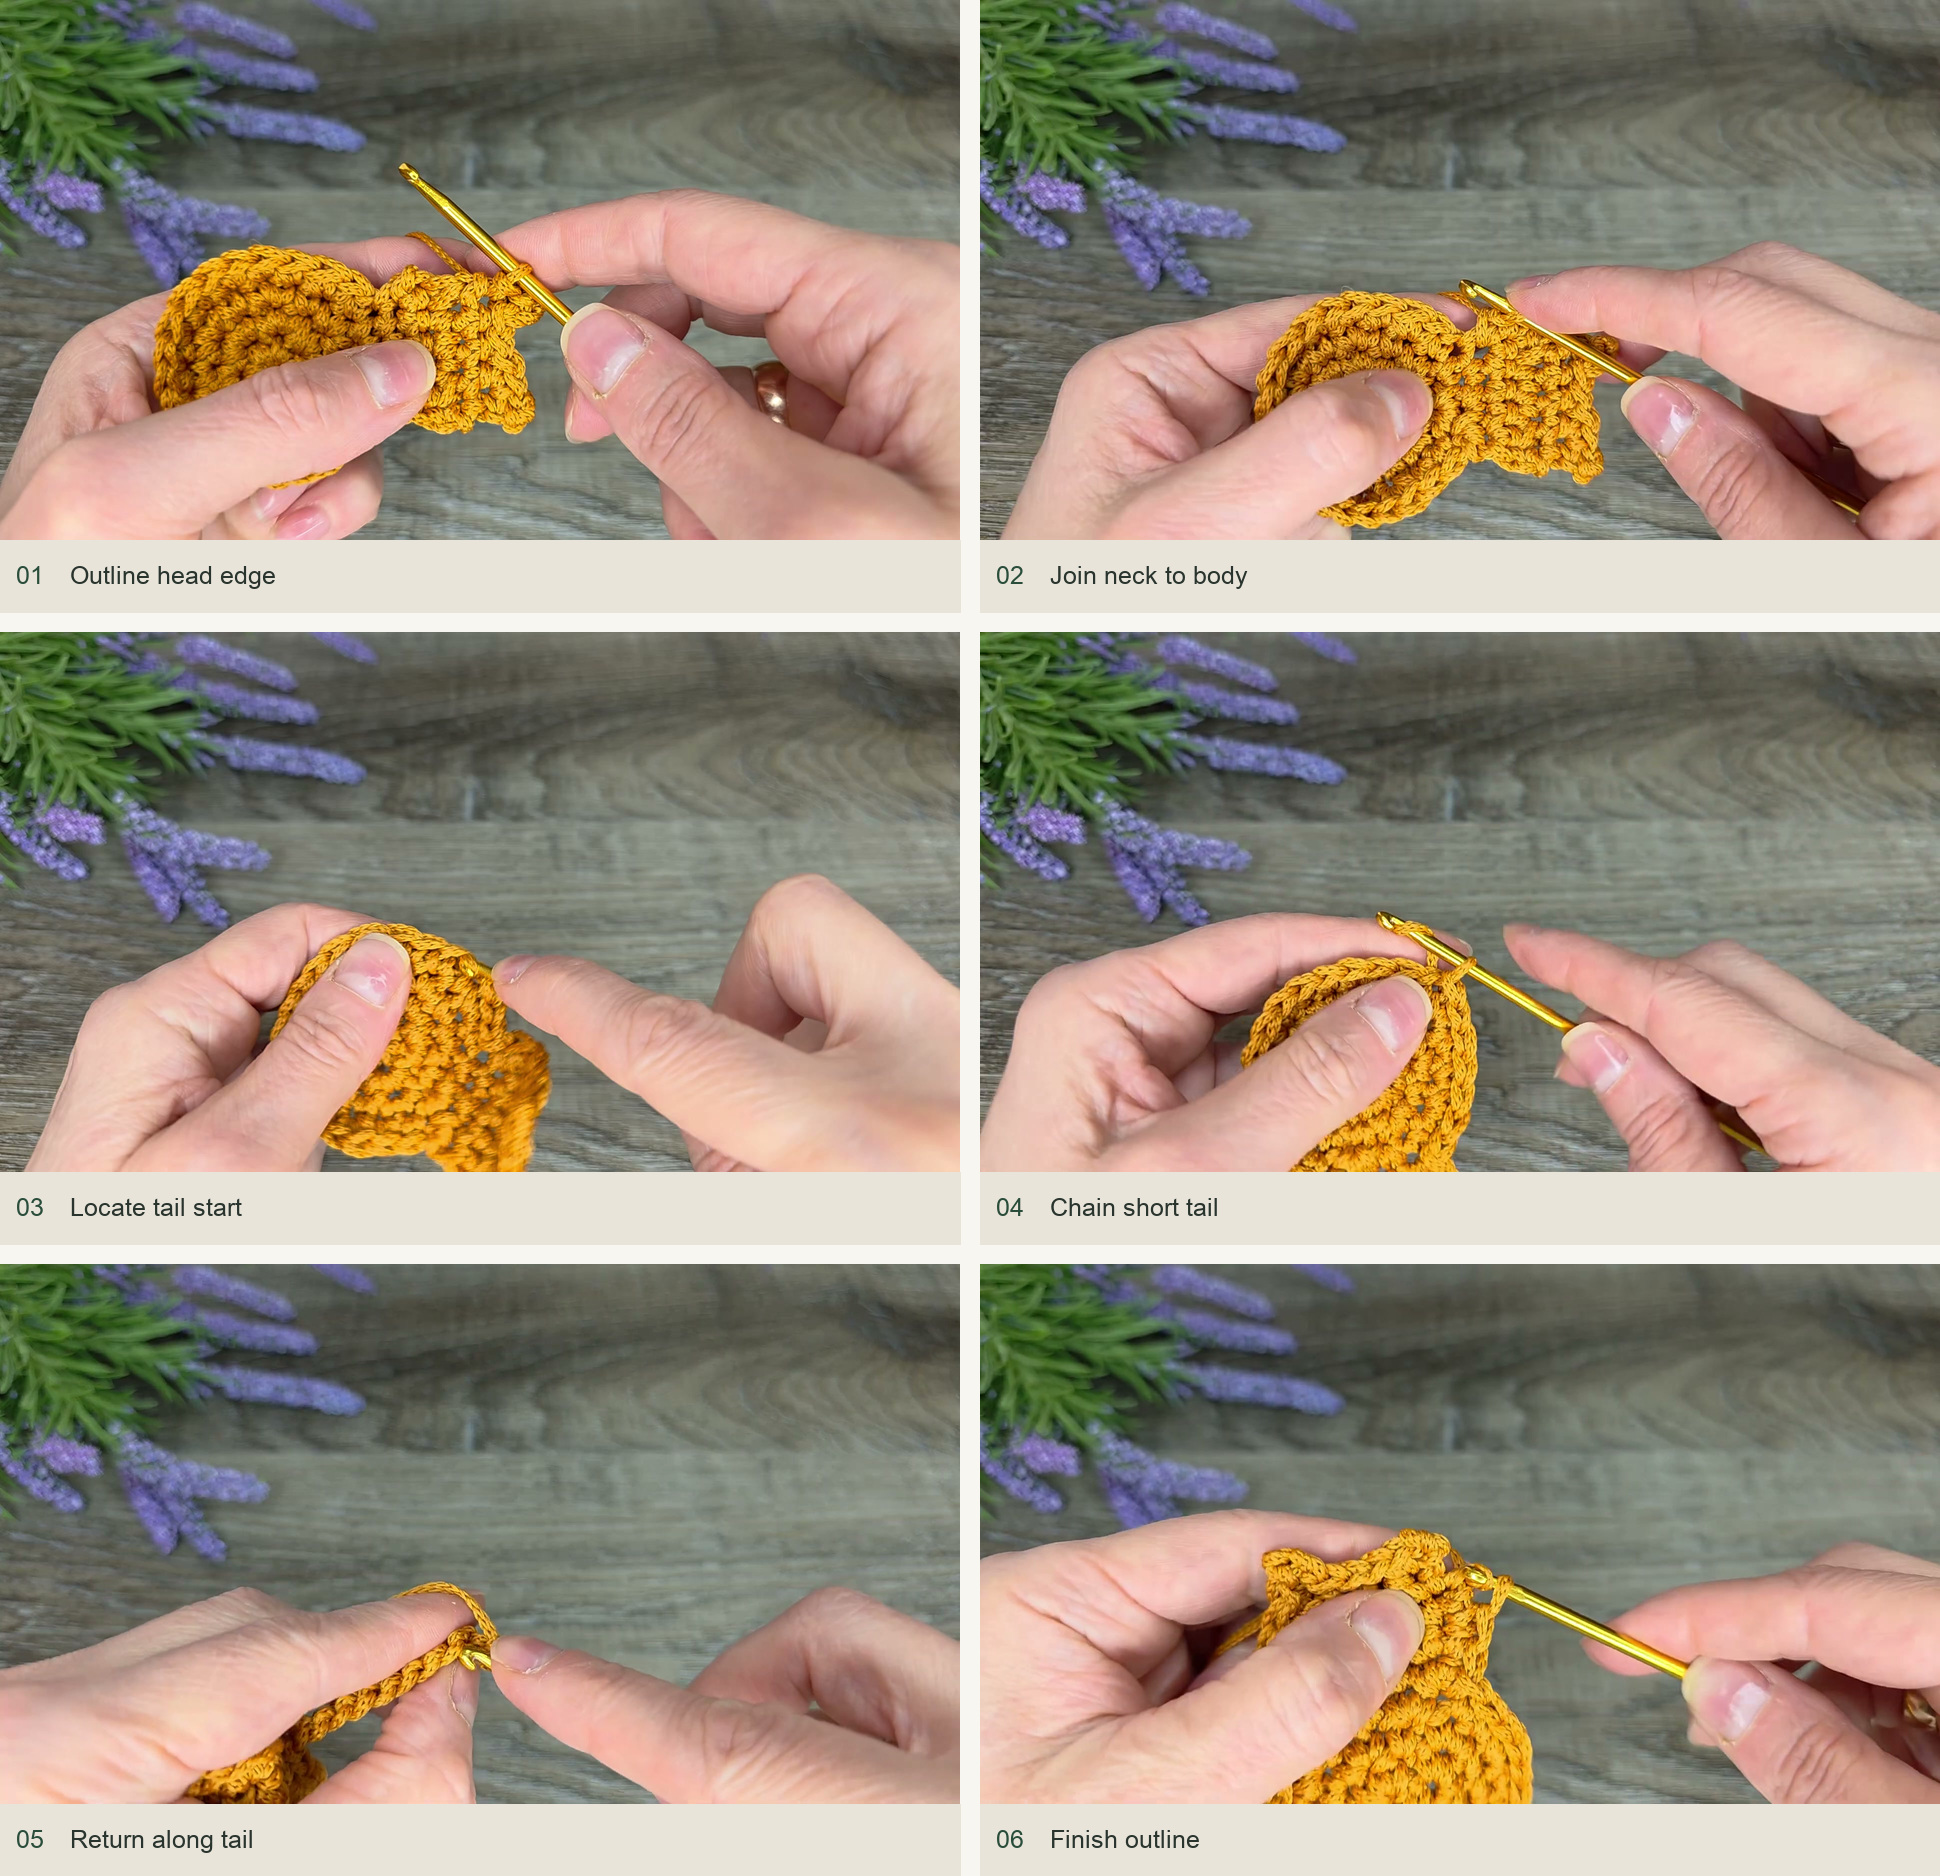
Source demonstration: Outline head edge → Join neck to body → Locate tail start → Chain short tail → Return along tail → Finish outline -
Crochet the tiny heart
Make an adjustable ring and ch 2. Into the ring work three dc and three hdc. Ch 1 and slip stitch into the upper loop of the last hdc to make the small lower point. Work three more hdc and three dc into the ring. Ch 2 and slip stitch into the ring. Pull the center closed. Keep the working yarn attached: it will become the bookmark cord.
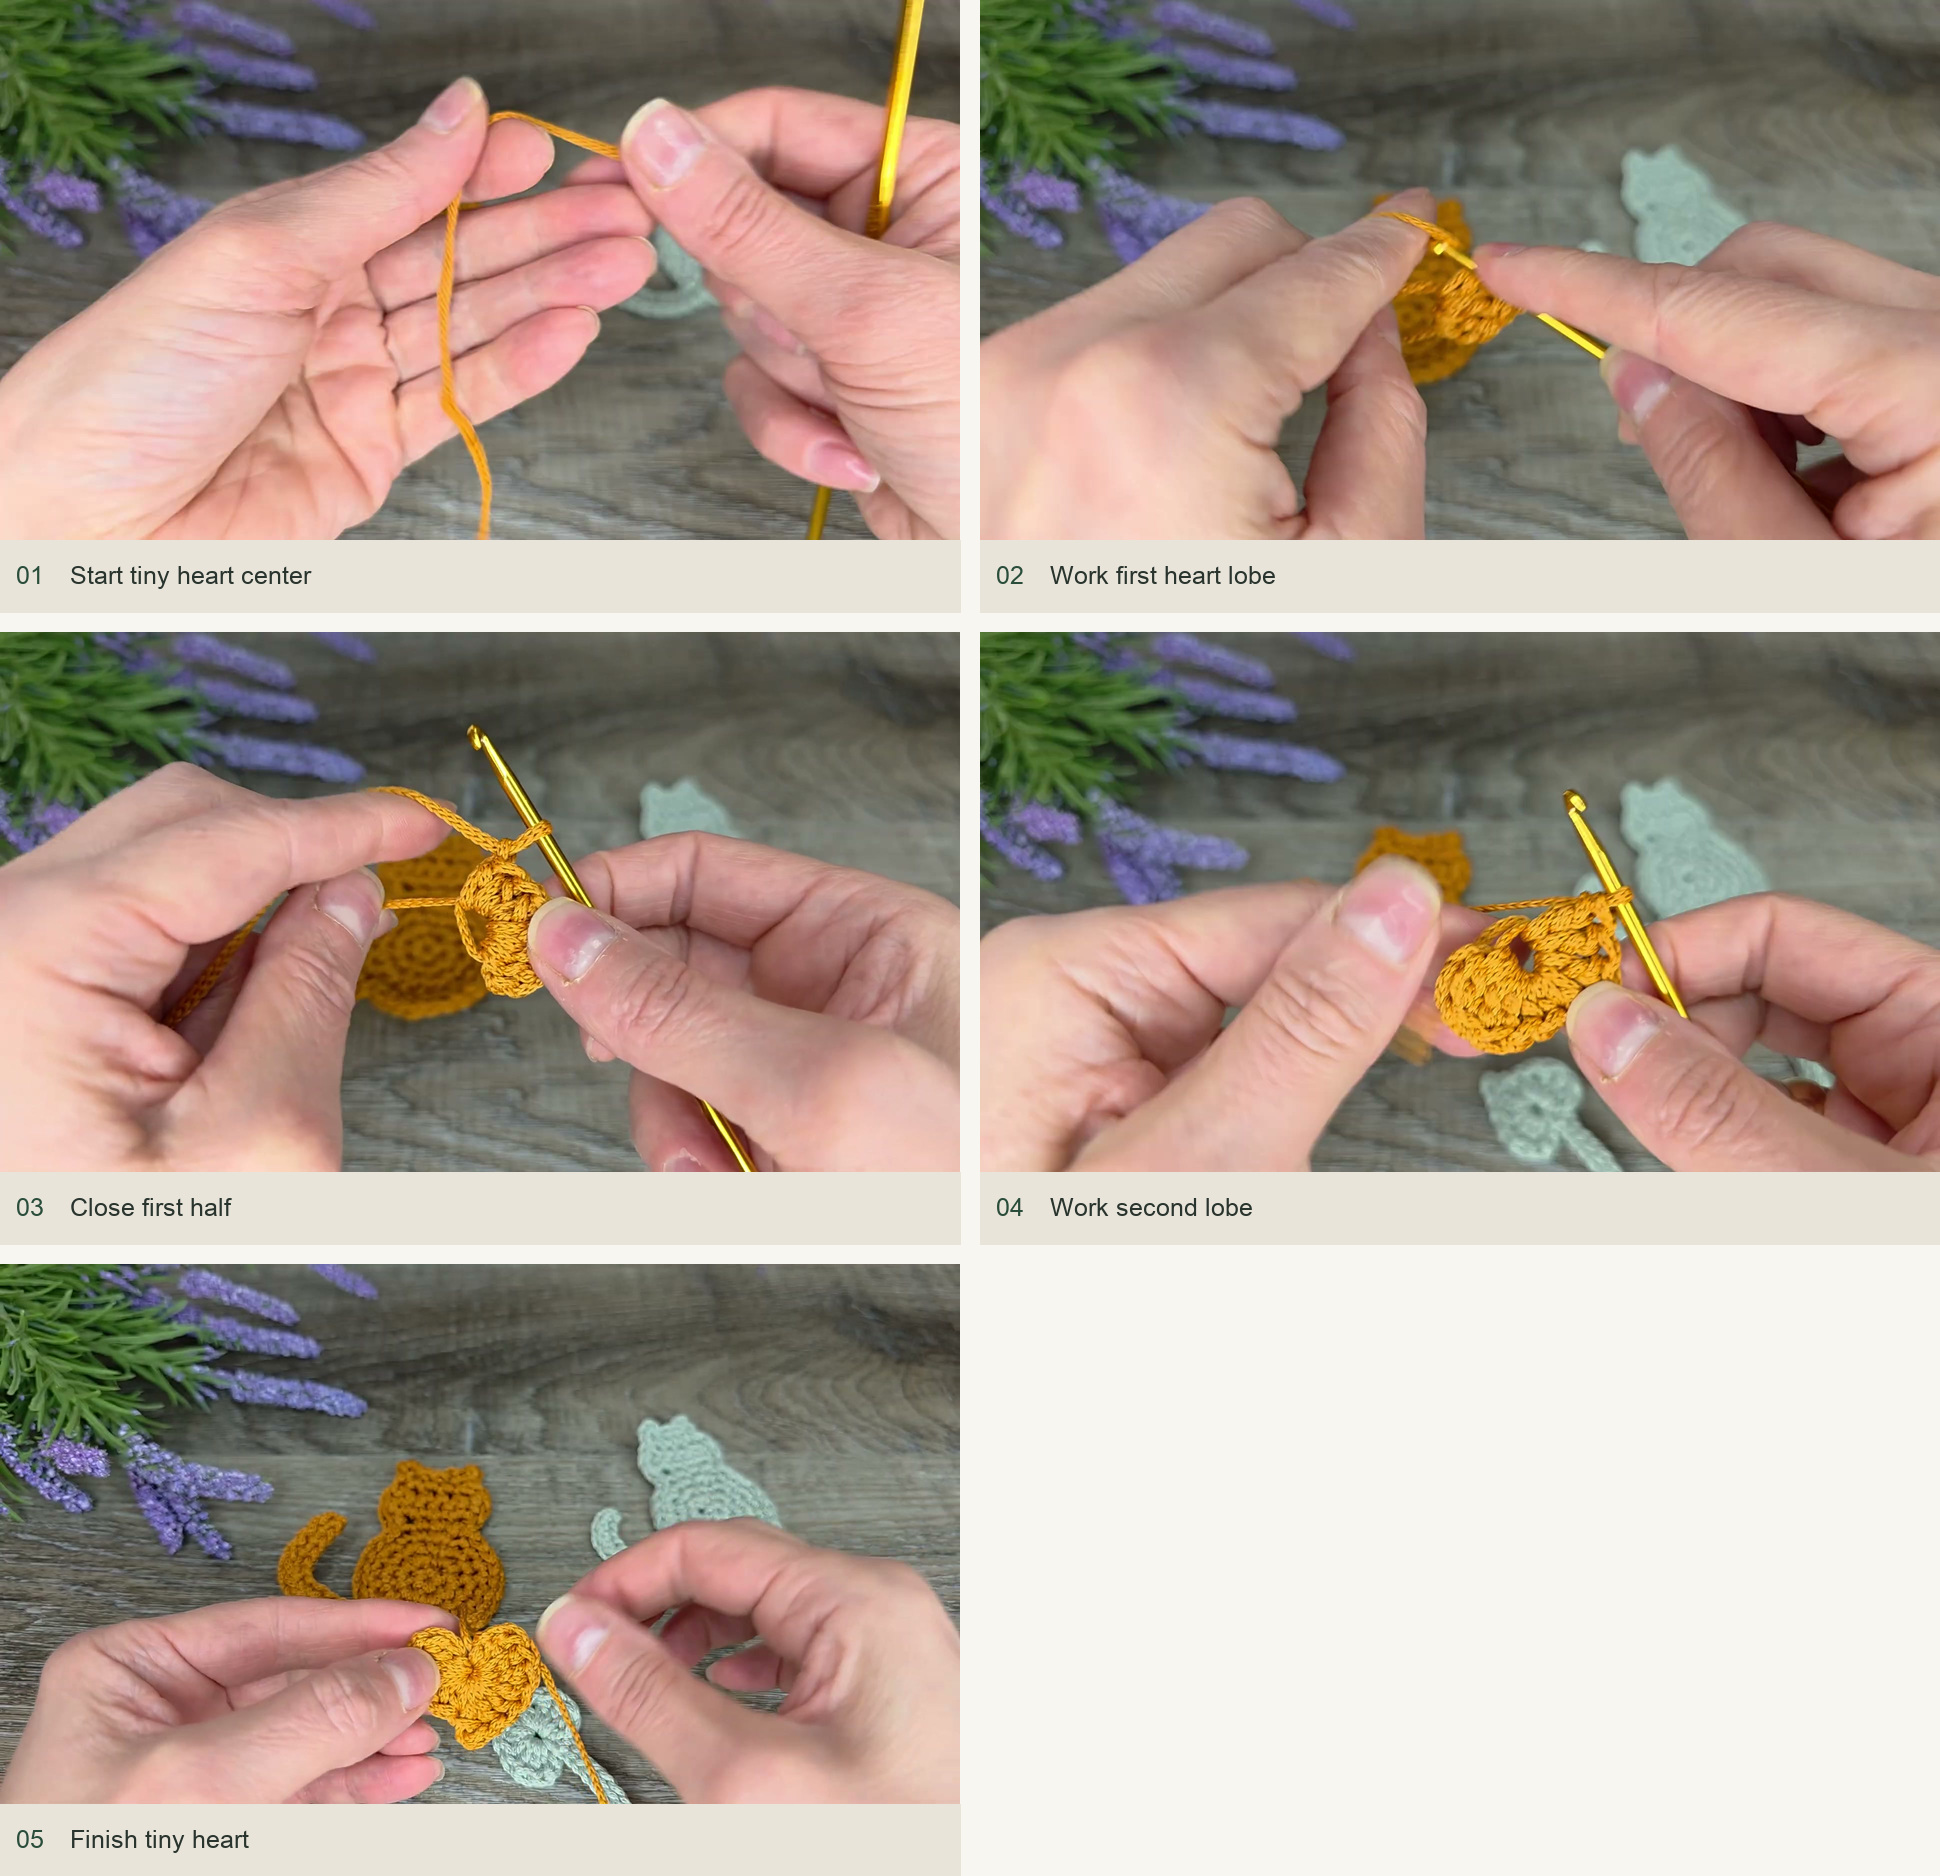
Source demonstration: Start tiny heart center → Work first heart lobe → Close first half → Work second lobe → Finish tiny heart -
Make and attach the long cord
Chain to the required book length. The creator compares 45 chains and then makes 50 for the demonstrated cord. Enlarge the active loop and draw it through a suitable point at the lower center of the cat, just above the slip-stitch outline, bringing it to the reverse. Orient the chain so its top braid faces the same direction as the cat’s front.
Work sl st back along each back bump of the chain, returning toward the heart. This creates a firmer narrow cord rather than a bare chain. For a fifty-chain cord, work fifty corresponding slip stitches. Anchor beside the heart with a sl st, secure the yarn and weave the ends into the back of the heart.
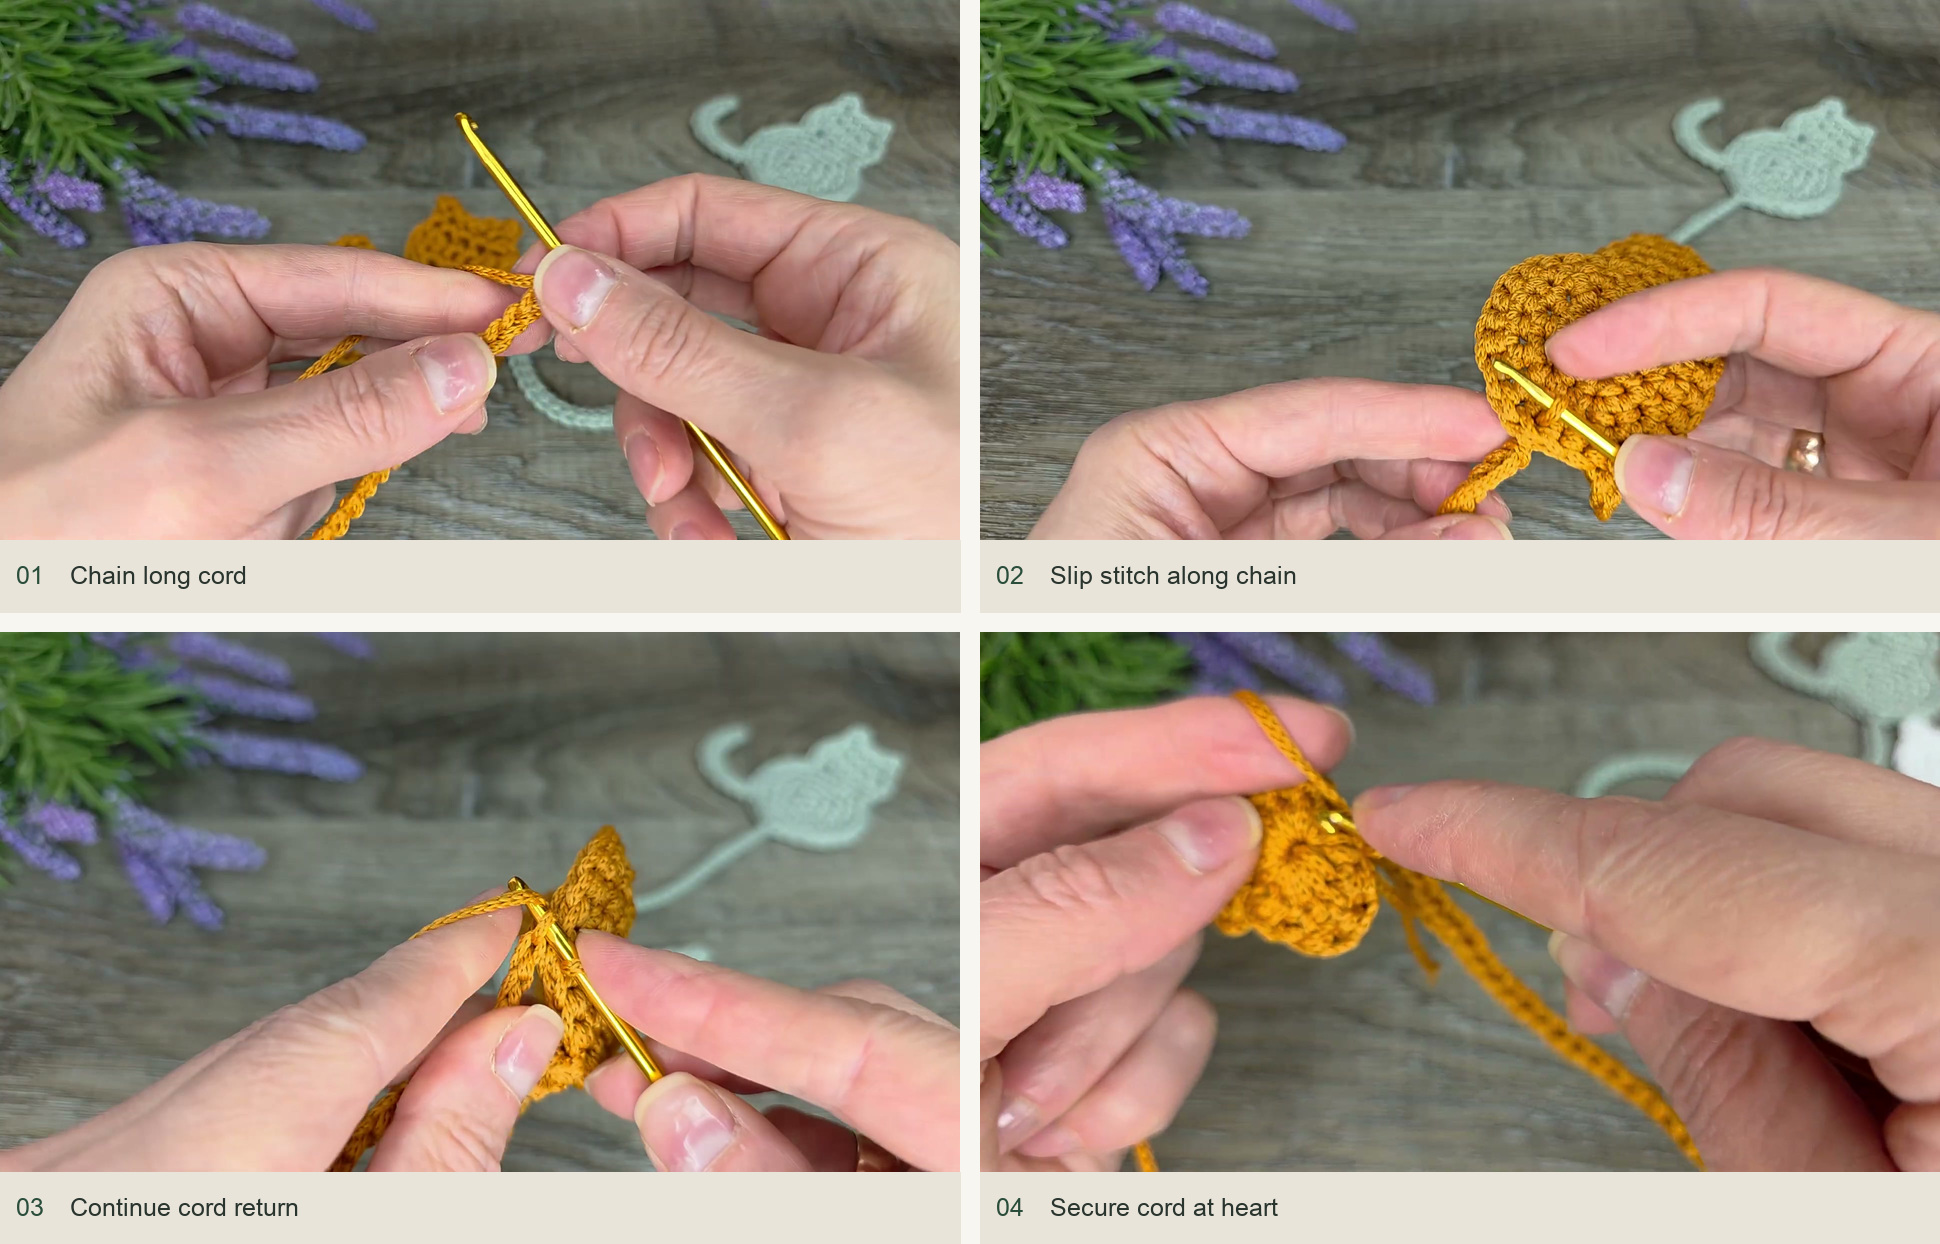
Source demonstration: Chain long cord → Slip stitch along chain → Continue cord return → Secure cord at heart -
Shape the bookmark flat
Arrange the cat, curled tail, cord and heart on a flat surface. Dampen and shape according to the yarn or cord care instructions. Protect synthetic cord from direct iron heat. Let every part dry before placing it between pages. The cord should lie flat while the cat and heart remain beyond opposite page edges.
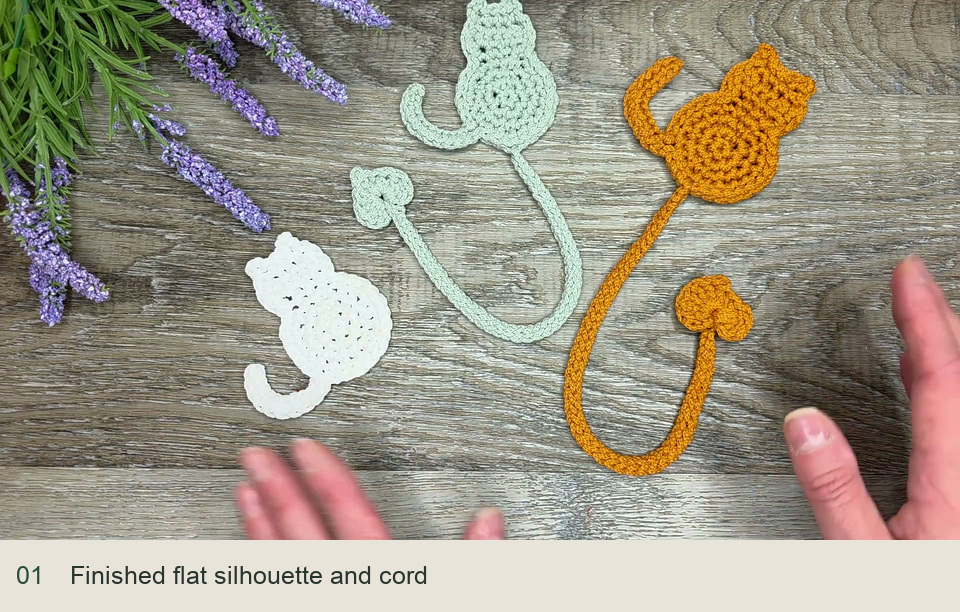
Source demonstration: finished flat cat silhouette with pointed ears, short tail and heart-ended cord.
Keeping the small silhouette clear
If the body cups, count the increase rounds before trying to stretch it. If the ears look unequal, compare their three-chain loops and anchoring positions. A tight slip-stitch outline can pull the cat’s body into an oval, so keep those loops relaxed. The separate cord benefits from the same care: overly tight return slip stitches make it twist into a spring.
For a slimmer bookmark, choose a finer yarn and matching hook instead of reducing the cat’s round counts at random. The head width, body circumference and tail placement work together; preserving their proportions gives a more recognizable cat.
Inspired by Вязание с Мариной Метель ’s video tutorial.
Save this pattern for later
Pin it to one of your boards so it’s ready when you have a free evening and the right yarn.